
User Manual


Using OmniBook Accessories
Using the Floppy Drive
1-11
To insert or remove a floppy disk
When the OmniBook is reading or writing data to the floppy drive, the floppy disk
icon appears on the Status panel.
CAUTION
Do not remove a floppy disk while the OmniBook is actively reading or writing
data. Wait until the floppy drive is done
—
otherwise, you could lose data or the
OmniBook could stop responding.
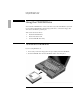
1. Hold the disk with its face up, then slide it into the floppy drive slot until it
clicks into place.
2. To remove the floppy disk, press the eject button.
Press the eject button to
remove the floppy disk.