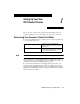
Setting Up Your New HP OfficeJet R Series 1 Before you start, review the following important information about your computer’s parallel port mode. After that, do the steps in the order listed. Determining Your Computer’s Parallel Port Mode To scan using your HP OfficeJet, you must set your computer’s parallel port to one of the following modes: ECP (Extended Capabilities Port) Available in recently manufactured Bi-Directional NOTE computers. This mode ensures the fastest scanning speed.
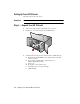
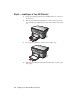
Setting Up Your HP OfficeJet Follow the steps in the order shown. IMPORTANT Do not turn on your HP OfficeJet until you are instructed to do so. Step 1 — Unpack Your HP OfficeJet 1 2 Remove the cardboard tray containing the accessory items. 3 Verify that the following items are included with your HP OfficeJet: Rest the box on its side, and pull out your HP OfficeJet.
g Three manuals: HP OfficeJet R Series Setup Guide, HP OfficeJet R Series Basic Operations Guide, and HP OfficeJet R Series Customer Care Guide In addition to the above items, a sticker with the HP Web site address is included. Put this sticker some place where you can quickly refer to it if you need support services. If any of the items are missing or damaged, contact the dealer from whom you purchased your HP OfficeJet. a b c e d f g 4 Choose a location and environment for your HP OfficeJet.
1-4 5 Remove the packaging materials (plastic wrap, cardboard insert, and packing tape) from the outside of the unit. 6 If your HP OfficeJet has an automatic document feeder (ADF), remove the packaging materials from the ADF lid.
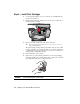
Step 2 — Attach the Front-Panel Overlay 1 2 Align the front-panel overlay with the front panel buttons. Push straight down firmly on both ends and the middle to snap the overlay into place.
Step 3 — Load Paper in Your HP OfficeJet 1 Remove the packaging materials from the HP OfficeJet, if you have not already done so. 2 Slide the paper width and length adjusters to their outermost positions. As you pull the paper length adjuster out, the bottom (IN) tray also slides out. 1-6 3 Insert paper into the IN tray, print side down, until it stops. 4 Slide the paper width and length adjusters in until they stop at the edges of the paper.
5 Push the IN tray back toward the unit until it stops, and lower the top (OUT) tray if you raised it before inserting paper. For information about loading specific paper types, see Chapter 2, “All About Paper,” of the HP OfficeJet R Series Basic Operations Guide. For information about paper tray capacities, see Chapter 6, “Technical Information,” of the HP OfficeJet R Series Customer Care Guide.
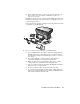
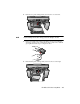
Step 4 — Install Print Cartridges 1 Locate the print-cartridge access door on the front of the HP OfficeJet, just above the OUT tray. 2 Pull the latch on the print-cartridge access door toward you and raise it up until it is fully extended. 3 Remove the cardboard insert from the inside of the unit. TIP Save the packaging materials in case you ever need to move or ship your HP OfficeJet. The print-cartridge carriage will be in the middle of the access area.
6 NOTE Push the color print cartridge firmly down into the slot on the left. The print-cartridge label should be facing you after the cartridge is inserted. 7 Remove the black print cartridge (the thinner one) from its packaging and, being careful to touch only the black plastic, gently remove both the green pull tab and blue tape covering the nozzles. 8 Push the black print cartridge firmly down into the slot on the right.
9 Lower each print-cartridge latch down onto the top of the cartridge, and push down until the latch locks firmly into place. 10 Close the print-cartridge access door. NOTE 1-10 Both print cartridges must be correctly installed (with the green tab and blue tape removed) for your HP OfficeJet to work. Make sure that the following things are done before continuing: • Cartridges are pushed firmly into their slots. • Cartridge labels are facing toward you. • Both print-cartridge latches are down and locked.
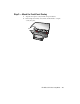
Step 5 — Connect the Printer Cable and Power Cord NOTE Use the printer cable that was shipped with your unit. It is a special bi-directional parallel, IEEE 1284-compliant printer cable with a 1284-C connector that is necessary for the proper functioning of your HP OfficeJet. If you choose to buy a longer cable, make sure it is an IEEE 1284-compliant parallel cable with a 1284-C connector. Connecting the Printer Cable 1 Connect the printer cable to the HP OfficeJet.
Connecting the Power Cord WARNING Choose a power outlet that is easy to access. This allows you to shut off power quickly. Power is present in the product even if the white power button on the left side of the unit’s front panel was used to turn the unit off. To shut off power completely, disconnect the power cord. For safe operation, use the power cord with a properly grounded outlet. Use only the power supply (HP part number 0950-2880) that came with your HP OfficeJet.
IMPORTANT 2 Plug the adapter end of the main power cord into the power supply adapter. 3 Plug the power outlet end of the separate power cord into the power outlet. Do not turn on your HP OfficeJet until you are instructed to do so. 4 If you have an ADF unit and the lid cord is not already attached, connect the cord securely to the back of the HP OfficeJet. The lid connector is located on the back of the unit, to the right of the printer-cable connector.
Step 6 — Install the HP OfficeJet Software Now you need to install software so that the HP OfficeJet can work with your computer for printing and scanning. NOTE You must install both the printing and scanning software to use the scan feature. If you are installing the software on a Windows NT 4.0 computer, you must have Service Pack 3 or higher installed. If you are using a dual-boot Windows 95/98 and NT 4.0 computer, see the Readme file on the HP OfficeJet R Series CD-ROM for important information.
b In the Run dialog box, type z:\setup.exe (substitute your CD-ROM drive letter for the “z”). An HP OfficeJet R Series software installation menu similar to the one below appears. 4 5 6 7 Click Install HP OfficeJet R Series Software. After the Welcome window appears, click Next. In the Software License Agreement window, click Yes. After the message appears that instructs you to turn on the unit, press the white power button on the left side of the front panel.
The Select HP Software window appears. 9 Click Next to continue. TIP Click Browse to select a different destination folder for the HP OfficeJet software, if desired. A progress window appears on your screen as the HP OfficeJet printing and scanning program files are copied to your computer. The following message appears while the program tests the cable connection between your computer and the HP OfficeJet. 10 Determine the results of the cable connection test.
11 After the Setup Complete and Product Tour window appears with the option to view the product tour selected, click Finish. 12 In the product tour window, click any topic to learn more about that topic. 13 After you are finished, click Quit to exit the tour. 14 If prompted to do so, restart your computer. This completes installation of the HP OfficeJet R Series software. Now you can install the third-party programs included with your HP OfficeJet.
To take the tour at any time in the future, do the following: 1 Insert the HP OfficeJet R Series CD-ROM into your computer’s CD-ROM drive. 2 In the HP OfficeJet R Series software installation menu, click Run Product Tour. For an example of this menu, see “Installing the HP OfficeJet R Series Software,” earlier in this chapter. TIP You can also access the tour from the Welcome tab on the toolbox.
Step 7 — Align Your Print Cartridges Before you start using your HP OfficeJet, you need to align the print cartridges to ensure the best copy and print quality. When you turn on your HP OfficeJet for the first time, you will see the message “Initializing,” followed by the message “Press Resume to Align Cartridges” on the front-panel display. NOTE If the messages are not in your language, you can change the language before aligning your cartridges.
1-20 Setting Up Your New HP OfficeJet R Series