
How to Use


HP OfficeJet R Series Setup Guide 2-3
Setting Up a Point-and-Print Client
Follow these steps to install the printing software on each client for either of
the following configurations:
◆ Windows 95/98 server with only Windows 95/98 clients.
◆ Windows NT 4.0 server with Windows 95/98 and/or NT 4.0 clients.
NOTE
A Windows 95/98 server cannot automatically download the software to a Windows
NT 4.0 client. For this configuration, follow the steps in “Setting Up a Peer-to-Peer
Client (95/98 server to NT 4.0 client).”
1
On the Windows desktop, double-click Network Neighborhood.
2
Find the name of the server that the HP OfficeJet is directly connected to,
and double-click its icon.
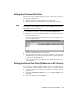
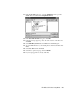
The server window appears showing shared devices, including the share
name of the HP OfficeJet.
3
Double-click the HP OfficeJet’s share name.
4
After the setup message “Before you can use the printer...” appears, click
Yes
and
then wait several moments while the client computer establishes
a connection to the HP OfficeJet.
After connecting to the shared HP OfficeJet, the HP OfficeJet R Series
window appears.
Setting Up a Peer-to-Peer Client (95/98 server to NT 4.0 client)
If you are using a configuration that includes a 95/98 server with an NT 4.0
client, follow these steps to install the printing software on each NT 4.0 client.
1
Set up the server by following the steps outlined earlier under “Setting
Up the Server.”
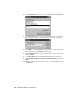
2
In the first Add Printer Wizard dialog box, select My Computer, and
click Next.
3
In the next dialog box, click New Port.