OFFICEJET PRO 8500A Getting Started Guide Guía de instalación inicial A910
Copyright Information © 2010 Copyright Hewlett-Packard Development Company, L.P. Edition 1, 3/2010 Reproduction, adaptation or translation without prior written permission is prohibited, except as allowed under the copyright laws. The information contained herein is subject to change without notice. The only warranties for HP products and services are set forth in the express warranty statements accompanying such products and services.
Use the printer......................................................................................................... 2 HP Digital Solutions............................................................................................. 3 Internet features.................................................................................................. 5 Set up and use fax................................................................................................... 7 Set up fax.........................
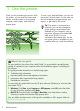
1. Use the printer Thank you for purchasing this printer. With this printer, you can print documents and photos, scan documents to a connected computer, make copies, and send and receive faxes. To scan, copy, and send faxes, you can use the printer’s control panel. You can also use the control panel to change settings, print reports, or get help for the printer.
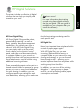
HP Digital Solutions HP Direct Digital Filing HP Direct Digital Filing provides robust, general-office scanning—as well as basic, versatile, document-management capabilities—for multiple users over a network.
Requirements Before you set up the digital solutions, make sure you have the following: For Scan to Network Folder, Fax to Network Folder • Appropriate privileges on the network. You must have write access to the folder. • The name of the computer where the folder is located. For information about finding the computer name, see the documentation for your operating system. • The network address for the folder.
The printer offers innovative, Web-enabled solutions that can help you quickly access the Internet, obtain documents, and print them faster and with less hassle—and all without using a computer. In addition, you can use a Web service (Marketsplash by HP) to create and print professional-quality marketing materials. Note: In addition to these solutions, you can send print jobs to the printer remotely from mobile devices.
Marketsplash by HP Grow your business using online HP tools and services to create and print professional marketing materials. With Marketsplash, you can do the following: • • Quickly and easily create amazing, professional-quality brochures, flyers, business cards, and more. Choose from thousands of customizable templates created by award-winning business graphic designers. A variety of print options allow you to get exactly what you need, when you need it.
2. Set up and use fax English T his printer allows you to send and receive black-andwhite and color faxes. Set up fax Before using the fax feature, follow these steps to connect your printer successfully. Tip: You can use the Fax Setup Wizard (Windows) or HP Utility (Mac OS X) to set up the fax. For more information about fax features available with the printer, see the user guide (which is available on your computer after you install the software).
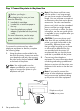
Step 1: Connect the printer to the phone line Note: If the phone cord that came with the printer is not long enough, you can use a coupler to extend the length. You can purchase a coupler at an electronics store that carries phone accessories. You also need another phone cord, which can be a standard phone cord that you might already have in your home or office. For more information, see the user guide (which is available on your computer after you install the software).
Many phone companies offer a distinctive ring feature that allows you to have several phone numbers on one phone line. When you subscribe to this service, each number is assigned a different ring pattern. You can set up the printer to answer incoming calls that have a specific ring pattern. If you connect the printer to a line with distinctive ring, have your telephone company assign one ring pattern to voice calls and another ring pattern to fax calls.
Connecting additional equipment Remove the white plug from the port labeled 2-EXT on the back of the printer, and then connect a phone to this port. If you are connecting additional equipment, such as a dial-up computer modem or a telephone, you will need to purchase a parallel splitter. A parallel splitter has one RJ-11 port on the front and two RJ-11 ports on the back.
Test your fax setup to check the status of the printer and make sure it is set up properly for faxing. The fax test does the following: 1. From the printer’s control panel, touch right arrow and then touch Setup. 2. Touch Tools, and then touch Run Fax Test. The printer displays the status of the test on the display and prints a report. After the test is finished, the printer prints a report with the results of the test.
If you want to configure this setting… …do this: Auto Answer Set the answer mode to On if you want the printer to automatically receive incoming faxes. The printer will answer calls after the number of rings specified in the Rings to Answer setting. 1. Rings to Answer (Optional) Set the number of rings to answer Note: If an answering machine is connected to the printer, the rings to answer for the printer must be set to a higher number than the answering machine. 2. 3. 1. 2. 3. 4. 5.
…do this: Fax Speed Set the fax speed used to communicate between the printer and other fax machines when sending and receiving faxes. Note: If you experience problems sending and receiving faxes, try using a lower fax speed. 1. Fax Error Correction Mode If the printer detects an error signal during the transmission and the error-correction setting is turned on, the printer can request that a portion of the fax be resent. Note: If you have problems sending and receiving faxes, turn off error correction.
Use fax In this section, you will learn how to send and receive faxes. Learn more! See the user guide for more information about the following topics: • Send a fax using monitor dialing • Send a fax from a computer • Send a fax from memory • Schedule a fax to send later • Send a fax to multiple recipients • Send a fax in Error Correction Mode The user guide is available on your computer after you install the software. Send a fax You can send faxes in a variety of ways.
Send a standard fax Load the document you want to fax in the printer. 3. You can fax either from the automatic document feeder (ADF) or from the scanner glass. Enter the fax number by using the keypad. T ip: To add a pause in the fax number you are entering, touch * repeatedly, until a dash (-) appears on the display. 4. Touch Start Black or Start Color. T ip: If the recipient reports issues with the quality of the fax you sent, you can try changing the resolution or contrast or your fax. 2.
Receive faxes You can receive faxes automatically or manually. Note: If you receive a legal-size or larger fax and the printer is not currently set to use legal-size paper, the printer reduces the fax so that it fits on the paper that is loaded. If you have disabled the Automatic Reduction feature, the printer prints the fax on two pages. If you are copying a document when a fax arrives, the fax is stored in the printer’s memory until the copying finishes.
When you are on the phone, the person you are speaking with can send you a fax while you are still connected (called “manual faxing”). You can receive faxes manually from a phone that is connected to the printer (through the 2-EXT port) or a phone that is on the same phone line (but not directly connected to the printer). 1. Make sure the printer is turned on and you have paper loaded in the main tray. 2. Remove any originals from the document feeder tray. 3.
Working with reports and logs You can print sevral different types of fax reports: • • • • These reports provide useful system information about the printer. Fax Confirmation page Note: You can also view the call history on the printer’s control panel display. To view the call history, touch Fax, and (Call History). However, then touch this list cannot be printed. Fax Log Image on Fax Send Report Other reports To print a report 1. Touch right arrow Setup. , and then touch 2.
Many telephone companies provide their customers with digital phone services, such as the following: • DSL: A Digital subscriber line (DSL) service through your telephone company. (DSL might be called ADSL in your country/region.) • PBX: A private branch exchange (PBX) phone system • ISDN: An integrated services digital network (ISDN) system. • FoIP: A low-cost phone service that allows you to send and receive faxes with your printer by using the Internet.
3. Set up wireless (802.11) communication ou can connect it wireless to Y an existing wireless (802.11) network. To connect the printer, complete the following steps in the order listed. Note: Before you set up wireless communication, make sure the printer hardware is set up. For more information, see the setup poster that came with the printer.
Connecting without a wireless router English If you do not have a wireless router (such as a Linksys wireless router or Apple AirPort Base Station), you can still connect the printer to your computer using a wireless connection (known as a “computer-to-computer” or an “ad hoc“ wireless connection). For more information, see the user guide. Step 1: Connect the printer to your wireless network 1. On the printer’s control panel, touch right arrow , and then select Network. 2.
Mac OS 1. Place the HP software CD into the computer. 2. Double-click the HP Installer icon on the software CD, and then follow the onscreen instructions. 1. Touch right arrow Network. 2. Touch Wireless, and then touch Wireless Network Test. Step 3: Test the wireless connection Print the wireless test page for information about the printer’s wireless connection. The wireless test page provides information about the printer’s status, MAC address, and IP address.
Change the connection method Note: If you are changing to a wireless connection, make sure that an Ethernet cable is not connected to the printer. Connecting an Ethernet cable turns off the printer’s wireless capabilities. Follow the instructions for your operating system. Windows 1. On the computer desktop, click Start, select Programs or All Programs, click HP, select your printer name, and then click Connect a New Printer. 2. Follow the onscreen instructions.
4. Solve setup problems T he following sections provide help with problems you might have while setting up the printer. If you need more help, see the user guide (which is available on your computer after you install the software). Problems setting up the printer • Make sure that all packing tape and material have been removed from outside and inside the printer. • Make sure that the printer is loaded with plain, white, unused A4- or Letter-size (8.5x11 inch) paper.
This section contains information about solving problems you might have when setting up fax for the printer. Note: If the printer is not set up properly for faxing, you might experience problems when sending faxes, receiving faxes, or both. If you are having faxing problems, you can print a fax test report to check the status of the printer. The test will fail if the printer is not set up properly for faxing. Perform this test after you have completed setting up the printer for faxing.
The printer is having problems sending and receiving faxes • Make sure you use the phone cord or adapter that came with the printer. (If you do not use this phone cord or adapter, the display might always show Phone Off Hook.) • Other equipment that uses the same phone line as the printer might be in use. Make sure extension phones (phones on the same phone line, but not connected to the printer) or other equipment is not in use or off the hook.
The printer can send faxes but cannot receive faxes If you are not using a distinctive ring service, check to make sure that the Distinctive Ring feature on the printer is set to All Rings. • If Auto Answer is set to Off, or if you subscribe to a voicemail service on the same phone line that you will use for faxing, you can only receive faxes manually.
The printer cannot send faxes but can receive faxes • 28 The printer might be dialing too fast or too soon. For example, if you need to access an outside line by dialing “9,” try inserting pauses as follows: 9-XXX-XXXX (where XXX-XXXX is the fax number you are sending to). To enter a pause, touch * and select a dash (-).
Wireless (802.11) setup problems Follow these suggestions in the order listed. Note: If you are still encountering problems, see the problem-solving information in the user guide (which is available on your computer after you install the software).
Step 2. Check the wireless signal strength If the strength of the signal for your wireless network or computer is weak or if there is interference on the wireless network, the printer might not be able to detect the signal. To determine the strength of the wireless signal, run the Wireless Network Test from the printer’s control panel. (For more information, see “Step 4. Run the Wireless Network Test” on page 30).
When the printer is connected to a network, you can use the “embedded Web server” (“EWS”) to view status information and configure network settings from your computer web browser. No special software needs to be installed or configured on your computer. Note: You can open and use the EWS without being connected to the Internet, though some features will not be available. English 5.
Hewlett-Packard limited warranty statement HP product Duration of limited warranty Software Media 90 days Printer 1 year Print or Ink cartridges Until the HP ink is depleted or the “end of warranty” date printed on the cartridge has been reached, whichever occurs first. This warranty does not cover HP ink products that have been refilled, remanufactured, refurbished, misused, or tampered with.
Uso de la impresora............................................................................................... 34 HP Digital Solutions............................................................................................35 Funciones de Internet..........................................................................................37 Configurar y usar el fax...........................................................................................39 Configurar para fax............................
1. Uso de la impresora Gracias por adquirir esta impresora. Con esta impresora, puede imprimir documentos y fotos, escanear documentos para un equipo conectado, hacer copias, y enviar y recibir faxes. Para escanear, copiar y enviar faxes, puede usar el panel de control de la impresora. También puede usar el panel de control para cambiar configuraciones, imprimir informes u obtener ayuda de la impresora.
HP Digital Solutions ¡Sepa más! Para obtener más información acerca de la configuración y el uso de estas soluciones digitales, consulte la Guía del usuario. (La Guía del usuario está disponible en su equipo después de que instala el software.) Archivado digital directo HP Fax digital HP HP Direct Digital Filing proporciona escaneo general de oficina confiable, así como capacidades de administración de documentos básicas y versátiles para varios usuarios de una red.
Requisitos Antes de configurar las soluciones digitales, asegúrese de contar con los siguientes elementos: equipo, consulte la documentación del sistema operativo. • Para Escanear a Carpeta de red, Fax a Carpeta de red • • • • Privilegios apropiados en la red. Debe tener acceso de escritura a la carpeta. El nombre del equipo donde se encuentra la carpeta. Para obtener información sobre cómo buscar el nombre del equipo, consulte la documentación del sistema operativo.
Funciones de Internet Nota: Para usar estas funciones Web, la impresora debe conectarse a Internet (ya sea mediante un cable Ethernet o una conexión inalámbrica). No podrá usar estas funciones Web si la impresora se encuentra conectada mediante un cable USB. Nota: Además de estas soluciones, puede enviar trabajos de impresión a la impresora de manera remota desde dispositivos móviles.
Marketsplash por HP Haga crecer su negocio con las herramientas y los servicios HP en línea para crear e imprimir materiales de marketing profesional. Con Marketsplash, puede hacer lo siguiente: • • Cree rápida y fácilmente increíbles folletos de calidad profesional, volantes, tarjetas de negocios y más. Elija de entre miles de plantillas personalizables creadas por galardonados diseñadores gráficos comerciales.
2. Configurar y usar el fax sta impresora permite E enviar y recibir faxes en blanco y negro y en color. Configurar para fax está disponible en su equipo después de instalar el software). Consejo: puede usar el Asistente de configuración del fax (Windows) o la HP Utility (Mac OS X) para configurar el fax.
Paso 1: Conecte la impresora a la línea telefónica Nota: Si el cable telefónico que viene con la impresora no es lo suficientemente largo, puede utilizar un acoplador para ampliar la longitud. Puede comprar el acoplador en una tienda de electrónica que venda accesorios telefónicos. También necesitará otro cable telefónico, que puede ser uno estándar que ya tenga en su casa u oficina.
¿Qué es un servicio de timbre especial? contacto con la compañía de teléfonos o con el proveedor de servicios. onsejo: si se suscribe al servicio de C correo de voz en la misma línea que usará para fax, no podrá recibir faxes automáticamente. Dado que debe responder en persona a llamadas de fax entrantes, asegúrese de desactivar la función Respuesta automática.
Conexión de equipo adicional Retire el enchufe blanco del puerto etiquetado 2-EXT en la parte posterior de la impresora y luego conecte un teléfono a este puerto. Si va a conectar equipo adicional, como un módem de marcación de equipo o un teléfono, deberá comprar un bifurcador paralelo. Un bifurcador paralelo tiene un puerto RJ-11 en la parte delantera y dos puertos RJ-11 en la parte posterior.
Pruebe la configuración de fax para verificar el estado de la impresora y asegúrese de que esté configurado correctamente para el envío y recepción de fax. 1. En el panel de control de la impresora, toque la flecha a la derecha y luego Configuración. 2. Toque Herramientas y luego Ejecutar prueba de fax. La impresora muestra el estado de la prueba en la pantalla e imprime un informe. Después de terminada la prueba, la impresora imprime un informe con el resultado de la prueba.
Si desea configurar este ajuste... ...haga esto... Respuesta automática Establezca el modo de respuesta en Activado Si desea que la impresora reciba en forma automática los faxes entrantes. La impresora responderá las llamadas luego de la cantidad de timbres estipulada en la configuración de Timbres antes de responder. 1. 3.
Si desea configurar este ajuste... ...haga esto... Velocidad de fax Establecer la velocidad que emplea el fax para comunicarse entre la impresora y otros aparatos de fax al enviar y recibir faxes. Nota: Si experimenta problemas al enviar y recibir faxes, intente utilizar una velocidad de fax más baja. 1.
Usar el fax En esta sección, aprenderá a enviar y recibir faxes. ¡Sepa más! Para obtener más información acerca de los siguientes temas, consulte la Guía del usuario. • Envío de un fax mediante el control de llamadas • Envío de un fax desde un equipo • Envío de un fax desde la memoria • Programación de un fax para enviarlo más tarde • Envío de un fax a varios destinatarios • Envío de un fax en modo de corrección de errores La Guía del usuario está disponible en su equipo después de que instala el software.
Enviar un fax estándar 1. Cargue el documento que desee enviar por fax en la impresora. 3. Puede enviar faxes desde el alimentador automático de documentos (ADF) o desde el cristal del escáner. Introduzca el número de fax mediante el teclado numérico. onsejo: Para agregar una pausa C en el número de fax que desea introducir, toque * varias veces hasta que aparezca un guión (-) en la pantalla. 4. Toque Iniciar negro o Iniciar color.
Recibir faxes Puede recibir faxes de forma automática o manual. Nota: Si recibe un fax de tamaño legal o mayor, y la impresora no está configurada para utilizar papel de dicho tamaño, ésta reducirá el fax para ajustarlo al papel cargado. Si ha desactivado la función Reducción automática, la impresora imprimirá el fax en dos páginas. Si copia un documento al llegar un fax, éste se guarda en la memoria de la impresora hasta que finaliza la copia.
Recepción manual de un fax Puede recibir faxes manualmente desde un teléfono conectado a la impresora (a través del puerto 2-EXT) o de un teléfono que se encuentre en la misma línea telefónica (pero no conectado directamente a la impresora). 1. Asegúrese de que la impresora esté encendida y que cargó papel en la bandeja principal. 2. Retire los originales de la bandeja del alimentador de documentos. 3.
Trabajo con informes y registros Puede imprimir varios tipos diferentes de informes de fax: • • • • Estos informes incluyen información útil acerca de la impresora. Página de confirmación de fax Nota: También puede ver el historial de llamadas en la pantalla del panel de control de la impresora. Para ver el historial de llamadas, toque Fax (Historial de llamadas). y luego Sin embargo, esta lista no se puede imprimir.
Fax y servicios telefónicos digitales • DSL: un servicio de línea de suscriptores digitales (DSL) a través de la compañía telefónica. (Es posible que DSL se denomine ADSL en su país o región.) • PBX: sistema telefónico de intercambio privado de sucursales (PBX) • ISDN: sistema de servicio de red digital de servicios integrados (RDSI) • FoIP: servicio telefónico de bajo coste que permite enviar y recibir faxes con la impresora a través de Internet.
3. Configuración de comunicación inalámbrica (802.11) uede conectarla en forma P inalámbrica a una red inalámbrica existente (802.11). Para conectar la impresora, realice los siguientes pasos en el orden indicado. Nota: Antes de configurar la comunicación inalámbrica, compruebe que el hardware de la impresora esté configurado. Para obtener más información, consulte el póster de configuración que viene con la impresora.
Conexión sin direccionador inalámbrico Si no tiene un direccionador inalámbrico (como un direccionador inalámbrico Linksys o Apple AirPort Base Station), de todas formas puede conectar la impresora al equipo mediante conexión inalámbrica (lo que se conoce como “equipo a equipo” o conexión inalámbrica “ad hoc”). Consulte la Guía del usuario para obtener más información.
Mac OS 1. Inserte el CD del software HP en el equipo. 2. Haga doble clic en el icono del Instalador HP del CD de software y siga las instrucciones que aparecen en pantalla. Paso 3: Compruebe la conexión inalámbrica Imprima la página de prueba inalámbrica para obtener información sobre la conexión inalámbrica de la impresora. La página de prueba inalámbrica ofrece información sobre el estado de la impresora, la dirección MAC y la dirección IP.
Cambiar el método de conexión Nota: Si va a cambiar a una conexión inalámbrica, asegúrese de que no haya un cable Ethernet conectado a la impresora. Si conecta un cable Ethernet, se desactivan las funciones inalámbricas de la impresora. Siga las instrucciones para su sistema operativo. Windows 1. En el escritorio del equipo, haga clic en Inicio, seleccione Programas o Todos los programas, haga clic en HP, seleccione el nombre de la impresora y luego haga clic en Conectar una nueva impresora. 2.
4. Resolver problemas de configuración L as siguientes secciones proporcionan ayuda para problemas que puede tener mientras configura la impresora. Si necesita más ayuda, consulte la Guía del usuario (que se encuentra disponible en su equipo después de instalar el software). Problemas para configurar la impresora • Asegúrese de que se haya retirado toda la cinta y materiales de embalaje del interior y exterior de la impresora.
Problemas durante la instalación del software • Antes de instalar el software, asegúrese de que el resto de los programas está cerrado. • Si el equipo no reconoce la ruta hacia la unidad de CD que ha introducido, asegúrese de que está especificando la letra de unidad correcta. • Si el equipo no puede reconocer el CD de software HP en la unidad de CD, compruebe que el CD no esté dañado. Puede descargar el controlador del dispositivo en el sitio Web de HP (www.hp.com/support).
Paso 2: Revise la lista de posibles problemas Si ha ejecutado la prueba de fax, pero sigue teniendo problemas para configurarlo, revise la siguiente lista de posibles problemas y soluciones: La impresora está experimentando problemas al enviar y recibir faxes 58 • Compruebe que está utilizando el cable telefónico o adaptador suministrado con la impresora. (Si no usa este cable telefónico o adaptador, la pantalla puede mostrar siempre Teléfono descolgado.
• Si utiliza un servicio DSL/ADSL, asegúrese de que cuenta con un filtro DSL/ADSL conectado. Sin este filtro, no podrá enviar ni recibir faxes correctamente. • Si utiliza un sistema telefónico de intercambio privado de sucursales (PBX) o un adaptador de red digital de servicios integrados (RDSI) de conversor/terminal, asegúrese de que la impresora esté conectada al puerto correcto y que el adaptador de terminal esté configurado en el tipo de conmutación correspondiente al país/región.
La impresora no puede enviar faxes pero sí recibirlos • 60 Es posible que la impresora marque demasiado deprisa o demasiado pronto. Por ejemplo, si necesita acceder a una línea externa con el “9”, intente introducir pausas de la siguiente forma: 9-XXX-XXXX (donde XXX-XXXX es el número de fax receptor). Para introducir una pausa, toque * y seleccione un guión (-).
Problemas de configuración inalámbrica (802.11) Esta sección entrega información acerca de la solución de problemas que puede encontrar al conectar la impresora a la red inalámbrica. espués de resolver los D problemas...
Paso 2. Compruebe la intensidad de la señal inalámbrica Si la intensidad de la señal de la red inalámbrica o de la computadora es débil o si hay interferencia en la red inalámbrica, puede que la impresora no sea capaz de detectar la señal.
5. Uso del servidor Web incorporado (EWS) Cuando la impresora está conectada a una red, puede utilizar el servidor Web incorporado (“EWS”) para ver la información de estado y configurar los ajustes de red desde el explorador Web del equipo. No es necesario instalar ni configurar ningún software especial en el equipo. Nota: Puede abrir y usar el EWS sin estar conectado a Internet; sin embargo, algunas funciones no estarán disponibles.
Declaración de garantía limitada de Hewlett-Packard Producto HP Medio de almacenamiento del software Impresora Cartuchos de tinta o impresión Cabezales de impresión (sólo se aplica a productos con cabezales de impresión que el cliente puede sustituir) Accesorios Duración de la garantía limitada 90 días 1 año La garantía es válida hasta que se agote la tinta HP o hasta que se alcance la fecha de “fin de garantía” indicada en el cartucho, cualquiera de los hechos que se produzca en primer lugar.
© 2010 Hewlett-Packard Development Company, L.P. www.hp.