hp officejet d series reference guide
© Copyright Hewlett-Packard Company 2001 All rights are reserved. No part of the document may be photocopied, reproduced, or translated to another language without the prior written consent of Hewlett-Packard Company. Portions Copyright © 1989-2001 Palomar Software Inc. The HP OfficeJet D Series includes printer driver technology licensed from Palomar Software, Inc. www.palomar.
contents 1 get help . . . . . . . . . . . . . . . . . . . . . . . . . . . . . . . . . . . . . . . 1 2 quick start . . . . . . . . . . . . . . . . . . . . . . . . . . . . . . . . . . . . . 3 tutorial . . . . . . . . . . . . . . . . . . . . . . . . . . . . . . . . before you begin. . . . . . . . . . . . . . . . . . . . . . . front panel features . . . . . . . . . . . . . . . . . . . . . make a copy . . . . . . . . . . . . . . . . . . . . . . . . . enhance your copy . . . . . . . . . . . . . . . . . . . . .
hp officejet d series learn more . . . . . . . . . . . . . . . . . . . . . . . . . . . . . . . . . . . . . . . . . . 25 5 use the copy features . . . . . . . . . . . . . . . . . . . . . . . . . . . . .27 make copies . . . . . . . . . . . . . . . . . . . . . . . . . . . . . . . . . . make a copy . . . . . . . . . . . . . . . . . . . . . . . . . . . . . . . increase copy speed or quality . . . . . . . . . . . . . . . . . . . reduce or enlarge a copy. . . . . . . . . . . . . . . . . . . . . . .
hp officejet d series photo card functions menu options . . . . . . . . . . . . . . . . . . . . . . . . . . 44 7 use the fax features . . . . . . . . . . . . . . . . . . . . . . . . . . . . . 45 send a fax . . . . . . . . . . . . . . . . . . . . . . . . . . . . . . . . . . . . . . . . . . send a fax from your hp officejet . . . . . . . . . . . . . . . . . . . . . . . . . use speed dial entries to send a fax . . . . . . . . . . . . . . . . . . . . . . . send a color fax . . . . . . . . . . . . . . . . . .
hp officejet d series align the printheads . . . . . . . . . . . . . . . . . . . . . . . . . . . . . . . . . 65 clean the printheads . . . . . . . . . . . . . . . . . . . . . . . . . . . . . . . . . 66 clean the ink cartridge contacts. . . . . . . . . . . . . . . . . . . . . . . . . . 66 clean the printhead contacts . . . . . . . . . . . . . . . . . . . . . . . . . . . . .67 replacement alternatives. . . . . . . . . . . . . . . . . . . . . . . . . . . . . . . 69 override the ink level gauge . . . . . . . .
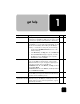
get help 1 help description Setup Poster The Setup Poster provides instructions for setting up and configuring your HP OfficeJet. Make sure you use the correct poster for your operating system (Windows or Macintosh). X Product Tour The tour provides a brief introduction to the HP OfficeJet and its capabilities, so you can start using it immediately.
hp officejet d series help description win mac Troubleshooting help To access troubleshooting information, go to the Director, click Help, then choose Troubleshooting. Troubleshooting is also available via the Help button that appears on some error messages. X Internet help and technical support If you have Internet access, you can get help from the HP website at: www.officejetsupport.com The website also provides answers to frequently-asked questions.
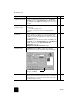
quick start 2 You can perform many functions using either the front panel or the HP OfficeJet software. Even if you do not connect your HP OfficeJet to a computer, you can use the front panel to copy, print photos, or fax documents. You can change a wide variety of settings using the front-panel buttons and menu system. tutorial This brief tutorial teaches you how to use your HP OfficeJet to make a copy, adjust copy settings, and change settings.
hp officejet d series front panel features The front panel is divided into the following main regions: • Fax area • Keypad • Shared buttons and front-panel display • Copy area • Scan area • On button Review the illustrations below and identify the location of the buttons on the front panel. You will not use all of the front-panel features in the tutorial, but you may find it helpful to note the locations of all the buttons.
hp officejet d series make a copy Follow the instructions below to make a copy of your color photo or picture. 1 Open the lid of your HP OfficeJet and place your picture face down in the bottom-right corner of the scanner glass with the sides of the picture touching the right and bottom edges. Top edge of original enhance your copy tutorial 2 In the Copy area of the front panel, press Start Copy, Color. If you had wanted to save the picture to the computer, you would have pressed Start Scan.
hp officejet d series Use this option to reduce or enlarge your picture. 5 Press 5 and then the 0 button on the keypad so that 50% appears, then press Enter. 6 Press Color on the front panel. The HP OfficeJet prints three color copies of your picture, reduced by 50%. If you do not do anything else with your HP OfficeJet, the settings that you adjusted will return to their default settings within two minutes. The number of copies returns to one and the copy percentage returns to 100%.
hp officejet d series The documents are fed through the ADF and are quickly copied. Next, you will review the Menu button. menu button review tutorial The Menu button lets you enter the menu system that you use to change photo card, fax, and copy settings, as well as perform maintenance and print reports. 1 Press Menu. The first submenu appears, which depends on what model of HP OfficeJet you have. 2 Press Menu repeatedly to view all the submenus.
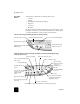
hp officejet d series front panel overview Left side of the front panel 2 3 4 5 1 6 7 8 9 10 Right side of the front panel 11 12 13 14 15 16 17 18 26 19 feature 8 20 21 22 23 24 25 purpose 1 Auto Answer: when the green light is on, fax transmissions will automatically be accepted. 2 Speed Dial: use to access speed-dial numbers that have been set up from the front panel or with the HP Director software.
hp officejet d series feature purpose 7 Pause/Redial: redials the most recently dialed number when in the ready state. Inserts a pause (hyphen) when in the dialing state. 8 Start Fax - Black: starts a black and white fax. 9 Start Fax - Color: starts a color fax. 10 Keypad: use to dial fax numbers, and enter numbers such as the quantity of copies or percentages when reducing or enlarging. You can also enter text using the keypad. 11 Menu: use to access the menu system.
hp officejet d series feature purpose 24 Start Copy - Color: use to start a color copy. 25 Special Features: use to access options that let you reduce or enlarge to a specified copy image size on paper loaded in the selected tray. The options are Normal, Fit to Page, Which Size?, Poster, 2 on 1, MarginShift and Mirror. 26 Start Scan: use to start the scan of an original from the ADF or the glass to the designated Scan To destination.
hp officejet d series 1 2 4 3 11 10 9 8 7 feature 6 5 purpose 1 Help: provides access to onscreen assistance in the form of an onscreen User’s Guide, Troubleshooting, Product Tour, Director Help, and information about your HP OfficeJet. 2 Fax: displays the Send Fax dialog box where you can enter the fax recipient information, specify the fax quality and color, and start a fax job.
hp officejet d series feature purpose 10 Log: displays a list of faxes recently sent and received. 11 Status: displays the status window. The following figure shows some of the features available through the HP Director for Macintosh. Consult the legend for a brief explanation of a specific feature.
hp officejet d series Feature 9 Purpose Customize: displays options for customizing the appearance and functionality of the Director and scanning. 10 Help: accesses Help for assistance with the HP OfficeJet software. 11 About: accesses copyright information about the HP OfficeJet software. hp officejet menu functions Access Menu functions by pressing the corresponding numbers for each menu option. For example: to set the language and country, press Menu, then press 7 and 7.
hp officejet d series 0:Photo Card Functions 1:Copy Setup 1:Save Photos to PC 0: Collation 1:Enhancements 2:Print Proof Sheet 3:Scan Proof Sheet 4: Print Photos 2:Paper Size 3:Color Intensity 4:Set Copy Defaults 5:Restore Copy Factory Settings 2:Fax Functions 3:Print Report 1:Scan and Fax Black Only 1:Last Transaction 2:Send Fax Later Black Only 4:Speed Dial Setup 1:Individual Speed Dial 2:Fax Log 3:Speed Dial List 3:Fax Forwarding Black Only 4:Menu Settings 4: Polling to Receive 6:Automati
load originals and load paper 3 You can copy from originals loaded on the glass or in the automatic document feeder. You can also print and copy onto a variety of paper types, weights, sizes, and transparency films. It is important, however, that you choose the right paper and make sure that it is loaded correctly and not damaged. load originals Your HP OfficeJet provides two ways to load originals for copying, scanning, and faxing.
hp officejet d series Top edge of original 2 load originals in the automatic document feeder Close the lid. Your HP OfficeJet has an automatic document feeder (ADF), which you can use to load up to 30 originals of the following paper types: • Plain Paper • 16 to 36 lb.
hp officejet d series load paper Following is the basic procedure for loading paper. There are specific considerations for loading certain types of paper, transparency film, and envelopes. After you review this procedure, see tips for loading other types of paper in the main tray on page 20 and load envelopes on page 19. For best results, adjust the paper settings each time you change paper types or paper sizes. For more information, see choose the paper tray and set the paper type on page 22.
hp officejet d series 18 2 Tap the stack on a flat surface to align the edges of the paper, and then check the paper for the following: – Make sure it is free of rips, dust, wrinkles, and curled or bent edges. – Make sure all the paper in the stack is the same size and type, unless you are working with photo paper. 3 Insert paper into the main tray print-side down until it stops. If you are using letterhead, insert the top of the page first. Be careful not to use too much or too little paper.
hp officejet d series To load the 250-sheet plain paper tray ! Review the Accessories guide that came with the 250-sheet plain paper tray for information on loading paper in this accessory. load envelopes Your HP OfficeJet provides two methods for working with envelopes. Do not use shiny or embossed envelopes, or envelopes that have clasps or windows.
hp officejet d series Adjust the paper-width guide against the envelopes (be careful not to bend the envelopes). Make sure the envelopes fit within the tray (do not overload it). Consult the help files in your word processing software for details on how to format text for printing on envelopes. tips for loading other types of paper in the main tray The following table provides guidelines for loading certain types of paper and transparency film.
hp officejet d series paper tips Labels (works only with printing) • Always use letter-size or A4-size label sheets designed for use with HP inkjet products (like Avery Inkjet Labels), and make sure that the labels are not over two years old. • Fan the stack of labels to make sure none of the pages are sticking together. • Place a stack of label sheets on top of standard paper in the main tray, print-side down. Do not insert labels one sheet at a time.
hp officejet d series choose the paper tray and set the paper type If you want to use a different type of paper, such as photo paper, transparency film, banner paper, or envelopes, simply load that paper in the main tray. You should then change the paper type settings to ensure the best print quality. If you have installed HP 250-sheet plain paper tray, that paper tray is the default paper tray that is used for copying.
use the scan features 4 Scanning is the process of converting text and pictures into an electronic format for your computer. You can scan just about anything: • Text documents • Photos • Magazine articles • 3D objects (be careful not to scratch the glass) to put into catalogs and flyers Because the scanned image or text is in an electronic format, you can bring it into your word processor or graphics program and modify it to suit your needs.
hp officejet d series to scan an original from your Windows computer 1 Load your original on the glass or in the automatic document feeder (ADF). 2 Press Start Scan. A scan of the original appears in the HP Image Viewer. 3 In the HP Image Viewer, you can edit the scanned image. When you have finished, click Accept. The HP OfficeJet does a final scan of the original and sends the image to the HP Photo View Center. See the onscreen User’s Guide for more information about using the HP Image Viewer.
hp officejet d series stop scanning You can stop a scan by pressing the Cancel button located on the front panel.
hp officejet d series 26 use the scan features
use the copy features 5 The copy features let you do the following: • Produce high-quality color and black-and-white copies using a variety of paper types and sizes, including iron-on transfers. • Reduce or enlarge the size of the copies you make from 25% to 400% of the copy’s original size. (Percentages may vary between models.) • Make the copy lighter or darker, adjust the color intensity, select the number of copies, and specify the quality of the copies you make.
hp officejet d series increase copy speed or quality reduce or enlarge a copy The HP OfficeJet provides three options that affect copy speed and quality. • Best produces the highest quality for all paper and eliminates the banding (striping) effect that sometimes occurs in solid areas. Best copies more slowly than the other quality settings. • Normal delivers high-quality output and is the recommended setting for most of your copying. Normal copies faster than Best.
hp officejet d series enhance text sharpness and photo colors 1 Press Menu. 2 Press 1 and then press 3. This selects Copy Setup, and then selects Color Intensity. 3 Press to make the image more pale or to make the image more vivid. The range of color intensity values appears as a circle on a scale on the front-panel display. 4 Press Start Copy, Black or Start Copy, Color. Use Text enhancements to sharpen edges of black text.
hp officejet d series perform special copy jobs In addition to supporting standard copying, your HP OfficeJet can also do the following: copy a photo • copy a photo • fit a copy to the page • print several copies on one page • print two originals on one page • shift image to increase the margin • make two-sided copies • collate copies • make a poster • prepare a color T-shirt transfer 1 Load the photo on the glass.
hp officejet d series Tip! Make sure that the glass is clean and the original has been placed in the bottom-right corner of the glass. You cannot use the automatic document feeder (ADF) for this feature. Fit to Page Original print several copies on one page 1 Load the original on the glass. 2 Load the appropriate paper. 3 Press Special Features until Fit to Page appears. 4 Press Enter. 5 Press Start Copy, Black or Start Copy, Color.
hp officejet d series 5 When How Many? appears, press to select the number of images that will fit on a page. Some larger sizes do not prompt you for a number of images. 6 Press Enter to select the number of photos you want to appear on a page. 7 Press Start Copy, Black or Start Copy, Color. Tip! If the number of copies of the photo on a single page does not come out as expected, try turning the original on the glass 90 degrees and start the copy again.
hp officejet d series Original MarginShift 1 Load the original on the glass or in the ADF. 2 Press Special Features until MarginShift 100% appears. 3 Press or to shift the margin to the left or to the right. Each step is a ¼-inch (6.35 mm) shift. 4 If you wish to change the reduction/enlargement percentage as well, enter a number using the keypad, then press Enter.
hp officejet d series – – 4 collate copies make a poster This option takes 2 single-sided originals and produces a two-sided copy. 2-sided original, 1-sided copy This option produces single-sided copies of a two-sided original. 2-sided original, 2-sided copy This option produces a two-sided copy from a two-sided original. Press Start Copy, Black or Start Copy, Color. The collate feature lets you produce sets of copies in the exact order that they are scanned from the automatic document feeder (ADF).
hp officejet d series The option Poster 2 pages Wide appears by default. 4 Press 5 Press Enter to confirm your selection. 6 Press Start Copy, Black or Start Copy, Color. to select how wide you want the poster to be. Tip! After you select the poster width, the HP OfficeJet adjusts the length automatically to maintain the proportions of the original. If the original cannot be enlarged to the selected poster size, an error message appears that tells you the number of pages wide that are possible.
hp officejet d series stop copying ! To stop copying, press Cancel on the front panel. learn more See the copy section in the onscreen User’s Guide to learn more about the following: • Perform special copying • Change color intensity • Enhance text sharpness and photo colors • Change settings for copying copy setup menu options The following options are available in the Copy Setup menu.
use a photo card 6 Photo card features are available only on certain models of the HP OfficeJet D Series. After you take photos with your digital camera, you can print them immediately or save them directly to your computer. what is a photo card? If your digital camera uses a photo card to store photos, you can insert the photo card into your HP OfficeJet to print or save your photos. Your HP OfficeJet has three different slots for photo cards.
hp officejet d series insert a photo card ! cards inserted incorrectly Insert the photo card into the appropriate slot on your HP OfficeJet. Reading camera photo card... appears on the front-panel display. The light next to the card slot blinks green when the card is being accessed. When the HP OfficeJet is finished reading the card, another message appears showing the number of files found on the photo card. You can safely remove the card only when the light is off.
hp officejet d series view and edit image files Your operating system (Windows or Macintosh) determines where you view and edit images on your photo card. use the hp photo view center The HP Photo View Center is a Windows software program for viewing and editing image files. You can print images, send images by e-mail or fax, upload images to a website, or use images in printing projects with the HP Photo View Center.
hp officejet d series At this point, you do not want to save the photos, but instead, choose an option to print the proof sheet. 3 Press until Proof Sheet appears, then press Enter. The proof sheet is printed. If you have more than 20 photos on the card, you can select the range of photos to be printed on the proof sheet. to Print a proof sheet from a card that is already inserted 1 press Menu. 2 print all photos print individual photos Press 0, and then press 2.
hp officejet d series 1 Do one of the following: – If your card is already in the slot, press Menu, press 0, then press 4. This selects Photo Card Functions, then selects Print Photos. – If your card is not in the slot, insert the photo card, and press 2 when Save Photos to PC? appears. 2 When Print What? appears, press then press Enter. 3 Press 4 Use the keypad to enter the photo numbers for the photos you want to print. 5 Press or Enter to enter the next photo number.
hp officejet d series 2 When Print What? Use DPOF appears, press Enter. 3 Press to select a photo size, then press Enter. 4 Press to select a paper type, then press Enter. use a proof sheet After printing a proof sheet, fill in the circles and place the proof sheet on the glass. The proof sheet is scanned and photo prints are generated. fill out the proof sheet Fill out the proof sheet to select the photos you want to print, as well as the number of prints, the size, and the paper type to use.
hp officejet d series 5 Place the top of the proof sheet face down on the glass in the bottomright corner with the sides of the originals touching the right and bottom edges. Top edge of original 6 Close the lid. 7 Press Menu. 8 Press 0, then press 3. This selects Photo Card Functions, then selects Scan Proof Sheet. The proof sheet is scanned and the HP OfficeJet prints the photos you specified on the proof sheet from the paper in the upper tray.
hp officejet d series photo card functions menu options 0:Photo Card Functions 1:Save Photos to PC 2:Print Proof Sheet 3:Scan Proof Sheet 4: Print Photos 44 use a photo card
use the fax features 7 Using your HP OfficeJet, you can do the following: • Send and receive paper faxes • Send a computer file as a fax • Send and receive color faxes send a fax Your HP OfficeJet lets you send a fax in a variety of configurations. These include the following: • Sending a paper fax (legal, letter, or A4) using the front panel or computer. • Sending a paper fax with a computer-generated cover page using the computer.
hp officejet d series Scroll through speed-dial entries. Turn Auto Answer on/off. Access one-touch speed-dial buttons. Change the resolution of the fax. Use keypad to dial fax numbers or enter text. Redials the most recently dialed number. Start fax. send a fax from your hp officejet Follow these steps to send a fax from your HP OfficeJet. 1 Load your original. For more information, see load originals on the glass on page 15 and load originals in the automatic document feeder on page 16.
hp officejet d series 4 send a color fax When the speed-dial number that you want appears, press Start Fax, Black or Start Fax, Color. You can send and receive color faxes to and from other color fax machines. If you attempt to send a color fax to a recipient who has a black-and-white fax machine, your HP OfficeJet sends the fax in black and white. To ensure the best quality when sending faxes in color, we recommend that you use a color original rather than a color copy if possible.
hp officejet d series This will select Fax Functions and Send Fax Later Black Only. cancel a scheduled fax 4 Enter the Send Time using the numeric keypad. 5 Press 1 for AM or 2 for PM. 6 When Enter fax number appears, enter the fax number of the recipient or select the group using the Speed Dial button. 7 When Store Fax Now? appears, press 1 for Yes, or 2 for No. If you selected 1, the document is scanned to memory and is sent at the selected time.
hp officejet d series ! receive a fax manually Press the Auto Answer button until the green light is lit. Before manually receiving a fax to your HP OfficeJet, we recommend that you remove any originals from the glass. 1 Press the Auto Answer button until the green light is off. This disables the automatic answering feature.
hp officejet d series 2 Press to scroll through the following report types. – 1:Last Transaction, which indicates the status of the last fax sent. – 2:Fax Log, which lists approximately the last 40 faxes sent and received. – 3:Speed Dial List, which lists your individual and group numbers. – 4:Menu Settings, which lists in outline form the entire menu system and indicates the current and default settings. – 5:Self-Test Report, which prints a self-test report.
hp officejet d series This selects the Status and Maintenance, then selects the Ring and Beep Volume option. 3 Press 4 Press Enter. to select one of the options: Soft, Loud, or Off. set up speed dialing Through your HP OfficeJet or your computer, you can assign entries to fax numbers you use often. This lets you dial those numbers quickly using the front panel’s Speed Dial button or one-touch speed-dial buttons.
hp officejet d series 3 Choose one of the following: – If this is your first group, the first unassigned number appears. Press Enter to select it. – If this is not your first group, 1=New 2=Edit appears. Press 1 to create a new group. The first unassigned number appears. Press Enter to select it. 4 When Add 1 of 20 appears, press until the appropriate speed-dial number appears, then press Enter to select it. The selected number and corresponding name appear on the display.
hp officejet d series 5 Press 1 for AM or 2 for PM. The new time and date settings appear on the front panel. set the fax header The fax header is usually set up during installation using the Fax Setup Wizard. If you need to change it, you can use the Fax Setup Wizard from the HP Director, or you can follow these steps to enter your name and fax number from the front panel. In Hungary, the subscriber identification code (fax header) can be set or changed only by authorized personnel.
hp officejet d series JKL 5 To get this character: Press 5 this many times: j 1 k 2 l 3 J 4 K 5 L 6 5 7 • After the correct letter appears, press , then press the number that corresponds to the next letter in the name. Again, press multiple times until the correct letter appears. • The cursor automatically advances to the right 1.5 seconds after the last button is pressed. • To insert a space, press Space (#).
learn more 6:Automatic Reports Setup 4: Polling to Receive Press or to move to the setting you want. Press Enter to select the displayed setting. Press Menu to display the menu functions.
hp officejet d series 56 use the fax features
maintain your hp officejet 8 This section provides instructions for keeping your HP OfficeJet in top working condition. Perform these maintenance procedures as necessary. clean the glass Dirty glass, from fingerprints, smudges, hair, and so on, slows down performance and affects the accuracy of special features such as Fit to Page and Copy. 1 Turn off the unit, unplug the power cord, and raise the lid. 2 Clean the glass with a soft cloth or sponge slightly moistened with a nonabrasive glass cleaner.
hp officejet d series clean the exterior Use a soft, damp, lint-free cloth to wipe dust, smudges, and stains off the case. The interior of the unit does not require cleaning. Keep fluids away from the interior of the unit as well as the front panel. install the automatic document feeder If you remove the automatic document feeder tray for any reason, you can replace it easily. Use the illustration below, and make sure the tray snaps into place.
hp officejet d series check the ink level perform color calibration handle printheads An easy way to check the ink supply level can be done from the front panel. 1 Press Menu. 2 Press 7, then press 1. This selects the Status and Maintenance menu, then selects the Check Ink Level option. A message in the front-panel display lets you know how much ink you have left, for both black and tri-color ink cartridges. 3 Press Cancel to exit the menu.
hp officejet d series verify a printhead needs to be replaced If a printhead error message appears on the front-panel display, verify that the printhead needs to be replaced. 1 Turn the unit off and then turn it on. If the error message still appears, continue with the following steps. 2 Open the print-carriage access door by lifting the handle until the door locks into place. The print carriage moves to the center of the unit.
hp officejet d series replace the printheads 6 Push the failed printhead firmly down into the appropriate slot using the printhead handle. Do not touch the printhead tower, and do not remove the printhead handle. 7 Move the print carriage latch down, and make sure the loops catch the hooks. Snap the latch into place, then close the print carriage access door. 8 If the error message still appears, remove and reinsert the printhead again and close the print carriage access drawer.
hp officejet d series Caution! To avoid damaging the printer, remove a printhead only when a replacement is available. If a printhead is removed without being replaced: – – – 3 Close the print carriage and the print-carriage access door. Replace the printhead within 24 hours. Never remove an ink cartridge and a printhead at the same time. Remove the old printhead by lifting the printhead handle and pulling upward.
hp officejet d series handle ink cartridges 6 Push the new printhead firmly down into the appropriate slot using the printhead handle. Do not touch the printhead tower, and do not remove the printhead handle. 7 Move the print carriage latch down, and make sure the loops catch the hooks. Snap the latch into place, then close the print carriage access door. 8 After the message appears in the front-panel display, press Enter to align the printheads. A page prints to confirm alignment.
hp officejet d series Caution! If you ignore the messages and do not replace the ink cartridges, eventually the HP OfficeJet will stop working completely to avoid damaging the printheads. See the Support and Specifications booklet for information on ordering replacement ink cartridges. 1 Turn on the unit, then open the print-carriage access door by lifting the handle until the door locks into place. The print carriage moves to the center of the unit.
hp officejet d series Caution! Hold the cartridge away from you as you remove the plastic tape so the ink does not spill on you or your clothing. Caution! Do not touch the copper contacts. 4 Push the new ink cartridge firmly down into the appropriate slot until it clicks into place. Note the color bars on the print carriage. The ink-cartridge label should be face-up after the cartridge is inserted.
hp officejet d series This selects the Status and Maintenance menu, then selects the Align PrintHeads option. A page prints to confirm printhead alignment. You can either discard or recycle this page. If the page does not appear, see the Troubleshooting help, which you access from the HP Director. clean the printheads clean the ink cartridge contacts Use this feature when the Self-Test Report shows streaking or white lines through any of the colored bars. Do not clean printheads unnecessarily.
hp officejet d series clean the printhead contacts 6 Place the ink cartridge back into the holder. 7 Repeat if necessary for the other ink cartridge. 8 Close the door and plug in the unit. Because you removed an ink cartridge from its holder, the HP OfficeJet needs to align the printheads. 9 After the message appears in the front-panel display, press Enter to align the printheads. A page is printed to confirm alignment.
hp officejet d series 4 Remove the printhead by lifting the printhead handle and pulling upward. 5 Inspect the copper contacts and the contacts inside the printhead socket for ink and debris buildup. 6 Clean any visible ink deposits with the clean, soft, lint-free cloth. If necessary, moisten the cloth with one drop of water. Caution! Clean only the copper contacts in the front of the printhead, and wipe upwards only. Do not clean the ink nozzles on the under side of the printhead.
hp officejet d series A page prints to confirm printhead alignment. You can either discard or recycle this page. If the page does not appear, see the Troubleshooting help, which you access from the HP Director. replacement alternatives To get the best performance from your HP OfficeJet, we recommend using only genuine Hewlett-Packard supplies. See the Support and Specifications booklet for information on ordering replacement ink cartridges and printheads.
hp officejet d series 3 When the prompt appears asking if you want to override the ink level gauge, press 1 for Yes, or 2 for No. to override the ink level gauge for the tri-color ink cartridge 1 Press and at the same time, then release. 2 On the keypad, press in order, 4, 5, 6. 3 When the prompt appears asking if you want to override the ink level gauge, press 1 for Yes, or 2 for No. Always install an ink cartridge before performing an Ink Level Gauge override.
hp officejet d series 4 Enter the two-digit number corresponding to the language on the keypad. For example: for English, you would enter 11. 5 After entering the language, you are prompted to confirm that the language you selected is the one you want. 6 Press 1 for Yes and 2 for No. 7 After the language is selected, you are prompted with all the countries for that selected language. 8 To select the country, you can: – Press until the desired country appears.
hp officejet d series maintenance menu options 3:Print Report 1:Last Transaction 7:Status and Maintenance 1:Check Ink Level 2:Fax Log 3:Speed Dial List 4:Menu Settings 2:Clean PrintHeads 3:Align PrintHeads 5:Self-Test Report 6:Automatic Reports Setup 4:Perform Color Calibration 5:Restore Factory Defaults 6:Set Power Save Mode Time 7:Set Language and Country Use Menu to display the Status and Maintenance menu options. Press and to move to the setting you want.
additional setup information 9 This section covers how to handle messages that may or may not appear during installation, how to set up the connection between your computer and your HP OfficeJet, and how to add and remove the HP OfficeJet software. The standard installation instructions are provided in your Setup Poster, which you should keep for later use. For comprehensive information, see the fully-searchable onscreen User’s Guide, which is accessible only if the software has been installed.
hp officejet d series If the Microsoft messages did not appear, try the following: • Verify that you are using a high-speed (12 Mbps) USB cable and that it does not exceed five meters in length (16.4 feet). • Verify that the computer is USB-ready. For more information about determining whether your computer is USB-ready, see your computer’s documentation or check with the computer’s manufacturer.
hp officejet d series 3 Follow the software installation steps outlined in the Setup Poster that came with your HP OfficeJet. If the previous version installed message appears If you receive a message that you have a previously installed version, you will not be able to finish installing the HP OfficeJet software. You will have to uninstall the previously installed version in order to install the HP OfficeJet software.
hp officejet d series Should you need to disconnect your parallel adapter from the HP OfficeJet, press the buttons found on the top and bottom of the adapter and pull the adapter straight out. You may need to disconnect the power cord to access the lower button on the adapter. setup for simple sharing Your HP OfficeJet can be shared by two different computers by having both computers connected directly to the HP OfficeJet. Both computers must have the HP OfficeJet software installed.
hp officejet d series AppleTalk is not supported. connecting to the USB port on your computer remove and reinstall your hp officejet software Do not simply delete the HP OfficeJet program files from your hard drive. Be sure to remove them properly using the uninstall utility provided in the HP OfficeJet program group. to uninstall from a Windows computer 1 On the Windows taskbar, click Start, choose Programs, choose Hewlett-Packard, choose HP OfficeJet D Series, then choose Uninstall Software.
hp officejet d series learn more See the additional setup information section in the onscreen User’s Guide to learn more about: 78 • Set up your HP OfficeJet for network printing • Understand point-and-print and peer-to-peer networks • Set up the host • Set up a point-and-print client • Set up a peer-to-peer client (Windows 98 server to 2000 client) additional setup information
index Numerics resolution, 8 scan to, 9, 24 special features, 10, 32, 34 speed dial, 8, 46, 51 start scan, 10, 23 tray select/paper type, 9, 35 two-sided copy, 33 2 on 1 feature, 32 250-sheet plain paper tray, 9, 17, 19, 22 A address book, sending faxes to groups, 51 adjust settings copy, 29 fax, 50 adjust sound volume for fax, 50 align printheads, 65 auto-answer button, 8, 48 automatic document feeder copy from, 6 load originals in, 16 use for two-sided copies, 33 B banner paper, tips on loading, 21 b
hp officejet d series director review, 10 double-sided copies, 33 DPOF, print, 41 E enhancements, 29 enlarge a copy, 9, 28, 30 enter text from keypad, 53 envelopes, load, 19 error reports, fax, 49 exclamation light (needs attention), 8 F factory defaults change for copying, 29 restore, 70 fast copy quality, 28 fax adjust volume, 50 auto redial, 50 auto-answer, 8 broadcast, 47 busy redial, 50 buttons, 4 cancel scheduled fax, 48 confirmation reports, 49 create group speed-dial settings, 51 create individual
hp officejet d series Memory Stick, 37 menus, 55 advanced fax setup, 55 copy setup, 36 fax functions, 55 photo card functions, 44 print reports, 72 speed dial setup, 55 status and maintenance, 55, 72 multiple recipients create groups, 51 send fax to, 47 N no answer redial, 50 normal copy quality, 28 number of copies, 9 set, 5, 29 numbers, redialing, 50 O originals how to place in the ADF, 16 how to place on glass, 15 multiple copies, 31 print two on one page, 32 output tray, 21 extender, 18 P paper chang
hp officejet d series settings best copy quality, 28 copy a photo, 30 copy color intensity, 28 copy defaults, 29 copy quality, 28 copy speed, 28 country and language, 70 darken a copy, 28 date and time, 52 enlarge a copy, 28 fast copy quality, 28 fax header, 53 lighten a copy, 28 normal copy quality, 28 paper tray, 22 power save mode, 71 reduce a copy, 28 ring and beep volume, 50 save copy, 29 text enhancement, 29 setup additional information, 73 simple sharing, 76 82 shift margins, 32 SmartMedia, 37 soft
Visit the hp officejet information center It has everything you need to get the most value from your HP OfficeJet. • Technical Support • Supplies and Ordering Information • Project Tips • Ways to Enhance Your Product www.officejetsupport.com © 2001 Hewlett-Packard Company Printed in the U.S.A., Mexico, Germany, Singapore, or China.