hp officejet 4100 series all-in-one reference guide
© Copyright Hewlett-Packard Company 2003 All rights are reserved. No part of the document may be photocopied, reproduced, or translated to another language without the prior written consent of Hewlett-Packard Company. This product incorporates Adobe’s PDF technology, which contains an implementation of LZW licensed under U.S. Patent 4,558,302. Adobe and the Acrobat logo are either registered trademarks or trademarks of Adobe Systems Incorporated in the United States and/or other countries.
contents 1 get help . . . . . . . . . . . . . . . . . . . . . . . . . . . . . . . . . . . . . . . . . . . 1 2 quick start . . . . . . . . . . . . . . . . . . . . . . . . . . . . . . . . . . . . . . . . . 3 use your hp officejet with a computer . . . . . . . . . . . . . . . . . . . . . . . . . 4 3 load originals and load paper . . . . . . . . . . . . . . . . . . . . . . . . . . . 7 load originals . . . . . . . . . . . . . . . . . . . . . . . . . . . . load paper . . . . . . . . . . . . . . . . . . . .
contents 8 additional setup information . . . . . . . . . . . . . . . . . . . . . . . . . . . . 39 possible installation problems . . . . . . . . . . . . . . . . . . . . . . . . . . . . . .39 remove and reinstall your hp officejet software . . . . . . . . . . . . . . . . . .40 connect your hp officejet to a phone, modem, or answering machine . . .41 additional troubleshooting help . . . . . . . . . . . . . . . . . . . . . . . . . . . . .42 9 technical information . . . . . . . . . . . . . . . . . . . .
get help 1 This Reference Guide contains information on using your HP Officejet and provides additional troubleshooting assistance for the installation process. The Reference Guide also contains information on how to order supplies and accessories, technical specifications, support, and warranty information. The table below lists additional sources of information for your HP Officejet.
chapter 1 2 hp officejet 4100 series
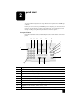
quick start 2 You can perform many functions using either the front panel or the HP Officejet software. Even if you do not connect your HP Officejet to a computer, you can use the front panel to copy documents or photos, and send a fax. You can change a wide variety of settings using the front-panel buttons and menu system. front panel features Review the illustrations below and identify the location of the buttons on the front panel.
chapter 2 button purpose 10 Speed Dial: access programmed speed dial entries. 11 Setup: access the menu system for reports, fax settings, and maintenance. 12 Fax: select the fax function. 13 Scan: select the scan function. 14 Copy: select the copy function. 15 Photo Fit to Page: enlarge a photo to fit a full-size sheet of paper.
quick start feature purpose 1 Select Device: Use this feature to select the product you want to use from the list of installed HP products. 2 Settings: Use this feature to view or change various settings for your HP device, such as print, scan, or copy. 3 Status: Displays the status window for all-in-one devices only. 4 Send a Fax: Use this feature to send a fax and access fax settings. 5 Scan Picture: Scans an image and displays it in the HP Photo & Imaging Gallery.
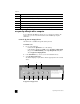
chapter 2 1 3 4 2 5 6 7 8 the hp photo and imaging director for macintosh OS X 6 feature purpose 1 Select Device: Use this feature to select the product you want to use from the list of installed HP products. 2 Settings: Use this feature to view or change various settings for your HP device, such as print, scan, or copy. 3 Scan Picture: Scans an image and displays it in the HP Photo and Imaging Gallery. 4 Scan Document: Scans text and displays it in a text editing software program.
load originals and load paper 3 You can make copies from originals loaded on the automatic document feeder (ADF). You can also print and copy onto a variety of paper types, weights, sizes, and transparency films. It is important, however, that you choose the right paper and make sure that it is loaded correctly and not damaged. load originals You can copy or scan any original by placing it in the automatic document feeder. 1 Load your original in the automatic document feeder.
chapter 3 8 3 Tap the stack on a flat surface to align the edges of the paper, and then check the paper for the following: – Make sure it is free of rips, dust, wrinkles, and curled or bent edges. – Make sure all the paper in the stack is the same size and type, unless you are working with photo paper. 4 Insert paper into the paper tray print-side down until it stops. To avoid bending the paper, make sure you do not push the paper in too far, or push too hard.
load originals and load paper load envelopes Use the print feature of your software to print to envelopes with your HP Officejet. Do not use shiny or embossed envelopes, or envelopes that have clasps or windows. You can load the paper tray with one or multiple envelopes. reference guide 1 Remove all paper from the paper tray. 2 Slide an envelope into the tray, with the envelope flap up and to the left (print-side down), until it stops.
chapter 3 load 4 x 6 inch photo paper Following is the procedure for loading 4-by-6 inch photo paper into your HP Officejet. 1 Remove all paper from the paper tray, and then slide a stack of photo paper into the tray until it stops. Make sure the print-side faces down. If the photo paper you are using has perforated tabs, load the photo paper so that the tabs are closest to you. 2 Adjust the paper-width guide against the stack of photo paper until it stops.
load originals and load paper 2 Adjust the paper-width guide against the cards until it stops. Make sure the cards fit within the tray (do not overload it). tips for loading other types of paper in the paper tray The following table provides guidelines for loading certain types of paper and transparency film. For best results, adjust the paper settings each time you change paper types and paper sizes. For more information, see set the paper type on page 12.
chapter 3 paper tips Labels (works only with printing) • Always use letter-size or A4-size label sheets designed for use with HP inkjet products (like Avery Inkjet Labels), and make sure that the labels are not over two years old. • Fan the stack of labels to make sure none of the pages are sticking together. • Place a stack of label sheets on top of standard paper in the paper tray, print-side down. Do not insert labels one sheet at a time.
use the copy features 4 The copy features let you do the following: • Produce high-quality color and black-and-white copies. • Reduce or enlarge the size of the copies you make from 25% to 200% or 50% to 200% (depending on your model) of the copy’s original size. • Make the copy lighter or darker, select the number of copies, and specify the quality of the copies you make. • Use special copying features to make high-quality copies of photos, using special photo paper, or to create transparencies.
chapter 4 1 Load your original. 2 Press Copy until Copy Quality appears. 3 Press select it. 4 Press Start Black or Start Color. until the desired quality setting appears, and then press Enter to set the number of copies You can set the number of copies using the front panel. 1 Press the Copy button. 2 Use the keypad or press the 3 Press Enter. 4 Press Start Black or Start Color. or to enter the number of copies.
use the copy features Text enhancement is the default option. You can turn off Text enhancement by selecting Photo, Mixed, or None if the following occur: • Stray dots of color surround some text on your copies. • Large, black typefaces look splotchy (not smooth). • Thin, colored objects or lines contain black sections. • Horizontal grainy or white bands appear in light- to medium-gray areas. 1 Press Copy until Enhancements appears.
chapter 4 fit a copy to the page Use the Photo Fit to Page button when you want to automatically enlarge or reduce your original to fit Letter or A4 size paper. You can enlarge a small photo to fit a full-size page, as shown below. Using Photo Fit to Page may prevent unwanted cropping of text or images around the margins. Original Fit to Page 1 Load the original in the ADF. For more information, see load originals on page 7. 2 Press the Photo Fit to Page button.
use the scan features 5 Scanning is the process of converting pictures and text into an electronic format for your computer. You can scan photos and text documents. Because the scanned image or text is in an electronic format, you can bring it into your word processor or graphics program and modify it to suit your needs. You can do the following: • Scan photos of your kids and e-mail them to relatives, create a photographic inventory of your house or office, or create an electronic scrapbook.
chapter 5 stop scanning You can stop a scan by pressing the Cancel button located on the front panel.
use the fax features 6 Using your HP Officejet, you can: • Send and receive paper faxes. • Send computer faxes (reference the HP Photo & Imaging Help). • Send and receive color faxes. Fax features are available only on some HP Officejets. send a fax You can send a fax in a variety of configurations. These include the following: • send a paper fax (using the front panel or computer). • send a paper fax with a PC-generated cover page (using the computer).
chapter 6 For more information on speed dialing, see set up speed dialing in the HP Photo & Imaging Help. 3 Press Enter. 4 Press Fax to scroll through the fax options. 5 When you reach the option whose setting you wish to change, press to scroll through the setting options. 6 When you reach the setting you want to change, press Enter to accept the setting. 7 Press Start Black or Start Color. send a color fax You can send and receive color faxes to and from other color fax machines.
use the fax features 8 Press Enter. 9 Enter the Send Time using the numeric keypad. 10 At the prompt, press 1 for AM or 2 for PM. 11 When Store Fax Now? appears, press 1 for Yes or 2 for No. If 1 is selected, the document is scanned to memory and is sent at the selected time. If 2 is selected and you haven’t loaded your originals, a message appears reminding you to load the original before the send time. 12 Press Start Black.
chapter 6 print reports You can set up your HP Officejet to print error reports and confirmation reports for each fax you send and receive. You can also manually print reports as you need them. generate reports automatically This setting lets you configure your HP Officejet so that it automatically prints error and confirmation reports. 1 Press Setup. 2 Press 1, then press 5. This selects Print Report, then selects Automatic Reports Setup.
use the fax features to change the resolution from the front panel 1 Load your originals in the ADF. 2 Enter the fax number using the keypad, or press Speed Dial until the desired speed-dial entry appears. 3 Press Enter. 4 Press Fax to scroll through the fax options. 5 Stop scrolling when you reach the Resolution menu. 6 Press until the desired resolution quality appears (Standard, Photo, Fine, Very Fine). 7 Press Enter.
chapter 6 – This selects the Busy Redial option. The default setting for Busy Redial is Redial. Press 4. This selects the No Answer Redial option. The default setting for No Answer Redial is No Redial. 4 Press Enter. 5 Press 6 Press Enter. to select Redial or No Redial, as desired. forward faxes to another number With fax forwarding, you can send a fax that you receive to another fax number during the next 24-hour period. to forward faxes from the front panel 1 Press Setup.
use the fax features Follow the steps in edit or cancel fax forwarding on page 24. When Forwarding is ON 1=Edit 2=Cancel appears on the display, press 2 to cancel fax forwarding. use error correction mode Error Correction Mode (ECM) eliminates data lost due to poor phone lines by detecting errors that occur during transmission and automatically requesting retransmission of the erroneous portion. Phone charges are unaffected, or may even be reduced, on good phone lines.
chapter 6 change the answer ring pattern (distinctive ringing) Distinctive ringing is a feature offered by phone companies that allows several phone numbers to share the same line. Each number has a specific ring pattern. If you do not have this service, use the default ring pattern, which is All Rings.
use the fax features The name is limited to 13 characters in length. For more information, see enter text on page 28. 7 After Enter Another? appears, press 1 (Yes), if you want to set up another number, or press 2 (No) to exit. delete speed-dial settings Follow these steps to delete an individual speed-dial entry. 1 Press Setup. 2 Press 2, then press 2 again. This selects Speed Dial Setup, then selects Delete Speed Dial.
chapter 6 This selects the Basic Fax Setup menu, then selects the Fax Header option. 3 Enter your personal or company name at the prompt. Use the guidelines provided in the next section under enter text. 4 Press Enter. 5 Enter your fax number using the numeric keypad. 6 Press Enter. enter text The following list provides tips for entering text using the front-panel keypad. • Press the keypad numbers that correspond to the letters of a name. ABC These letters correspond to this number, and so on.
use the fax features fax job menu The following options become available when the Fax button is pressed. Fax Number Resolution Enter Fax # or Speed Dial Fine Very Fine Photo Standard How to Fax Lighter/ Darker Send Fax Now Fax from Memory Send Fax Later Poll to Receive Set New Defaults No Yes Enter a fax number or speed dial. When the Fax button is pressed: Press and to move to the option you want. Press Enter to select the displayed setting.
chapter 6 30 hp officejet 4100 series
maintain your hp officejet 7 This section provides instructions for keeping your HP Officejet in top working condition. Perform these maintenance procedures as necessary. clean the glass Dirty glass, from dust, smudges, hair, and so on, slows down performance and affects the accuracy of features such as Fit to Page and Copy. 1 Turn off the unit, unplug the power cord, and raise the scanner lid. 2 Clean the glass with a soft cloth or sponge slightly moistened with a nonabrasive glass cleaner.
chapter 7 clean the white strip Minor debris can accumulate on the white strip located underneath the scanner’s lid. 1 Turn off the unit, unplug the power cord, and raise the scanner lid. 2 Clean the white strip with a soft cloth or sponge slightly moistened with a mild soap and warm water. 3 Wash the strip gently to loosen debris; do not scrub the strip. 4 Dry the strip with a chamois or soft cloth. Caution! Do not use paper-based wipes as these may scratch the strip.
maintain your hp officejet Ink nozzles under tape Copper contacts Plastic tape with pink tab (must be removed) Do not touch the copper contacts or the ink nozzles replace the print cartridges Front-panel messages appear to let you know that you should replace your print cartridges. See order print cartridges on the back cover for information on ordering replacement print cartridges. 1 Turn on the unit, then lift open the print cartridge access door. The print carriage moves into view.
chapter 7 Note: It is normal to see ink build-up in the print cartridge slots. 3 Remove the new print cartridge from its packaging and, being careful to touch only the bright pink plastic tab, gently remove the plastic tape to uncover the ink nozzles. Caution! Do not touch the copper contacts or ink nozzles. Once you have removed the plastic tape, install the print cartridge immediately to prevent the ink from drying in the nozzles.
maintain your hp officejet align the print cartridges The HP Officejet prompts you to align cartridges every time you install or replace a print cartridge. Aligning the cartridges ensures high-quality output. To align the print cartridges when prompted: 1 Press Enter on the front panel. An align cartridges (test pattern) page prints. 2 Load the align cartridges page face down in the ADF between the paperwidth guides and press the Enter button again. 3 Recycle or discard the page.
chapter 7 set scroll speed The Scroll Speed option lets you control the rate that text messages appear in the front-panel display. You can choose Normal, Fast, or Slow. The default is Normal. 1 Press Setup. 2 Press 5, then press 6. This selects Maintenance, and then selects Set Scroll Speed. 3 Press until the desired speed appears, then press Enter. set the prompt delay time The Prompt Delay option lets you control the amount of time before a message is displayed in the front-panel display.
maintain your hp officejet setup menu options The following options are available from the Setup button.
chapter 7 38 hp officejet 4100 series
additional setup information 8 During the installation of the HP Officejet software, a number of windows are displayed. You should see the following: • Installing • Copying files • A request to plug in the HP Officejet • Green OK and check mark • Request to restart your computer (may not occur in all cases) • Registration If you did not see all of these windows, there may be a problem with the installation.
chapter 8 On Windows, check the System Tray for applications that are running in the background and close them before restarting your computer. remove and reinstall your hp officejet software If six icons do not appear in the Director, you may need to uninstall and re-install the software. Do not simply delete the HP Officejet program files from your hard drive. Be sure to remove them properly using the uninstall utility provided in the HP Officejet program group.
additional setup information 3 Double-click on HP Uninstaller. 4 Follow the directions that appear on the screen. 5 After the program finishes removing the software, disconnect your HP Officejet, and restart your computer. 6 To reinstall the software, insert the HP Officejet 4100 Series CD-ROM into your computer’s CD-ROM drive. Note: When re-installing the software, follow the instructions on the Setup Poster.
chapter 8 additional troubleshooting help You may want to refer to the readme file for more information on possible installation problems. On Windows, you can access the readme file from the Start button on the taskbar; select Programs, Hewlett-Packard, hp officejet 4100 series, View the Readme File. On Macintosh, you can access the readme file by double-clicking on the icon located in the top-level folder of the HP Officejet software CD-ROM.
technical information 9 Additional specifications information can be found in the HP Photo & Imaging Help, in the hp officejet 4100 series section. physical specifications height width depth weight (without print cartridges) 8.25 in. (20.96 cm) 7.5 lbs (3.4 kg) 18.54 in. (47.09 cm) 7.5 lbs (3.4 kg) with paper trays and ADF closed 7.18 in. (18.24 cm) 16.76 in. (42.58 cm) with ADF and paper tray extended 10.30 in. (26.15 cm) 16.76 in. (42.
chapter 9 notice to all users of the European Economic Area (EEA) This product is designed to interwork with the analogue telephone networks in the following countries/regions: Germany UK Netherlands France Spain Italy Belgium Luxembourg Sweden Austria Denmark Ireland Norway Finland Switzerland Greece Portugal Network compatibility depends on customer selected settings, which must be reset to use the equipment on a telephone network in a country/region other than where the product was pur
hp support 10 This section explains the support services information provided by Hewlett-Packard. If you are unable to find the answer you need in the printed or onscreen documentation supplied with your product, you can contact one of the HP support services listed in the following pages. Some support services are available only in the U.S. and Canada, while others are available in many countries/regions worldwide.
chapter 10 U.S. phone support is available in both English and Spanish languages 24 hours a day, 7 days a week (days and hours of support may change without notice). call elsewhere in the world The numbers listed below are current as of the printing date of this guide. For a list of current international HP Support Service numbers, visit this address and choose your own country/region or language: www.hp.com/support For Korea, you can also visit this address: http://www.hp.co.
hp support country/region hp technical support country/region hp technical support Denmark +45 39 29 4099 Russian Federation, Moscow +7 095 797 3520 Ecuador 1800-711-2884 Russian Federation, St. Petersburg +7 812 346 7997 Europe (English) +44 (0) 207 512 5202 Saudi Arabia +800 897 14440 Egypt 02 532 5222 Singapore 65 6272 5300 Finland +358 (0) 203 47 288 Slovakia +421 (0) 2 682 08080 France (0.34 Euro/min.) +0892 69 60 22 South Africa (inside RSA) 086 000 1030 Germany (0.
chapter 10 Note: When transporting your HP Officejet, make sure that the pens have been removed, the HP Officejet has been properly shut down by pressing the power button, and you have allowed time for the carriage to return to the service station and for the scanner to return to its parked position. 1 Turn on the unit. Disregard steps 1 through 6, if your unit will not turn on and the print carriage is in the home position. You will not be able to remove the print cartridges. Proceed to step 7.
hp support 10 Place the return shipping label on the outside of the box. 11 Include the following items in the box: – A complete description of symptoms for service personnel (samples of print quality problems are helpful). – A copy of the sales slip or other proof of purchase to establish the warranty coverage period. – Your name, address, and a phone number where you can be reached during the day.
chapter 10 50 hp officejet 4100 series
11 warranty information HP Officejet 4100 series Duration of Limited Warranty (hardware and labor): 1 Year Duration of Limited Warranty (CD media): 90 Days Duration of Limited Warranty (print cartridges): Until the HP ink is depleted or the “end of warranty” date printed on the cartridge has been reached, whichever occurs first.
chapter 11 For each software Product, HP’s limited warranty applies only to a failure to execute programming instructions. HP does not warrant that the operation of any Product shall be uninterrupted or error free.
warranty information To the extent this Limited Warranty Statement is inconsistent with local law, this Statement shall be deemed modified to be consistent with such local law. Under such local law, certain disclaimers and limitations of this Statement may not apply to the Customer.
chapter 11 54 hp officejet 4100 series
index Numerics 4-by-6 inch photo paper load, 10, 12 A speed, 13 tutorial, 4 Customer Support, 45 web site, 45 ADF, 7 adjust volume for fax, 25 align print cartridges, 35 Answer Ring Pattern, 26 automatic document feeder, 7 automatic reduction fax, 25 D B E best copy quality, 13 busy number redial automatically, 23 enhance copies, 14 enlarge copy, 14, 16 envelopes load, 9 Error Correction Mode (ECM), 25 C cancel scan, 18 scheduled fax, 21 cartridges align, 35 replace, 33 clean print cartridges, 35
index K keypad enter text, 28 L labels load, 12 lighten copies, 14 load change the paper type, 12 envelopes, 9 original in ADF, 7 paper, 7 photo paper, 10, 12 postcards, 10, 12 print cartridges, 33 set the paper size, 12 tips, 11 M maintenance align print cartridges, 35 clean print cartridges, 35 clean the exterior, 32 clean the glass, 31 clean the white strip, 32 normal sounds, 36 replace print cartridges, 33 restore factory defaults, 35 self-maintenance sounds, 36 self-test report, 32 menus copy option
index setting, 27 transparency film recommended, 7 tips on loading, 11 troubleshooting remove and reinstall software, 40 T-shirt Transfer Iron-On load, 11 tutorial reference guide front panel, 3 make a copy, 4 U unanswered number redial automatically, 23 V W warranty, 45 service, 51 statement, 51 upgrades, 51 white strip cleaning, 32 volume adjust, 25 57
chapter 12 58 hp officejet 4100 series
declaration of conformity According to ISO/IEC Guide 22 and EN 45014 Manufacturer’s Name and Address: Hewlett-Packard Company, 16399 West Bernardo Drive, San Diego, CA 92127-1899, USA declares that the product Product Name: hp officejet 4100 series (Q1608A) Model Number(s): officejet 4110 (Q1609A), officejet 4110xi (Q1610A), officejet 4110v (Q1611A), officejet 4105 (Q1612A), officejet 4105z (Q1613A), officejet 4115 (Q1614A) Product Options: All conforms to the following Product Specifications: Safety:
order media To order media such as HP Premium Inkjet Paper, HP Premium Inkjet Transparency Film, HP Iron-On T-shirt Transfer paper, or HP Greeting Cards, go to www.hpshopping.com For orders in countries other than the U.S. and Canada, select other countries, then click Yes to leave hpshopping.com. From this website, you can access hpshopping.com for your specific language or country/ region.