
Configuring Systems for Terminals, Printers, and Other Serial Devices (32022-90057)


Automatic Configuration of DTCs
Performing an Automatic Configuration Inside NMMGR
Chapter 3
50
Step 3: Complete Automatic configuration
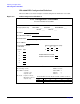
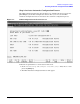
The DTC Automatic Configuration Screen appears (Figur e3-2).
Figure 3-2 The DTC Automatic Configuration Screen
Follow the steps listed here.
1. Make sure that the power for the DTC that you want to automatically add and
configure is turned on.
2. Enter the LAN address of the DTC to be configured in the “DTC LAN station
address” field. The LAN address can be found on a label inside the front cover or on
the back panel of the actual DTC box. Note that the LAN address is different from
the IP address which is discussed in step 4 below.
3. (Optional) Enter the DTC node name in the format node.domain.organization in the
“DTC node name” field. If you leave this field blank, a default DTC node name will
be created. The default node name created will be DTCxxxx.domain.organization,
where xxxx are the last four digits of the DTC’s LAN address and
domain.organization are taken from the host's node name.
4. (Optional) Enter the DTC IP address in the “DTC IP Address” field. The IP address
is used if your HP e3000 is configured as part of a network and you want the DTC to
be able to respond to PING/iX requests.
5. Press the
[Auto Config]
function key to invoke DTCCNTRL and start the automatic
configuration process.