
Configuring and Managing MPE/iX Internet Services (August 2002)


Chapter 7
Samba for MPE/iX Services
Starting and Stopping Samba for MPE/iX
101
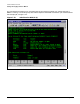
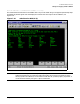
How to use SWAT:
To use the SWAT interface, just point and click on any of the options on the front page
banner. The following are the brief descriptions of what each link in the banner stands for:
Home Samba help and documentation page
Globals Link to global variable and configuration options
Shares This link allows you to select the available shares for configuration or lets
you create/delete shares from the record.
Printers This link makes it possible to choose existing printers from the printers
section of smb.conf file and change the configuration for each one of them.
Status The status of the Server can be polled by clicking on this link, smbd and
nmbd running status can also be checked. In addition, information on
active connections, active share and active files that are open can be
retrieved, allowing easy monitoring of server usage.
View This link gives an abbreviated view of the smb.conf file. A full view can
also be obtained by clicking on the “Full View” button.
Starting and Stopping Samba for MPE/iX
This section covers the steps to start or stop Samba for MPE/iX.
Starting Samba for MPE/iX
Before you start to run Samba for MPE/iX server or client components, you should have set up the TCP/IP
networking on your HP e3000 system as well as your PC. On the HP e3000 system, you should have a proper
IP address and subnet mask configured in NMMGR as well as NETCONTROL START successfully executed. You
must choose to start SMBD and NMBD either as listener jobs or under control of INETD.
Disable Resource Sharing
If your system has NBDAEMON.PUB.HPLANMGR running, then SMBD and NMBD will not be able to use ports
137 and 139 as NBDAEMON already binds to them. The workaround solution is to stop the PDSERVER
process. The NBMON and NBDAEMON processes will not start because of this workaround. This can be done
by modifying the file PDSSERV.NET.SYS by changing the line 7 from 1 to 0. This will set up PDSSERVE for
non-reserved servers.
The following shows the steps of making non-reserved servers:
1. Modify the file PDSSERV.NET.SYS and change the line 7 from 1 to 0.
2. Shutdown the network.
3. Stream JCONFJOB.NET.SYS.
4. Start the network backup.
5. The command nscontrol status=services should show non-reserved PDSERVERs.