
Configuring and Managing Host-Based X.25 Links - Edition 6 (36939-90057)


Configuring X.25 Links Step-by-Step
Modify the Network Management Configuration File
Chapter 6
143
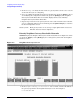
press the
[Go To]
key. That brings you to the X.25 SVC Address Key Paths screen
where you can then remove the default name POOL by typing over it with spaces and
then saving the data.
4. If the address type is a switched virtual circuit, complete steps a through c, but if the
address type is a permanent virtual circuit, skip to step 5.
a. In the Remote X.25 address field, enter the X.25 address of the remote host for
X.25 public data networks or private networks.
b. Make sure the name of the facility set you are using is in the Facility set field.
You may either choose the default facility set (STDSFSET) or enter an alternative.
If you are configuring a new facility set, enter a new name. (To modify facility set
parameters, enter a 5 in the last field on the screen and press the
[Go To]
key.)
c. In the Security class field, enter the level of logical security you want to have
on this particular entry. The possible values are IN (accept calls from the
address), IO (accept calls from and send calls to the address, default), OU (send
calls to the address, incoming calls are rejected), and LK (block calls to or from
the address).
5. If the address type is a permanent virtual circuit (PVC), in the Permanent VC
number field, enter the PVC number of the PVC on the remote node. This value
cannot be greater than the number of PVCs for which you are subscribed. It must be
within the PVC range you defined during DTC configuration.
6. After you have finished entering new information for each remote node, press the
[Save Data]
key. (Press the key once for each remote node you are configuring.)
7. If you have completed configuration of X.25 iX System Access, press the
[Validate
Netxport]
key. Otherwise, press the
[Prior Screen]
key to return to the X.25
Configuration screen.
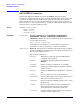
Fields Network directory name The network directory file that will be updated by the
information entered through this screen.
Remote node name You must enter the remote node name of each X.25 node into the
network directory. Include entries for all remote nodes and, if you want
to be able to perform loopback, the local HP 3000 node as well.
Remote IP address Also in the network directory, you must enter the IP Address of
each node whose identity you have entered into the network directory.
For the format of this parameter, see the information in the “Fields”
section under “X.25 Configuration.”
Address key The X.25 address key is the name of a remote node with which your
local node will be communicating. Hewlett-Packard recommends that
you make the name be the node portion of the remote node’s name
(where its full name is
node.domain.organization
). You must
configure an X.25 address key for each remote node with which your
node will be communicating. You have a combined maximum of 1024
X.25 address keys in the SVC and PVC path tables. The X.25 address
key name must be eight characters or less and the first character must
be alphabetic. A default address key called POOL allows any system to
access the local system even if the remote system's address is not
configured. POOL can also be used when level 3 programmatic access
(NetIPC) provides an X.25 address.