
Using VPLUS: An Introduction to Forms Design (32209-90004)


2-13
_______________________________________________________________
| |
| :
RUN ENTRY.PUB.SYS |
| |
| HP32209v.uu.ff ENTRY (C) HEWLETT-PACKARD CO. 1986 |
| |
| ENTER FORMS FILE NAME AND PRESS RETURN:
ORDFORM1 |
| ENTER BATCH FILE NAME AND PRESS RETURN:
CUSTLIST |
_______________________________________________________________
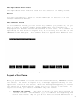
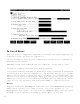
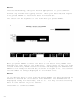
Figure 2-10. Run ENTRY and the SHIPTO Form, Ready for Record No. 1
Run Entry and Display Form
Once the forms file is compiled, you can enter data into any form in that
file through ENTRY. Run ENTRY as shown in Figure 2-10. When the RUN
command is accepted, ENTRY displays two prompts, as shown. The first
requests the forms file name and the second asks for the name of the
batch file. The batch file is the file to which the entered data is
written.
Action
In response to the forms file prompt, type the name ORDFORM1 since this
is the name of your compiled forms file. Then in response to the batch
file prompt, for this exercise identify the batch file by the name
CUSTLIST.
In general, the file names you use with ENTRY can be any valid MPE file
name, meaning a name of up to eight characters that starts with a letter
of the alphabet. The file name can be qualified by your
groupname
and
acctname
. Thus, if your group is MASTER and your account is ORDERS, the
names could be entered as:
ORDFORM1.MASTER.ORDERS
CUSTLIST.MASTER.ORDERS
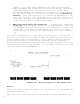
Once you have answered the two prompts, ENTRY opens the forms file
ORDFORM1 and creates a new batch file with the name CUSTLIST. Then ENTRY
clears the screen and displays the first form in the forms file. In this
case, only one form was defined, the SHIPTO form, as shown in Figure
2-10.
You should see the cursor (the blinking underline) indicating the
position where you can type in a character. The cursor is positioned to
the first unprotected field into which you can enter data. Notice that
all the fields are displayed by ENTRY in inverse video, which is the
default field enhancement specified by FORMSPEC.