Using VPLUS An Intro to Forms Design Self-Paced Training Guide HP 3000 MPE/iX Computer Systems Edition 3 Manufacturing Part Number: 32209-90004 E0886 U.S.A.
Notice The information contained in this document is subject to change without notice. Hewlett-Packard makes no warranty of any kind with regard to this material, including, but not limited to, the implied warranties of merchantability or fitness for a particular purpose. Hewlett-Packard shall not be liable for errors contained herein or for direct, indirect, special, incidental or consequential damages in connection with the furnishing or use of this material.
PRINTING HISTORY New editions are complete revisions of the manual. Update packages, which are issued between editions, contain additional and replacement pages to be merged into the manual by the customer. The dates on the title page change only when a new edition or a new update is published. No information is incorporated into a reprinting unless it appears as a prior update; the edition does not change when an update is incorporated.
PREFACE The Using VPLUS/V: An Introduction to Forms Design self-paced training guide is intended to show you how to design forms. The Guide is useful on several levels. Its primary use is as a self-teaching tool to designing forms with FORMSPEC and then entering data in these forms through ENTRY. It can also be used as a guide to using particular features of either FORMSPEC or ENTRY. You should be familiar with the HP 3000 in order to use this guide.
CONVENTIONS USED IN THIS MANUAL NOTATION nonitalics DESCRIPTION Words in syntax statements which are not in italics must be entered exactly as shown. Punctuation characters other than brackets, braces and ellipses must also be entered exactly as shown. For example: EXIT; italics Words in syntax statements which are in italics denote a parameter which must be replaced by a user-supplied variable. For example: CLOSE filename [ ] An element inside brackets in a syntax statement is optional.
Brackets, braces or ellipses appearing in syntax or format statements which must be entered as shown will be underlined. For example: LET var [[subscript] ] = value Output and input/output parameters are underlined. A notation in the description of each parameter distinguishes input/output from output parameters. For example: CREATE (parm1,parm2,flags,error ) shading Shading represents inverse video on the terminal's screen. In addition, it is used to emphasize key portions of an example.
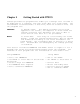
Chapter 1 Getting Started with VPLUS VPLUS/V provides two programs that enable you to design a set of forms to be displayed at a terminal, and then enter data into these forms. The entered data is transferred to a disc file, known as the batch file. The two programs are: FORMSPEC ENTRY To design forms. The design includes how the form appears on the screen, the sequence in which forms are issued, and rules that determine the type of data to enter and how that data is to be processed. To enter data.
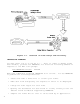
Figure 1-1. Overview of Forms Design and Data Entry INTRODUCING FORMSPEC You must first log on to the HP 3000. Then, in order to design forms with VPLUS/V, you must run FORMSPEC. You enter the following command in response to the MPE colon prompt: :RUN FORMSPEC.PUB.SYS RETURN When this command is accepted, FORMSPEC is in control. to perform the following functions: 1-2 You use FORMSPEC * Create and name a forms file to contain your forms.
Block Mode FORMSPEC operates in block mode. In block mode, all data typed in unprotected areas on the screen is sent to FORMSPEC at one time when you press ENTER, rather than line-by-line as with RETURN. FORMSPEC issues "menu" screens on which you type any necessary information into "unprotected" areas of the screen. (Unprotected areas are highlighted.) You move to the start of each successive field by pressing TAB.
Menu Sequence The menus issued by FORMSPEC have a basic sequence that can, however, be varied through use of the function keys PREV FORM or NEXT FORM, PREV or NEXT, and the MAIN/RESUME key. In addition, the Main Menu provides great flexibility in selecting what you want to do, whether it is adding a form, modifying an existing form, or changing the characteristics of all the forms in the file, called globals. Figure 1-3 illustrates the basic FORMSPEC menu sequence.
Figure 1-3. Menu Sequence in FORMSPEC INTRODUCING ENTRY In order to enter data into a set of forms, you run ENTRY. The forms must be in a forms file designed through FORMSPEC.
:RUN ENTRY.PUB.SYS RETURN When the operating system accepts this command, ENTRY is in control. You use ENTRY to perform the following data entry functions: * Name the forms file containing the forms to be displayed. * Create a batch file to contain the entered data or access an existing batch file. * Enter data on the displayed forms, correct any errors detected by ENTRY. Valid data is written to records in the batch file. * Look at the data written to the batch file records.
tions for ENTRY. These functions differ slightly depending on whether you are operating in browse/modify or data collection mode. The function keys are illustrated in the following diagrams, Figure 1-4 for data collection and Figure 1-5 for browse/modify mode. . Figure 1-4. Function Key Labels for ENTRY in Collect Mode The ENTRY labels and their functions are: HEAD FORM Press to display the first form (as defined in FORMSPEC). PRINT Press to print current form on line printer.
REFRESH Press to clear corrections from current record. PREV REC Press to display previous record. NEXT REC Press to display the next record. If the record already displayed is the last record, a message is displayed that states there are no more batch records. COLLECT Press to return to Data Collection mode. EXIT Press to exit from ENTRY. Terminating ENTRY You can terminate ENTRY and return to MPE control at any time by pressing EXIT.
Chapter 2 Design and Use a Simple Form Section 1 introduced you to FORMSPEC and ENTRY. In this and the following sections, you will use both programs to create a simple data entry application. In the process, you will come to understand and be familiar with the features and capabilities of both FORMSPEC and ENTRY. Throughout the exercises in this guide, you will see the menu or form under discussion displayed on the left page and the accompanying discussion on the right.
Run Formspec The first step in forms design is to decide on the layout of the form or forms that you need for your application. You may have an established form or you may be starting from scratch. In any case, you generally need a rough draft of the forms to be created as the first step in forms design with FORMSPEC. However, in this guide this first step is taken for you. A simple form is provided in this section; increasingly complex edits and additional forms are provided in later sections.
of which the first must be alphabetic. FORMSPEC accepts a fully qualified file name, which can include the group and account in which the file is stored, as well as any lockwords assigned for security. Syntax filename {/lockword ][.groupname [.acctname ]] With up to eight characters per name, and the three separators (slash and periods) you can see that if you specify the fully qualified file name, it can take up to 36 characters. This is why the field for the forms file name is so long.
Figure 2-3. The Main Menu Select the ADD Option After you type in the file name and press ENTER twice, FORMSPEC creates the forms file. FORMSPEC then displays the next menu in the menu sequence, the Main Menu, shown in Figure 2-3. Action In general, after you create a forms file the first option you select is to add a form. You specify add a form by typing the letter A in the Main Menu selection box, as shown in Figure 2-3. Press ENTER.
Figure 2-4. The Form Menu for the SHIPTO Form Defining the New Form Once you select the add option at the Main Menu and press ENTER, FORMSPEC displays a Form Menu, as shown in Figure 2-4. On the Form Menu, you specify the characteristics of the form, which are the form name, the form sequencing options, whether the form is reproduced from another form, and a comment, if desired.
beginning of the comment field and type in the comment. Match the comment shown in Figure 2-4 or make up your own comment. Press ENTER to record the form characteristics for the SHIPTO form. Topic: Form Menu Fields The next step is to actually layout the new form on the blank menu that FORMSPEC displays for this purpose. But before doing so, read the following descriptions of the fields displayed on all Form Menus.
The Reproduced From Field The Reproduced From field is used for the creation of family forms. Action For more information, refer to "Form Families" in Section 3 of the VPLUS/V Reference Manual. The Comments Field In the Comments field, you can enter any comment you please or, if you want to leave it blank, simply press ENTER when the Form Menu is displayed--all default values are assumed in this case.
appear on the form, press ESCAPE before typing each bracket. Combining ESCAPE and [ indicates the start of a field. Similarly, combining ESCAPE and ] indicates the end of a field. When preceded by ESCAPE, the brackets do not appear on the form and do not take up any room; for this reason they are called nonprinting brackets. With either printing or nonprinting brackets, you can fill the field with dots (periods) so you can see the extent of the field.
printing brackets. Within these brackets, a field tag names each field. For example, ordate identifies the field into which a date is entered, and name identifies the field into which the customer name is entered. The other field tags are address, city, st, zip, and phone. These tags never appear when the form is displayed. All the other text, which consists of the title and the labels on the fields, will be displayed exactly as it is typed on the screen during form layout. Table 2-1.
Figure 2-7. The Field Menu for the Date Field Using the Default Field Edits Once you press ENTER to record the new form, the next menu displayed by FORMSPEC is the Field Menu for the first field in the form. In this exercise, it is the Field Menu for ORDATE, as shown in Figure 2-7. FORMSPEC displays a Field Menu for each field identified on the form. These menus are displayed in a sequence, called screen order, based on the order the fields appear on the form, counting from left to right, top to bottom.
Since you are using all default values for the fields in the SHIPTO form, the form is now completely defined. Press MAIN/RESUME to go to the Main Menu. Figure 2-8. The Main Menu Compile the Forms File Before the SHIPTO form can be used for data entry, the forms file ORDFORM1 must be compiled. The process of compilation changes the form and field definitions into machine-readable form so that the forms file can be used for data entry.
Figure 2-9. The Main Menu In Case of Errors When the file is completely compiled, the window line again displays the forms file name, as shown in Figure 2-9. If you attempt to exit without compiling the forms file, a message is displayed that states: WARNING: Forms file modified and not compiled. Press EXIT to exit. Be sure to compile the forms file before exiting. If you have made any mistakes in defining a form, a message is displayed in the window line during compilation.
_______________________________________________________________ | | | | :RUN ENTRY.PUB.SYS | | | HP32209v.uu.ff ENTRY (C) HEWLETT-PACKARD CO. 1986 | | | | | ENTER FORMS FILE NAME AND PRESS RETURN: ORDFORM1 | | ENTER BATCH FILE NAME AND PRESS RETURN: CUSTLIST _______________________________________________________________ Figure 2-10. Run ENTRY and the SHIPTO Form, Ready for Record No. 1 Run Entry and Display Form Once the forms file is compiled, you can enter data into any form in that file through ENTRY.
Figure 2-11. The SHIPTO Form, Record No. 1 with a Typing Error Enter Data Action Type in the date September 22, 1986, as shown in Figure 2-11. Since the date fills the field, the cursor is positioned to the beginning of the next unprotected field, the Name field. Note that if data does not fill a field, you must press TAB to move the cursor to the next field. Action Continue typing in data until each field contains a value, as shown in Figure 2-11. Press TAB to move to each field.
Figure 2-12. Corrected SHIPTO Form, Record No. 1 Correct Typing Errors Before you can correct a typing error, such as the misspelling shown in Figure 2-12, you must position the cursor at the field to be corrected. If the cursor is above the field, where "above" means closer to the top of the terminal screen than the field to be corrected, then you simply press TAB until the cursor is at the desired field.
Action Practice backtabing, using the method appropriate to your terminal. Correct any fields with typing errors. When your data matches Figure 2-12, press ENTER to record the data for Record #1. The cursor can be anywhere on the form when you press ENTER. Figure 2-13. The SHIPTO Form, Ready for Record No. 2 Once you press ENTER to write the data to the batch file, ENTRY then displays the next form in the forms file.
Chapter 3 Simple Editing The ORDFORM1 forms file, as it is currently designed (refer to Section 2), accepts any data entered by the user or allows the user to leave all fields blank. This section shows how to modify the forms file to add simple field type and data type edits that cause standard checks to be performed on entered data. For the user, this section shows how to correct errors detected by ENTRY and also shows how to browse through the data records entered in the batch file.
file request to FORMSPEC. Figure 3-2. The Main Menu Select the GO TO FORM Option FORMSPEC opens the ORDFORM1 forms file and issues the Main Menu, as shown in Figure 3-2. Notice that the name of the open forms file (ORDFORM1) is shown in the window line after the FORMS FILE: heading. Action Type G in the selection box to indicate that you want to "Go To" one of the three choices listed. Since you need to modify the SHIPTO form, you type the name of the form (SHIPTO) in the Go to form field. Press ENTER.
Figure 3-3. The Form Menu Change Form Name Since you selected to go to the SHIPTO form at the Main Menu, when you press ENTER FORMSPEC issues the Form Menu for the SHIPTO form, which is a duplicate of the form shown earlier as Figure 2-4. Since the SHIPTO form is to be changed significantly in this section by the addition of order information, change the form name to ORDER. Action Type ORDER in the Form Name field, as shown in Figure 3-3. changes are needed. Press ENTER.
Figure 3-4. The Form Layout for the ORDER Form Add New Fields FORMSPEC displays the Form Layout Menu for the ORDER form (which was called SHIPTO), as shown in Figure 3-4. Once a form is displayed, you can change the placement, name or size of any existing fields, or the header information and text on the form. Action For this exercise, you add six new fields to the ORDER form; the lengths and positions of the new fields are defined in Table 3-1. Table 3-1.
Figure 3-5. The Form Layout for the ORDER Form Use Non-Printing Delimiters The result is an order number field at the top of the form and five fields of order information at the bottom, as shown in Figure 3-5. Action In order to fit these five new fields on a single line, you need to use nonprinting delimiters, which are created by pressing ESCAPE and then [ to indicate the start-of-field; pressing ESCAPE followed by ] to indicate the end-of-field.
Action Using the terminal field edit and cursor control keys changes the existing form to look like Figure 3-5. When the form is complete, press ENTER. The new fields are recorded as part of the ORDER form in the ORDFORM1 forms file. Remember that this form cannot be used by ENTRY until the forms file is recompiled. Figure 3-6.
the field tag entered during form layout can be any combination of upper or lower case letters, such as ordnum. The uppercase name, ORDNUM, is the name by which the field is identified on the Field Menu, as shown in Figure 3-6. If you want, you can change the field name to another all uppercase field name. You may want to do so for several reasons.
any letters outside the field delimiters. Both upper and lowercase letters are allowed during form layout so that you can have up to 52 one-character fields. In the current example, the field tag ordate was shifted up to become the official field name ORDATE. The Field Enhancement Field The field enhancement indicates how the field looks when ENTRY displays the form.
Figure 3-7. The Field Menu for the Order Number Field Specify Field Type and Initial Value Action Since you want to make sure the user always enters an order number, change the field type from O for optional to R for required on the Field Menu for ORDNUM. This makes it impossible for the user to leave the order number blank when ENTRY displays the ORDER form. Action Let's say that the order number must always be a number with a value of at least 100000.
Table 3-2. Simple Field Edits for the ORDER Form ----------------------------------------------------------------------------------------| | | | | Field | Name | Simple Edit | | | | | ----------------------------------------------------------------------------------------| | | | | Order Number | ORDNUM | Change Field Type (FType) to R for required. | | | | | | | | Add Initial Value of 100000.
Specify Field Edits When you press ENTER to record the field type specification on the Field Menu for ORDNUM, FORMSPEC issues the next sequential Field Menu, which is the one for ORDATE. The menu for the ORDATE field also has only default specifications. Figure 3-8 The Field Menu for the Order Number Action Change the field type to R for required and change the data type to MDY. When a date is specified as MDY, this means the user must enter a valid date in the order: Month Day Year.
Figure 3-9 The Field Menu for NAME Action Let's keep the default values for the name, address, and phone number fields, meaning they are all to be optional and, if specified, to have any characters. To do this, just skip these fields by pressing NEXT at each menu until the Field Menu for QTY is issued. Figure 3-10.
The QTY field is the first field in the shown in Figure 3-10. This field should and the quantity should be entered as a unsigned number, consisting only of the field, use the data type DIG. line of order information, as always be specified by the user number. To insure that an digits 0-9, is entered in this Action Change the field type to R for required and change the data type to DIG. Press ENTER to record the changes. Figure 3-11.
Figure 3-12. The Field Menu for the Description Field Action Change the Field Menu for PARTNUM to a required field, as shown in Figure 3-11. Press ENTER to record the change. This means that the user must enter a part number. Action When the Field Menu for DESCRIPTION is displayed, as shown in Figure 3-12, press NEXT. This keeps the defaults, which specify that the field is optional and able to accept any characters.
Figure 3-13. The Field Menu for the Unit Price Field Figure 3-14. The Field Menu for the Total Price Field The next two fields are UPRICE, as shown in Figure 3-13, and TPRICE, as shown in Figure 3-14. The user needs to enter prices into these fields.
Action Change the field type of each field to R for required and change the data type of each field to NUM2. Press ENTER for each Field Menu to record these changes. These are all the changes to be made in this section. Action Press MAIN/RESUME to return to the Main Menu. Figure 3-15. The Main Menu Action Type X in the selection box, as shown in Figure 3-15. Press ENTER to compile ORDFORM1. When the compile is complete, press EXIT to exit FORMSPEC.
Table 3-8.
_________________________________________________________________ | | | | :RUN ENTRY.PUB.SYS | | | HP32209v.uu.ff ENTRY (C) HEWLETT-PACKARD CO. 1986 | | | | | ENTER FORMS FILE NAME AND PRESS RETURN: ORDFORM1 | | ENTER BATCH FILE NAME AND PRESS RETURN: ORDATA _________________________________________________________________ Figure 3-16. Run ENTRY and the ORDER Form, Batch Record No.
Figure 3-17. The ORDER Form, Batch Record No. 1 Change Initial Value You can change the initial value by typing a new value over the value that appears in the field. However, it is more likely that you need to change only the last two or three digits of this value. To do this, use a cursor control key to place the cursor under the first digit you want to change and then type in the new characters. Action Change the order number to 100001 by changing the last digit to 1, as shown in Figure 3-17.
Figure 3-18. The ORDER Form, Batch Record No. 1 with Errors Error Handling Action Type data in the form, as shown in Figure 3-18. Press ENTER. ENTRY does not accept the data and issues the message shown in the window line, which is used for error as well as status messages. The reason for the error message is that the date is in DMY order, rather than in MDY order. Since the field is defined as an MDY type, the month must precede the day of the month.
Figure 3-19. The ORDER Form, Batch Record No. 1 Multiple Errors The data is still not accepted, as shown in Figure 3-19, because a value for the Quantity field is omitted. This is not allowed because the field was defined as a required field. Note that the field is underlined and full bright to let you know that it is in error. Action Enter the value 2 in the Quantity field. Press ENTER.
error. If so, correct the errors and press ENTER. Figure 3-20. The ORDER Form, Batch Record No. 2 Enter Data This time the data is accepted, and Record #1 is written to the batch file ORDATA. The ORDER form is displayed, ready for Record #2, as shown in Figure 3-20. Note that all fields are blank, except for the Order Number field that contains the initial value 100000. Action Continue to enter data in this form until there are four records in the batch file ORDATA.
Figure 3-21. The ORDER Form, Batch Record No. 1 Change to Browse Mode If you want to look at the data entered so far in the batch file, you use the Browse mode available with ENTRY. Action Press BROWSE. This key places ENTRY in "Browse/Modify" mode. In order to examine the data in the entire file, you start with the first record and step through the records in the batch file in the sequence in which they were entered. Action Press FIRST REC.
Figure 3-22. The ORDER Form, Batch Record No. 2 Browse the Records Action To look at the next record, press NEXT REC. Record #2 is displayed, such as the example in Figure 3-22. Your Record #2 contains the data you invented and entered earlier in this exercise. Action Continue pressing NEXT REC until all the records in the file have been displayed. When there are no more records, ENTRY displays the following message in the window line: There are no more batch records.
Figure 3-23. The ORDER Form, Batch Record No. 5 Return to Collect Mode Now, you are ready to return to Collect mode and continue data collection. Action Press COLLECT. Assuming Record #4 is the last record in the file, the form with only initial values is displayed so you can continue entering data into Record #5, as shown in Figure 3-23. Remember, the mode in which ENTRY is currently operating is always displayed in the window line.
press EXIT. When you press EXIT in either mode, ENTRY terminates and returns you to MPE. The next time you run ENTRY with the same batch file (assuming you have not recompiled the forms file) you enter data into the record following the last record in the file.
Chapter 4 Full Field Edits This section introduces the simple programming language provided by FORMSPEC, called processing specifications. This language includes edit statements that are used for full field editing, the subject of this section. It also includes other types of statements that are used for more advanced processing, as you will learn in later sections. The edit statements consist of a statement name followed by one or more parameters.
Figure 4-1. The Forms File Menu Run FORMSPEC The overall form layout and specification of the ORDER form is not changed. However, field edits need to be added to several fields in the form. Action Issue the RUN command, as shown in Figure 4-1. Press RETURN. Specify the forms file (ORDFORM1) on the Forms File Menu, also shown in Figure 4-1. Press ENTER.
Figure 4-2. The Main Menu, Selecting Go To Field Select GO TO FIELD Option When you press ENTER at the Forms File Menu, the Main Menu is issued. Since there are no changes to the Form Menu or to the form layout, you can go directly to the first Field Menu to which an edit is to be added. Suppose this Field Menu is for the date field. Action Type G in the selection box, the form name ORDER in the form name box, and the field name ORDATE in the field box (shown in Figure 4-2). Press ENTER.
Figure 4-3. The Field Menu for ORDATE in the ORDER Form The Field Toggle When you press ENTER, FORMSPEC displays the Field Menu for ORDATE, as shown in Figure 4-3. All the field edits described in this section, as well as the advanced processing specifications described in later sections, are entered in the area of the Field Menu below the heading: *** Processing Specifications *** (The processing specifications are statements whose syntax is fully described in the VPLUS/V Reference Manual.
particular fields that are unprotected. You can now enter any edit (or processing) statements that apply to the current field. If you are in the lower, processing specification, part of the menu and want to change an attribute of the upper part, you should always press FIELD TOGGLE to return to the upper part and then make your change.
Table 4-1. Comparison Editing Statements ---------------------------------------------------------------------| | | Statement | Meaning | | ---------------------------------------------------------------------| | | EQ | is equal to | | | NE | is not equal to | | | LT | is less than | | | GT | is greater than | | | LE | is less than or equal to | | | GE | is greater than or equal to | | ---------------------------------------------------------------------- | | | | | | | | | | | | | | | | Range Check.
Pattern Check. Another edit statement checks an entered value against a pattern, which indicates the type of character that can be entered as well as the exact character. The key word MATCH indicates that the value is to be matched against the pattern. For example, you can specify that a value start with any uppercase letter followed by three digits, a hyphen, and two more digits with the following pattern: MATCH uddd-dd Allows A123-56 or C009-10 and so forth.
Figure 4-4. The Field Menu for ORDATE in the ORDER Form Use Single Value Comparisons Now that you understand how to use the FIELD TOGGLE, lets add some processing specifications to the field. The first type of field edit you will use is a single value comparison. Action Press FIELD TOGGLE. Type the field edit statement EQ $TODAY in the lower menu, as shown in Figure 4-4. Press ENTER. The statement EQ $TODAY is one possible comparison. It means that the data entered in the field must be today's date.
Figure 4-5. Field Menu for QTY in the ORDER Form Single value comparisons can also be used for other fields of the form. If you want to ensure that the number of parts ordered is one or more, you use the GE statement to test that the data entered is greater than or equal to one. Action Use NEXT to display Field Menus until the Field Menu for QTY is displayed. Press FIELD TOGGLE. Type GE 1 in the lower menu, as shown in Figure 4-5. Press ENTER.
Syntax of the FORMSPEC Edit Statements MINLEN value {GT} {LT} {GE} {LE} value {EQ} {NE} ["errormsg "] ["errormsg "] } {IN } {value [,value ]... {NIN} {lowvalue:highvalue [,lowvalue:highvalue ]...} ["errormsg "] } {value [,lowvalue:highvalue ]... MATCH pattern ["errormsg "] The Value Parameter Values used in comparisons may be constants, field names, or expressions. Examples of these are: constants Includes values such as "JONES", 123.
Expressions. Expressions can be formed only with numeric and can only use the operators shown in Table 4-3. Table 4-3.
The Error Message Parameter A custom message is any series of up to 80 characters enclosed within quotation marks. The message should follow the field edit statement, either on the same line or a following line, and must precede any subsequent processing statements. Figure 4-6. Field Menu for STATE in the ORDER Form Use a Table Check Action Use PREV to return to the Field Menu for ST; then use FIELD TOGGLE to go to the processing specification area. Type IN $STATE, as shown in Figure 4-6. Press ENTER.
Figure 4-7. Field Menu for ZIP in the ORDER Form Use Pattern Matches Now you should be at the Field Menu for the field, ZIP. Action Press FIELD TOGGLE. Type MATCH ddddd[-dddd] in the lower menu, as shown in Figure 4-7. Press ENTER. Here you use a pattern match to make sure that any entered zip code is five digits with, optionally, four more digits with a hyphen between the fifth and sixth digit.
Figure 4-8. Field Menu for PHONE in the ORDER Form A good illustration that uses some of the pattern characters is the match pattern for a telephone number. Action Press FIELD TOGGLE. Type MATCH [(ddd)]b*ddd-dddd in the lower menu, as shown in Figure 4-8. Press ENTER. The brackets surrounding the area code allow it to be omitted. The asterisk (*) after the letter b allows zero spaces or as many as you want. Table 4-5 illustrates some other examples of pattern choices. Table 4-5.
Figure 4-9. Field Menu for PARTNUM in the ORDER Form When you press ENTER at the Field Menu for PHONE, the Field Menu for QTY, which was shown earlier in Figure 4-5, is displayed on your terminal screen. Action Press NEXT to display the Field Menu for PARTNUM. A part number also provides a good example of how to use a pattern match. Action Press FIELD TOGGLE. Type MATCH Puddd-??? Figure 4-9. Press ENTER.
Figure 4-10. Field Menu for ORDATE in the ORDER Form CUSTOM ERROR MESSAGES Whenever you specify a field edit, you should also provide a custom error message to be issued by ENTRY when an entered value fails the field edit. Otherwise, if a field fails the edit, a standard VPLUS/V message is issued. Since the standard messages cannot be informative for a particular edit, each field edit should have a message that tells the user exactly why the entered value is incorrect.
The message is displayed by ENTRY in the window line of the form as a single line. Table 4-6.
Table 4-7. Summary of Custom Error Messages ---------------------------------------------------------------------------------------------| | | | | Field Name | Edit Statement | Custom Message | | | | | ---------------------------------------------------------------------------------------------| | | | | ORDATE | EQ $TODAY | Enter today's date in Month Day Year order. | | | | | | ST | IN $STATE | Enter the correct 2-character state code.
Unless the file is compiled, none of the new edits or error messages will be executed when the file is used with ENTRY. _________________________________________________________________ | | | :RUN ENTRY.PUB.SYS | | | | HP32209v.uu.ff ENTRY (C) HEWLETT-PACKARD CO. 1986 | | | | ENTER FORMS FILE NAME AND PRESS RETURN: ORDFORM1 | | ENTER BATCH FILE NAME AND PRESS RETURN: NEWDATA | ___________________________________________________________________________ Figure 4-12.
Figure 4-13. The ORDER Form, Displaying Errors TEST THE FIELD EDITS In order to test the field edits added to the ORDER form, enter incorrect data in each of the edited fields. Action Type in the data shown in Figure 4-13 and press ENTER. All six of the fully edited fields are in error. Accordingly, ENTRY highlights and underlines all six fields and displays the custom error message for the first field in the window line.
Figure 4-14. The ORDER Form, Batch Record No. 2 USE REFRESH IN COLLECT MODE Suppose you have typed most or all of the data in a form when you realize that the data is all wrong. In this case, rather than clearing the data by hand or typing over it, it is simpler to reset the form to its initial values by pressing REFRESH. Action Type some of the data into the form for Record #2, such as the example shown in Figure 4-14. Now, press REFRESH. This causes the entire terminal screen to be cleared.
Figure 4-15. Run ENTRY; The ORDER Form, Batch Record No. 3 REVIEW AND CORRECT ENTERED DATA After entering data in a set of records, it is a good idea to proof the data. As you learned in Section 3, this can be accomplished with Browse mode. Action Press BROWSE to go into Browse/Modify mode and then press FIRST REC to view the first record in the file. You can then proceed sequentially through the entire file, checking the data entered in each record, by pressing NEXT REC.
Record #3 is the next available data record in the NEWDATA file, since you have already entered the first two records. Action Press BROWSE to go to Browse mode. Figure 4-16. The ORDER Form, Batch Record No. 1 When you press BROWSE, the last record entered is displayed, which in this exercise is Record #2 (shown earlier in Figure 4-16). Action Press FIRST REC to look at Record #1, as shown in Figure 4-16. If you find any errors, correct them by typing over the data and then pressing ENTER.
Figure 4-17. The ORDER Form, Batch Record No. 2 If you copied the data from Figure 4-14 exactly, then the word "Bicycles" is misspelled in Record #2. Action Press NEXT REC to get to Record #2. Press TAB to position the cursor at the Name field. Correct the error by typing BICYCLES over the word BYCLES. Press ENTER to write the corrected data to the batch file.
Figure 4-18. The ORDER Form, Batch Record No. 3 USE REFRESH IN BROWSE MODE In Browse mode, REFRESH can be used in the same manner as in Collect mode, however, when pressed in Browse mode, REFRESH does not clear all the data; it simply clears any changes typed over the original data. Action Return to Collect mode by pressing COLLECT. Type data into Record #3, as shown in Figure 4-18. Press ENTER. Now press BROWSE to verify the data entered in Record #3.
Action Press REFRESH. Compare the data on your screen with Figure 4-18. After you press REFRESH, the form contains the original values. Since you have not changed Record #3, it is not necessary to press ENTER. You have completed this session. Action Press EXIT.
Chapter 5 ADD NEW FORM AND SPECIFY CALCULATED VALUES Forms file ORDFORM1 now contains one form with field editing specified for data entered on that form. In this section, you add a new form to the file. The new form contains fields in which data is calculated and then displayed at the terminal without user intervention, and fields in which user-entered data is formatted.
Figure 5-1. Forms File Menu Add New Form Action Run FORMSPEC and specify the forms file ORDFORM1 when the Forms File Menu is displayed, as shown in Figure 5-1. Press ENTER.
Figure 5-2. Main Menu SELECT ADD OPTION Action When ENTER is pressed for the Forms File Menu, the Main Menu is issued. Enter A in the selection box to add a form, as shown in Figure 5-2. Press ENTER.
Figure 5-3. Form Menu for the TOTALS Form When you press ENTER, a new Form Menu is displayed. Action Name the new form TOTALS by typing TOTALS in the Form Name field, as shown in Figure 5-3. The other default values need not be changed. Press ENTER. You specify the Next Form option such that this form follows the first form (ORDER) and, after the totals are entered, the first form is repeated. You could have changed the Next Form Name to ORDER to repeat the first form.
Figure 5-4. Form Menu for the ORDER Form When you press ENTER to record the TOTALS form, a blank screen is displayed on which to design layout for the TOTALS form. Before you design the new form layout, let's return to the Form Menu for ORDER. Action Press PREV FORM twice. On the Form Menu for ORDER, change the Next Form Name from $HEAD to TOTALS and supply a new comment, as shown in Figure 5-4. Press ENTER.
Figure 5-5. Form Layout for TOTALS DESIGN THE FORM LAYOUT Now that the forms sequence for the two forms has been established, you can design the layout for the new TOTALS form. Action First, press NEXT FORM to go to the Form Menu for TOTALS (Figure 5-3), then, press NEXT to go to the Form Layout Menu, which is a blank screen with a message that appears briefly in the upper left corner. Design the layout for the TOTALS form as shown in Figure 5-5 and described in Table 5-1.
| Tax Rate | tr | 14 | 4 | | | | | | | Tax | tax | 14 | 10 | | | | | | | Shipping | ship | 16 | 10 | | | | | | | Total | total | 19 | 10 | | | | | | | Customer Name | name | 22 | 42 | | | | | | --------------------------------------------------------------------------------------------- TOPIC: DISPLAY-ONLY FIELDS Now that the new form, TOTALS, is defined, you establish display-only fields in both forms.
field, or a constant value, or a calculated value to a destination field. If the destination or source is not specified, the value of the current field, currentfield, is assumed. The destination is always a field, either a specified field name, the current field, or a save field name. The source can be a field, a constant, an expression, or an index retrieve operand. Note that, unlike the edit statements, the various SET statements cannot have a custom error message.
Figure 5-6. Field Menu for ORDATE in the ORDER Form DEFINE FIELDS FOR FORM ORDER Let's use the SET TO statement to assign specified values to displayonly fields. Action Locate the Field Menu for ORDATE in the ORDER form. One method is to press PREV FORM twice and then press NEXT until the Field Menu for ORDATE is displayed. Another method is to use the Main Menu to go to the specified field.
to assign a date to a field, the data type (DType) must be MDY, DMY, or YMD.) The Field Menu for ORDATE in the ORDER form now appears as shown in Figure 5-6. Figure 5-7. Field Menu for TPRICE in the ORDER Form CALCULATED VALUES In addition to assigning specified values to display-only fields, the SET TO statement is also used to assign calculated values to displayonly fields. In this case, the data type of all the fields involved in the calculations must be numeric.
Press FIELD TOGGLE. Type the SET TO statement shown in Figure 5-7 in the processing specification area. Press ENTER. The SET TO statement calculates the value of TPRICE from UPRICE and QTY. The data type for TPRICE is already NUM2 so it need not be changed. Note that the data types of QTY and UPRICE are already numeric; QTY is type DIG and UPRICE is NUM2. As a result of this specification, the user need only enter values in the QTY field and the UPRICE field.
Action Refer to the form layout for TOTALS, which was shown earlier in Figure 5-5. Since the TOTALS form, as its name implies, contains the totals for the order, the fields contain mainly dollar values and percentages. Thus, all the fields are numeric, except the order number, the date, and the customer name fields. Another feature of this form is that very few items require user entry. Most fields that are not display-only can be assigned initial values.
Figure 5-10. Field Menu for DISCNT_PERCNT in the TOTALS Form When you press ENTER at the Field Menu for ORDATE, the next Field Menu displayed is for the TOTNET field, which contains the total net price of the current order. This field is entered by the user; it should equal the total order price of the TPRICE field, which was calculated on the previous form, ORDER. Note that this field must be numeric since it is used in later calculations.
TOPIC: IF STATEMENT The condition in an IF statement that determines which statements are executed is always a simple edit statement. It may be preceded by a field name to indicate the field to which the edit applies. If there is no field name, the edit statement applies to the current field. IF [value ] editstatement THEN [statement ]... [statement ]... [ELSE [statement ]...] ] [[statement ]...
Figure 5-11. Field Menu for DISCNT CONDITIONAL CALCULATIONS When you press ENTER to record DISCNT_PERCNT, the menu for the next field, DISCNT, is displayed, as shown in Figure 5-11. The DISCNT field illustrates a new statement. In most cases, a discount is granted conditionally. In this exercise, you give the customer a discount only if the total net value of the order is at least $1,000. Such a discount can be calculated automatically using the IF statement.
Figure 5-12. Field Menu for SUB in the TOTALS Form MORE CALCULATED FIELDS The next field after DISCNT is called SUB and contains the subtotal. This value is the result of subtracting any discount from the net total. The subtotal is another display-only field containing a dollar value. Action Change the field type (FType) to D and the data type (DType) to NUM2. Then press FIELD TOGGLE to enter the SET statement that calculates a subtotal, as shown in Figure 5-12. Press ENTER.
Figure 5-13. Field Menu for TAX_RATE in the TOTALS Form After you press ENTER at the SUB field, the next Field Menu is the one for the tax rate (TR) field. Action As shown in Figure 5-13, change the name of this field to TAX_RATE for clarity in subsequent statements. Make it a required field, and give it the data type NUM2. Since tax rates are fairly stable, assign this field an initial value of 6.25 for a tax rate of 6 1/4%. Press ENTER.
Figure 5-14. Field Menu for TAX in the TOTALS Form The next Field Menu is for the TAX field, which is a display-only field calculated from the tax rate and the discounted total. Action As shown in Figure 5-14, change the field type to D, the data type to NUM2 to correspond to the other dollar values, and then go to the Processing Specifications to enter the SET statement to calculate the tax. Press ENTER. Assuming the tax rate is 6.
Figure 5-15. Field Menu for SHIP in the TOTALS Form The next Field Menu displayed is for the SHIP field, which is the shipping cost value. Shipping cost is a user-entered value that may or may not be needed. Action At the Field Menu for SHIP, leave the field type as O for optional, change the data type to NUM2 to conform to the other dollar values, and provide an initial value of zero (in the format .00 as shown in Figure 5-15).
Figure 5-16. Field Menu for TOTAL in the TOTALS Form The next field, TOTAL, contains the total cost of the order. The value of TOTAL is calculated by adding the tax and any shipping cost to the subtotal. Action Change the field type to D and the data type to NUM2. Then enter the SET statement in the Processing Specifications area, as shown in Figure 516. Press ENTER. The last field on the TOTALS form contains the customer name originally entered on the ORDER form. Action Leave this field as is.
formatting depends on the data type. Table 5-1 summarizes automatic formatting. Note that whenever data is moved from one field to another (with SET TO for example) the data is formatted during the move. Unless it is an initial value, is moved, or is specifically formatted by a formatting command, user-entered data is not formatted but is stored exactly as it was entered. As a result of automatic formatting, the date in the ORDER and TOTALS forms is always in the format mm/dd/yy (both dates are type MDY).
Figure 5-17. Field Menu for SHIP in the TOTALS Form FORMATTING STATEMENTS On the other hand, the two numeric values entered by the user in the TOTNET and SHIP fields are not formatted. You can, however, use formatting statements to align these entered values with the calculated dollar value in other fields. Specifically, to format the values of the TOTNET and SHIP fields in the TOTALS form, use the data formatting statements STRIP and JUSTIFY. Action Locate the Field Menu for SHIP in the TOTALS form.
In addition to STRIP and JUSTIFY (illustrated above), FORMSPEC provides two other formatting statements: FILL and UPSHIFT. The FILL statement replaces any leading or trailing blanks in a field with any printing character you choose. The UPSHIFT statements shifts all lowercase letters to uppercase. Action Press MAIN/RESUME to return to the Main Menu. Select X to compile the forms file and press ENTER. Press EXIT when done. FORMSPEC compiles the new forms into the forms file ORDFORM1.
--------------------------------------------------------------------------------------------- Table 5-4.
Figure 5-18. Run ENTRY; Record No. 1 DISPLAY, REVIEW, AND MODIFY CALCULATED VALUES To enter data into the new forms, you run ENTRY, Action Issue the RUN command for ENTRY as shown. Use the forms file name ORDFORM1 and a new batch file name, DATA5. When ENTRY displays the first form, ORDER, enter values in any unprotected fields, as shown in Figure 5-18. Press ENTER to record the data.
Figure 5-19. Record No. 1, Browse Mode REVIEW CALCULATED VALUES When you press ENTER to record the data on the ORDER form, ENTRY displays the next form, TOTALS. Before entering any data on TOTALS, let us view the data calculated by ENTRY for record #1. Action To do this, press BROWSE. The ORDER form is displayed with all the data you entered, plus the date and the total price supplied by ENTRY, as shown in Figure 5-19. Note that today's date is now displayed in the date field in the form mm/dd/yy.
Figure 5-20. Record No. 2 Action Press COLLECT to display the next form, TOTALS. Four of the fields on this form have initial values as shown in Figure 5-20. For the order, you can change only the value of the order number, although any of the other initial values may be changed since they are not protected. Action Leave the order number the same as the one that you entered on the ORDER form. Enter the total calculated on the ORDER form in the Total Net Price field.
Figure 5-21. Record No. 2, Browse Mode You can examine the totals calculated for this record using Browse mode. Action Press BROWSE. As shown in Figure 5-21, not only have the subtotal, the tax, and the final total been calculated, but all the numeric values are formatted. Action Press COLLECT to return to collect mode.
Figure 5-22. Record No. 3, Browse Mode You can now continue entering orders. On the next order, you specify a quantity and a unit price sufficient to give a discount. Action Copy the example shown in Figure 5-22. Use a quantity of 10 and a unit price of 125.50 on the ORDER form. Press ENTER.
Figure 5-23. Record No. 4, Browse Mode Action Next, enter the total net price as 1255.00 on the TOTALS form, as shown in Figure 5-23. Press ENTER. You can assume that with an order this large, no shipping is charged, therefore you leave the shipping cost at its initial zero value. Action Browse the two records you just entered; they should appear as shown in Figure 5-22 and Figure 5-23.
Figure 5-24. Record No. 4, Browse Mode MODIFY VALUES USED IN CALCULATIONS Suppose you want to change the discount percent on this last order to 8 percent rather than 10 percent. Action To do this, remain in Browse mode, TAB to the Discount % field, and change the displayed value to 8. Press ENTER. When you press ENTER to record the new value, the discount, the subtotal, the tax, and the final total are all recalculated.
5-32
Chapter 6 Using Safe Fields and Understanding Phases Values entered on one form of a forms file can be transferred to another form through the use of save fields, which are fields in the forms file that are independent of any particular form. As such, they can be used to hold values for transfer between forms. Save fields are defined on the Save Field Menu. This section will discuss the definition and use of Save Fields. Processing statements can be executed before, after, or while the form is displayed.
Figure 6-1. The Menu Sequence for Global and Save Field Menus As shown in Figure 6-1, there are two paths to the Save Field Menus. Remember, with either path, you must first reach the Main Menu by running FORMSPEC and requesting the forms file by name on the Forms File Menu. Once at the Main Menu, one path is to enter S in the selection box at the Main Menu and press ENTER. A Save Field Menu will be displayed (shown later in this section) on which you can define a new save field.
Figure 6-2. Main Menu ADD SAVE FIELDS Since save fields do not belong to any particular form, they can be used to transfer data between one form and another. In the case of the forms file, ORDFORM1, you want to transfer the order number, the net total, and the customer name from the ORDER form to the TOTALS form. For this purpose you need three save fields, one for each value to be transferred. Action To display this menu, run FORMSPEC and request the forms file ORDFORM1 on the Forms File Menu.
Figure 6-3. Save Field for SORDNUM This selection causes a blank Save Field Menu to be displayed (not shown). Action Enter the name (SORDNUM), length (6), and data type (DIG) , and initial value of 100001 to define the save field, as shown in Figure 6-3. Press ENTER. You should always specify an initial value for fields of type DIG, NUM[n], or IMPn. Character fields default to spaces.
Table 6-1. Save Field Definitions for ORDFORM1 --------------------------------------------------------------------------------------------| | | | | | Save Field Name | Length | Data Type | Initial Value | | | | | | --------------------------------------------------------------------------------------------| | | | | | SORDNUM | 6 | DIG | 100001 | | | | | | | SNAME | 42 | CHAR | -| | | | | | | STOTNET | 10 | NUM2 | 0.
The SORDNUM save field was given the initial value 100001. This is the first sequential order number. Because the save field contains an initial value, the initial value previously specified for the ORDNUM field is not needed. Instead, you use the SET TO statement to transfer the value in the SORDNUM save field to the ORDNUM field. Action To modify the ORDNUM field, request the Main Menu and enter the specification shown in Figure Figure 6-4. When you press ENTER, the Field Menu for ORDNUM is displayed.
the statement shown in Figure 6-5. definition. Figure 6-6. Press ENTER to record this field Field Menu for ORDNUM in the TOTALS Form Action Now, go to the Field Menu for ORDNUM in the TOTALS form. As you did with the similar field in the ORDER form, change the field type to D, the data type to DIG, and delete the initial value. Then, go to the Processing Specifications area of the menu and add the statements shown in Figure 6-6. Press ENTER.
order number is reset to its initial value when it reaches the maximum amount the field can hold. In order to insure that the order number is incremented only in Collect mode, you need a way to prevent it from being incremented in Browse mode whenever ENTER is pressed to correct data in TOTALS. Also, it would be nice if the order numbers could be displayed when each form is initially displayed on the screen. So far, you have had to go into Browse mode to see the current order number.
| | phase. | | | | | | If there is no phase header, the field edit phase is assumed. The | | | FIELD header must be specified only if there are initialization | | | statements. | | | | -------------------------------------------------------------------------------------------| | | | FINISH | Statements in this phase are executed only when data entered in | | | all fields in the form have passed the field edits.
Action For a full discussion of this topic, read "Phases" in Section 4 of the VPLUS/V Reference Manual. Table 6-3.
the phase header INIT before the statement SET TO $TODAY. Press ENTER to record the change for each field. Later in this section, you use the INIT phase once again to initialize the total net price for the TOTNET field in TOTALS. Note that the value of SORDNUM is tested and incremented in the initialization phase, rather than in the final phase, to prevent its being incremented when corrections are entered in Browse mode.
Action Find the Field Menu for NAME and change the field type to R for required. Then press FIELD TOGGLE to enter the processing specifications shown in Figure 6-8. Press ENTER to record the changes. Making NAME a required field insures that a customer name is actually entered. Though not necessary for the transfer to TOTALS, it is good practice to associate a customer name with each order. The SET statement is executed in the field edit phase since no heading is specified.
Figure 6-10. Field Menu for TPRICE Now, make similar changes to the TPRICE field of the ORDER form and the TOTNET field of the TOTALS form. Action Add a statement to store the value of TPRICE in the STOTNET save field, as shown in Figure 6-10. Note that the order in which the processing specification statements are entered is important. The statement to move the value to the save field must follow the statement that calculates that value.
Figure 6-11. The Field Menu for TOTNET in the TOTALS Form The last change is to the TOTNET field in form TOTALS. Action First, change the field type to D for display-only and then add the statements (shown in Figure 6-11) to transfer the calculated net price from the ORDER form. You should delete the existing formatting statements (JUSTIFY RIGHT and STRIP LEADING "0") since the SET statement causes this formatting to be performed automatically. Press ENTER to record the changes.
Figure 6-12. Main Menu, Compile Selection Action Compile the forms file to record the new specifications in machine-readable form, as shown in Figure 6-12. Table 6-4 and Table 6-5 summarize all the current field specifications for the ORDER and TOTALS forms. (Refer to Table 6-1 for a summary of the save field specifications.) Table 6-4.
| 5 | ST | O | CHAR | IN $STATE | -| | | | | | | | | 6 | ZIP | O | CHAR | MATCH ddddd[-dddd] | -| | | | | | | | | 7 | PHONE | O | CHAR | MATCH [(ddd)]b*ddd-dddd | -| | 9 | QTY | R | DIG | GE 1 | -| | | | | | | | | 10 | PARTNUM | R | CHAR | MATCH Puddd-??? | -| | 11 | DESCRIPTION | O | CHAR | -| -| | | | | | | | | 12 | UPRICE | R | NUM2 | JUSTIFY RIGHT | -| | | | | | STRIP LEADING "0" | | | | | | | | | | 13 | TPRICE | D | NUM2 | SET TPRICE TO QTY * UPRICE | -| | | | | | SET STOTNET TO TPRICE | | | | | | | |
-______________________________________________________________________________________ | | | :RUN ENTRY.PUB.SYS | | | | HP32209v.uu.ff ENTRY (C) HEWLETT-PACKARD CO. 1986 | | | | ENTER FORMS FILE NAME AND PRESS RETURN: ORDFORM1 | | ENTER BATCH FILE NAME AND PRESS RETURN: DATA6 | ___________________________________________________________________________ Figure 6-13. Run ENTRY and the Completed ORDER Form, Record No.
Action Type in the name and the remaining values for the order, as shown in Figure 6-13, then press ENTER. Figure 6-14. TOTALS Form, Record No. 2 When you press ENTER to record the typed values, the system calculates the total price. It then displays the next form, TOTALS, as shown in Figure 6-14. The order number is the same as the number displayed on the previous form, ORDER, since this form contains the totals for the ORDER form.
press ENTER to record all the totals. Action For this exercise, make no changes and press ENTER to record the totals in the batch file and then display the next form. Figure 6-15. Browse Mode, Record No. 1 REVIEW AUTOMATIC VALUES Before entering another order, let's see what values have been calculated by the system. Action To do this, you must press BROWSE to go into Browse mode and then press FIRST REC to display the first record of the current order, as shown in Figure 6-15.
Figure 6-16. Browse Mode, Record No. 2 Action In order to see the data on the next form, press NEXT REC. The values calculated on the TOTALS form are displayed, as shown in Figure 6-16.
Figure 6-17. Browse Mode, Record No. 3 Action After browsing the first order (order number 100001), return to Collect mode by pressing COLLECT. A new form is displayed on which you can enter the next order. This form shows the order number as 100002 since the order number was incremented automatically when the TOTALS form for the previous order was initialized. Action Type data on this form as shown in Figure 6-17, then press ENTER. As before, the total price (1050) is calculated by the system.
Figure 6-18. TOTALS Form, Record No. 4 TERMINATE AND RESUME ENTRY IN MID-ORDER Action After entering the data on the first form of the order number 100002, press EXIT to terminate ENTRY. You return to MPE control, as signaled by the colon prompt (:). Now, run ENTRY again with the same files you specified at the start of this exercise. Action Run ENTRY. Then, when ENTRY asks for the forms file and batch file names, enter the files you have been using; ORDFORM1 and DATA6.
Figure 6-19. Browse Mode, Record No. 4 Action Press BROWSE. The TOTAL form you just entered is displayed with all the values calculated. The total net price and the customer name were transferred from the form on which they were entered before you pressed EXIT to terminate. Similarly, if you terminate between orders, the order number is incremented and displayed on the next form when you resume execution with the same batch file.
Figure 6-20. Browse Mode, Corrected Record No. 1 MODIFY DATA TRANSFERRED BETWEEN RECORDS To modify any data that has been written to a batch file, you must be in Browse mode. Then you locate the record and correct it. When you press ENTER, the corrected data is written over the previous data in the record. If this data appears only in one record or does not affect any other record, that is all you need to do.
TOTALS form directly--it is a display-only field protected from data entry. Figure 6-21. Browse Mode, Record No. 2 When you press ENTER to record the correct name on the ORDER form, the next record is displayed. This record still contains the old incorrect customer name, as shown in Figure 6-21. Although you cannot change the customer name directly on this form, you can force the new name to be transferred by pressing ENTER when the TOTALS form is displayed.
Figure 6-22. Browse Mode, Corrected Record No. 2 Action So, press ENTER and then press PREV REC to return to Record #2. that the name has been corrected, as shown in Figure 6-22. You see Similarly, if you change the quantity or unit price of an order recorded on the ORDER form, you must then press ENTER on the corresponding TOTALS record to make sure the order total is correct. Action The exercise is complete; press EXIT.
Chapter 7 Using Save Fields and Frozen/Repeating Forms The two forms defined so far in the forms file ORDFORM1 allow only a one line item per order. In order to allow a number of items to be entered on a single order, you separate the first form (ORDER) into two forms: the first, containing header information, is frozen on the screen; the second, containing one line of order information, is repeated and appended to the frozen form. This allows a variable number of parts to be entered on a single order.
. Figure 7-1. The Form Layout for the ORDER Form CHANGE FORMS FILE In the ORDFORM1 forms file, the ORDER form, as shown in Figure 7-1, contains customer information plus one line on which an order can be entered. This restricts each order to one part number--a more practical design is to have multiple order lines as well as the customer information.
ORDER_LINE ORDER_TOTALS Contains fields in which to enter quantity, part number, description, unit price, and total price of a single part (order line from the ORDER form). Contains totals for entire order (identical to the TOTALS form). Using FORMSPEC, you can copy forms within an existing file or to a new forms file. Therefore, rather than typing in the two forms, ORDER_HEAD and ORDER_LINE, let's copy the ORDER form twice within the ORDFORM1 forms file.
form to be copied. 2. Press ENTER. In this exercise, the form is being copied from the current forms file, so the forms file name does not need to be specified. Action Run FORMSPEC and open the ORDFORM1 forms file. Using the steps outlined above, copy the ORDER form to create the ORDER_HEAD form. Figure 7-2 shows the values to be entered on the Main Menu.
DELETE FORM Assuming you have run FORMSPEC and opened a forms file, the steps to delete a form are: 1. On the Main Menu, specify a D in the selection box and the name of the form to be deleted. 2. Press ENTER. Before modifying the two new forms, use the Main Menu to delete the ORDER form. Action Using the steps outlined above, delete the ORDER form. the values to be entered on the Main Menu.
FREEZE FORM, APPEND NEXT FORM The ORDER_HEAD form contains the date, the customer identification, the order number, and the item headings for the next form, ORDER_LINE. Because this form contains the headings for the ORDER_LINE form, it should be "frozen" on the screen while the order line is appended to it. A frozen form stays on the screen when the next form is displayed. It also stays on the screen if the next form is repeated so many times that there is no more room on the screen.
Figure 7-5. The Form Layout Menu for ORDER_HEAD CHANGE FORM LAYOUT FOR HEAD FORM When you press ENTER, the form layout for ORDER_HEAD is displayed. It is still an identical copy of the deleted form, ORDER, and appears as shown in Figure 7-5. The only change you make to the form layout is to delete the line on which order information is entered, the last line on the form. Action Use the terminal edit keys to delete the line in the ORDER_HEAD form layout on which order information is entered.
. Figure 7-6. The Form Menu for ORDER_LINE REPEAT CURRENT FORM, APPEND IT TO ITSELF Before changing any field characteristics on this form, you complete the form definition. Action Press NEXT FORM to go directly to the Form Menu for ORDER_LINE. Change the Repeat Option to A for repeat, appending. Leave the value C in the Next Form option, and change the next form name from TOTALS to ORDER_TOTALS. The Form Menu for the ORDER_LINE form should look like Figure 7-6; press ENTER.
Figure 7-7. The Form Layout Menu for ORDER_LINE DESIGN LAYOUT FOR NEW FORM The form for ORDER_LINE appears exactly like the form layout for ORDER, as shown in Figure 7-7, since it was copied from ORDER. Now, you want to delete every line except the line on which orders are entered. Action Delete all lines but the order information line (the last line). ENTER to record the form for ORDER_LINE.
. Figure 7-8. The Form Layout Menu for ORDER_LINE, completed The form for ORDER_LINE should look like Figure 7-8. This method of creating new forms from an existing form may appear complicated on paper, but it is far more efficient than designing the new form from scratch. Because the headings for the fields are on one form and the fields themselves on another, it could have been difficult to align the two forms correctly, especially when the fields are delimited by invisible delimiters.
Figure 7-9. The Form Menu for ORDER_TOTALS CHANGE FORM NAME The final change to the form definitions for the new version of ORDFORM1 is to change the name of TOTALS to ORDER_TOTALS. Action Press NEXT FORM to get to the Form Menu for TOTALS. Change the form name to ORDER_TOTALS and change the comment as shown in Figure 7-9; the other options can remain as specified. Press ENTER to record these changes. No changes are required to the form layout for this form.
Figure 7-10. The Main Menu, Globals Menu Option USE GLOBALS MENU TO IDENTIFY HEAD FORM Action Return to Main Menu by pressing MAIN. When the Main Menu is displayed, enter G in the selection box to request the Globals Menu, as shown in Figure 7-10; press ENTER.
Figure 7-11. The Globals Menu The Globals Menu allows you to specify the name of the first form to be displayed. It also allows you to change other global characteristics of the forms file. There are defaults provided for all the global characteristics, which you can accept or change as desired. Specifically, you can change the field, error, or window line enhancements and you can direct the window line to any line on the screen.
Figure 7-12. The Field Menu for TPRICE ACCUMULATE TOTALS In the previous version of ORDFORM1, the total price for the order was calculated and stored in the TPRICE field. This value was then transferred to the TOTNET field in the next form. Now that the order line is a repeating form, you must accumulate the individual values calculated for the TPRICE field in the ORDER_LINE form and transfer the total amount of all the orders to the TOTNET field in the ORDER_TOTALS form.
value for TPRICE is calculated and this value is added to the total value for the order in STOTNET. Figure 7-13. The Field Menu for ORDNUM However, in order for the accumulation specified for TPRICE to work, you must reset the value of STOTNET to zero at the beginning of each order.
suppose the following three order lines have been entered on form ORDER_LINE in Collect mode: 1ST QTY = 2 UPRICE = 10.50 TPRICE = 21.00 (STOTNET = 21.00) 2ND QTY = 4 UPRICE = 15.00 TPRICE = 60.00 (STOTNET = 81.00) 3RD QTY = 3 UPRICE = 14.00 TPRICE = 42.00 (STOTNET = 123.00) If the user then terminates this order by pressing NEXT FORM in ENTRY, the value of STOTNET is transferred to the TOTNET field of the ORDER_TOTALS form.
Figure 7-14. The Field Menu for TPRICE So what is the solution? For this particular set of forms, you can change the specifications on TPRICE so that STOTNET (and consequently TOTNET) reflects changes to the order line as long as they are made while the user is still entering data for the current order. Once the user presses ENTER to record the totals on ORDER_TOTALS, and then makes changes to a previously entered order, the user must recalculate the value of TOTNET manually.
. Figure 7-15. The Field Menu for ORDNUM One more change is required to the ORDER_TOTALS form to insure correct data in this situation. When NEXT FORM is pressed to stop the repeat of ORDER_LINE, the next form, ORDER_TOTALS, is displayed. Whenever this form is displayed in Collect mode, all the initialization procedures are performed. One of these procedures sets the order number from the SORDNUM save field and then increments the value of SORDNUM by 1.
display-only. TOPIC: CHANGE FORM SEQUENCE PROGRAMMATICALLY The basic control of forms sequence is established on the Form Menu. For example, the repeating form ORDER_LINE is defined on its Form Menu as a repeating appended form by the A in the Repeat Option selection box; and the frozen first form ORDER_HEAD is so defined by an F in the Next Form selection box. A CHANGE statement is provided by FORMSPEC that allows you to change these specifications during execution of the forms file.
the CHANGE statement to terminate the display of forms before the order number reaches the value 1,000,000. (As presently defined, the order number is reset to 100,001 when it reaches 999,999.) Action For a full discussion of the CHANGE statement, refer to Section 4 of the VPLUS/V Reference Manual. . Figure 7-16. The LINE_COUNT Save Field The first step is to change the repeat option of ORDER_LINE so that it is terminated automatically when ORDER_LINE has been repeated seven times.
Figure 7-17. The Field Menu for QTY Since QTY is the first field in ORDER_LINE, you use that field to increment the LINE_COUNT save field and conditionally terminate the repeat. Action Return to the Main Menu and use option G--to go to the QTY field of ORDER_LINE, where you specify the statements to increment the LINE_COUNT save field, as shown in Figure 7-17. Note that the existing edit statement must be preceded by a FIELD heading so that it is not executed in the initialization phase.
ed by modifications made in Browse mode. . Figure 7-18. The Field Menu for ORDNUM The next example of using a CHANGE statement affects the Next Form option. The current specification for the ORDNUM field has a length of six digits. Thus, if the order number is incremented above the value 999999, it no longer fits in the field. As currently defined, the order number is reset to 100001 before it overflows the field.
7-23
Table 7-2.
Table 7-3.
Table 7-4. Summary of ORDFORM1 Fields (cont'd) ______________________________________________________________________ | | | :RUN ENTRY.PUB.SYS | | | | HP32209v.uu.ff ENTRY (C) HEWLETT-PACKARD CO.
. Figure 7-19. The ORDER_HEAD Form as Initially Displayed ENTER DATA ON REPEATING FORM Now that ORDFORM1 has been redefined, run ENTRY and enter data into a new batch file. Action Issue the run command as shown and specify the forms file and batch file names, ORDFORM1 and DATA7. ENTRY displays the first form, ORDER_HEAD, as shown in Figure 7-19. Note that the window line is now positioned at the top of the form and that the line for the order information is not displayed yet.
. Figure 7-20. The ORDER_HEAD Form Frozen with the ORDER_LINE Form Appended The only data you are required to enter on this form is the customer name. However, for most purposes you also enter the customer's address and phone number. Action Type in the customer information on the header form as shown in Figure 7-20 and press ENTER to record this information in the first record of the batch file. Because the header form is defined as a "frozen" form, it remains on the screen when you press ENTER.
. Figure 7-21. Record No. 2 with Data Action Type data into all the fields on this form except the total price field, as shown in Figure 7-21; press ENTER.
Figure 7-22. The ORDER_LINE Form Appended for Record No. 3 When you press ENTER to record the data in the first order line, the unit price is formatted, the total price is calculated and displayed, and then a new ORDER_LINE form is repeated immediately below the last form. Action Now type data into the second order line, as shown in Figure 7-22. Press ENTER.
. Figure 7-23. The ORDER_LINE Form Appended for Record No. 4 When you press ENTER, the second line of order information is recorded as Record #3 of the batch file. The total price is displayed and a new blank order line form for Record #4 appears directly below the last line, as shown in Figure 7-23.
. Figure 7-24. The ORDER_TOTALS Form as Initially Displayed TERMINATE REPEATING FORM Suppose there is no more order information and you want to record the totals for the current order. Action Press NEXT FORM. The screen is cleared and the final form, ORDER_TOTALS, displayed on the screen. The totals from individual order lines have been summed to determine the net total for the order, which is displayed on this screen along with the order number and date, as shown in Figure 7-24.
Figure 7-25. The ORDER_HEAD Form When you press ENTER, the screen is cleared and a new header form is displayed, as shown in Figure 7-25. The new form has the order number 100002 since it is the start of a new order.
Figure 7-26. The ORDER_LINE Form Appended the Maximum Number of Times AUTOMATIC TERMINATION OF REPEATING FORM In the order just entered, the repeating form was terminated NEXT FORM. It is also terminated automatically after seven been entered on a single order. This termination is solely how the forms file ORDFORM1 was designed. It could have been that the repeat stopped after 10 forms, after 30 forms, or only when NEXT FORM is pressed.
Figure 7-27. The ORDER_TOTALS Form When you press ENTER to record the last line of data for the repeating form, the total for that line is calculated. Then the screen is cleared and the next form is displayed. The accumulated totals for all the order lines are summed into the net total and displayed on the last form of the order, as shown in Figure 7-27.
Figure 7-28. Browse Mode, Record No. 13 Action Press ENTER to have ENTRY calculate and record the remaining totals as Record #13 of the batch file. Then press BROWSE and the record appears as shown in Figure 7-28. Modify Accumulated Values Usually, modification of existing records is a simple matter--you locate the record you want to change, make the change, and then press ENTER to record it.
. Figure 7-29. Browse Mode, Record No. 1 DELETE RECORDS FROM BATCH FILE To delete a record from the batch file, you must be in Browse mode. Then, you locate the record to be deleted and press DELETE REC. The record is effectively deleted from the batch file and can no longer be referenced. This means if you try to view it in Browse mode, it is skipped. Furthermore, the space in the file that was occupied by the deleted records is no longer available.
Action To delete this order, first go to Browse mode by pressing BROWSE. Then press FIRST REC to find the first record in the file. In this case, it is also the first record of the order to be deleted. The record appears as shown in Figure 7-29. . Figure 7-30. Browse Mode, Record No. 2 Action When you press DELETE REC, the screen is cleared and the next record in sequence is displayed, as shown in Figure 7-30. Since Record #2 is part of order number 100001, press DELETE REC to delete it.
Figure 7-31. Browse Mode, Record No. 3 When it is deleted, it is replaced by the next record in sequence, as shown in Figure 7-31. Action Delete this record as well.
Figure 7-32. Browse Mode, Record No. 4 The next record is then displayed, as shown in Figure 7-32. Action Delete Record #4 in the same way. When you delete Record #4, you have deleted the entire order number 100001. Should you wish to enter another order for this company, it is added to the end of the existing orders with new record numbers and a new order number. Action The exercise is complete; press EXIT.
Chapter 8 Document Forms and Compile Fast Forms File The sample forms file used in this exercise, called ORDFORM1, has now been completely defined and is ready to use in production mode. In this last section you list the entire forms file to the line printer so that you have a formal definition of the file contents. But, before you list it, you make one last set of changes to the file.
Figure 8-1. Run FORMSPEC ADD COMMENTS TO PROCESSING SPECIFICATIONS When you entered the editing statements in Section 4, you added custom error messages that are displayed by ENTRY in case the edit fails. These messages are aids to the user to make error correction easier. FORMSPEC provides another type of message for the forms designer. These are comments that can be added to any processing specification to describe the purpose of the specification statement.
ORDFORM1, as shown in Figure 8-1. Figure 8-2. The Main Menu Action Then, when the Main Menu is displayed you go to the Field Menu for ORDNUM in the ORDER_TOTALS form, as shown in Figure 8-2. Press ENTER to go to the specified field.
Figure 8-3. The Field Menu for ORDNUM in ORDER_TOTALS Form Action When the Field Menu for ORDNUM in the ORDER_TOTALS form is displayed, enter the comments shown in Figure 8-3; press ENTER. Comments do not need to be added to editing specification statements since these all have custom error messages that sufficiently explain the statement without further comment.
Figure 8-4. The Main Menu LIST ENTIRE FORMS FILE Assuming you have run FORMSPEC and opened a forms file, the steps to get a listing of the forms file are: 1. On the Main Menu, specify a L in the selection box and 2. Press ENTER. Action Press MAIN/RESUME to go to the Main Menu. Using the steps outlined above, list the ORDFORM1 forms file. Figure 8-4 shows the value to be entered. The listing of forms file ORDFORM1 is shown in Appendix A.
. Figure 8-5. The Main Menu LIST SINGLE FORM Assuming you have run FORMSPEC and opened a forms file, the steps to list a single form are: 1. 2. On the Main Menu, specify a L in the selection box and the name of the form to be listed. Press ENTER. Action Using the steps outlined above, list the ORDER_HEAD form. shows the values to enter on the Main Menu. Figure 8-5 The listing of a single form is identical to that of each form on the forms file listing.
The formal designator of the FORMSPEC list file is FORMLIST. This is the name you should specify in the file equation. For example, to direct a listing to an HP 2680 laser printer whose device name is PP, you would need to exit FORMSPEC to return to MPE and enter the following command: :FILE FORMLIST;DEV=PP Do not try this yet because the forms file has not been compiled. . Figure 8-6.
the fast forms file. 2. Press ENTER. Action Using the steps outlined above, compile the ORDFORM1 forms file to a fast forms file called ORDFORMF. Figure 8-6 shows the values to enter on the Main Menu. When you press ENTER, the fast forms file is compiled. Although compilation to this file may take longer than a normal compilation, subsequent execution by ENTRY is faster. ___________________________________________________________________________ | | | :RUN ENTRY.PUB.SYS | | | | HP32209v.uu.
Action Run ENTRY, request the fast forms file, and use the existing batch file. Answer the file request prompts and respond Y to continue as shown in Figure 8-7. Since the batch file already contains data, the form for the next sequential record, Record #20, is displayed as shown in Figure 8-7. Before entering data in this record, this exercise demonstrates how to print a form from ENTRY to the line printer. Figure 8-8.
The form is printed on the line printer exactly as it was displayed on the screen, except that no enhancements show, as shown in Figure 8-8. A line printer has no way to indicate terminal enhancements such as blinking or half-bright. Also, the window line is not printed, nor are any values that are typed into fields but not entered. Initial values displayed with the form are, however, printed when the form is printed.
enhancements are not printable. Therefore, when you press PRINT to print this form, a blank line printer page is issued. Because of the nature of this form, do not attempt to print it. Action Simply enter data (except for the totals) into the repeating form until the three-line order is completed, as shown in Figure 8-9. Press ENTER for each line of the order. Notice that ENTRY calculates the totals when ENTER is pressed.
Figure 8-11. Example Listing of the TOTALS Form PRINT DATA (BROWSE MODE) After data has been entered in Collect mode, you can print the entered data as it appears on the form by going to Browse mode. Then locate the records you want to print and, as each record is displayed on the screen, press PRINT. For example, order number 10004 contains five records: the order heading, three repeating order lines, and the order total.
Figure 8-12.
Figure 8-13. Example Listing of an Order with Five Records, cont'd The order is now completely printed. printed. Action The exercise is complete; press EXIT.
[ Appendix A Forms File Listing ______________________________________________________________________________________ | | | *******************************************************************************| | * *| | * FORMSPEC Version B.04.12 *| | * FRI, AUG 8, 1986, 2:24 PM *| | * *| | * ODRFORM1.PUB.
Figure A-1. Forms File Listing _______________________________________________________________________________________ | | | FORMSPEC VERSION B.04.12 FRI, AUG 8, 1986, 2:24 PM| | FORMS FILE: ORDFORM1.PUB.
Figure A-1. Forms File Listing, (cont'd) _________________________________________________________ | | | FORMSPEC VERSION B.04.12 FRI, AUG 8, 1986, 2:24 PM | | FORMS FILE: ORDFORM1.PUB.
Figure A-1. Forms File Listing, (cont'd) __________________________________________________________ | | | FORMSPEC VERSION B.04.12 FRI, AUG 8, 1986, 2:24 PM| | FORMS FILE: ORDFORM1.PUB.
Figure A-1. Forms File Listing, (cont'd) _______________________________________________________________________________________ | | | FORMSPEC VERSION B.04.12 FRI, AUG 8, 1986, 2:24 PM| | FORMS FILE: ORDFORM.PUB.
Figure A-1. Forms File Listing, (cont'd) _______________________________________________________________________________________ | | | FORMSPEC VERSION B.04.12 FRI, AUG 8, 1986, 2:24 PM| | FORMS FILE: ORDFORM1.PUB.
Figure A-1. Forms File Listing, (cont'd) __________________________________________________________ | | | FORMSPEC VERSION B.04.12 FRI, AUG 8, 1986, 2:24 PM| | FORMS FILE: ORDFORM1.PUB.
A-8
Appendix B appended form Glossary of Terms Used in this Guide A form that is displayed on the terminal screen immediately below another form. arithmetic expression Any constants, field names, or save field names combined by arithmetic operators and resulting in a numeric value that can be used as an operand in a FORMSPEC processing statement.
describe a particular statement; a comment is listed with the forms file, but does not appear at forms file execution. compile a forms file Make the forms file ready for use; each time a forms file is changed it must be re-compiled so that the changes are available to an application or to ENTRY. conditional processing Type of FORMSPEC processing statement that is executed only when a condition is true; conditional processing is always introduced by an IF statement.
result of FORMSPEC processing or initialization. DMY Data type used to indicate a data type field into which the entered date must be in the order: Day Month Year. edit The process of checking entered data according to field type, data type or an edit statement associated with the field. edit statement One of a set of FORMSPEC processing statements that tests entered data.
statements that control how data entered in field is treated. field name Name assigned to each field in a FORMSPEC form. The name may be up to 15 uppercase characters. The first character must be alphabetic; the other characters can be alphabetic, digits, or the underline (_). Each field name must be unique to the form of which it is a member.
_, must start with letter A-Z. form sequence forms file Forms File Menu that Sequence in which FORMSPEC forms are displayed, also, and whether a form repeats and/or is appended to previous form. A MPE file containing definitions of a set of related forms that are displayed by an application or by ENTRY. FORMSPEC menu through which forms designer requests a new forms file be created to contain a new set of forms, or that an existing forms file be accessed so that it can be modified.
displayed. initialization phase Initial phase of FORMSPEC processing performed before form is displayed on terminal screen. list device An output device, such as a line printer, to which listings of program or data files are directed. listing Printed output showing the external characteristics of a file or form; forms file listings are generated by FORMSPEC, form or batch file listings by ENTRY.
system computer system; specifically controls program operation and files. operand Element used in FORMSPEC processing statements; depending on statement may be constant, field name, save field name, arithmetic expression, or index retrieve operand. optional field Field in FORMSPEC form that allows data to be omitted. phase Specification that determines when FORMSPEC processing is to be performed: before data entry, during data entry, or following data entry.
entered. RESUME f7 FORMSPEC function key that returns to the menu displayed before designer pressed MAIN to go to Main Menu. Physically, the same as MAIN. RETURN Key used to enter data or a command when terminal is not in block mode. save field A field in a FORMSPEC forms file that is not part of any form, and can be used to hold (save) data used by any field or form in the file. screen order Order of fields in a screen in which first field is at top left of screen and last field at bottom right.