
ODBCLINK/SE Reference Manual (36217-90410)

ODBCLink/SE Reference Manual Appendix D ODBCLink/SE Companion Product
ODBCLink/SE
©M.B. Foster Associates Limited 1995-2000 89
Installing MBF-Console for MBF-UDALink
The following example uses Reflection File Transfer from an HP-3000 to obtain the zipped file containing MBF-
Console. Similar procedures in other binary transfer methods can be used.
Note: If you are installing from a CD, go to page 91
Prior to the Reflection File Transfer, you will have to do the following:
⊗ Logon as MANAGER.SYS.
⊗ Restore DXINSTAL.PUB.SYS from the installation tape.
⊗ Run DXINSTAL.PUB.SYS. You will be prompted throughout the
installation. Put the tape back on line and reply to any requests.
DataExpress will prompt you for a group to reside in. This will be
DX.MBFOSTER by default.
⊗ If you encounter problems, contact out Technical Support Department at 1-
800-ANSWERS or E-Mail to support@mbfoster.com
.
Note: Create a directory called MBFoster for the client software.
This can be done using MS Explorer.
In the main menu at the top of the Reflection screen,
Select: File from the drop down menu
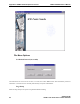
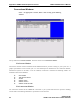
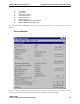
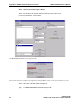
Select: Transfer… The File Transfer window is displayed.
Move the cursor to the Local File Name field, located at the top left of the File Transfer Window,
and type the name of the.exe file
Type: c:\mbfoster\odbccons.exe
Note: If you are installing a demo version of MBF-Console, enter
c:\mbfoster\democons.exe. The demo version will remain
active for 45 days after it has been installed. A demo version
can be downloaded from the MBFoster web page,
www.mbfoster.com, under Products. The demo version
obtained from the web page can be installed by running
democons.exe from the Run option of the Windows 95,
Windows 98 or Windows NT Start button.
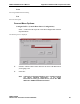
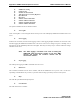
Place the cursor in the Host File Names field,
Type: odbccons.dx/dxdemo.mbfoster
DX or DXDEMO illustrates that both can be used but only one is entered
depending if the version being installed is production or demo. If you are testing a
beta version, use DXBETA.