Legato NetWorker Storage Node Installation Guide ® TM TM Release 5.
Copyright © 1998, Legato Systems, Inc. All rights reserved. Legato NetWorker is a registered trademark of Legato Systems, Inc. All other trademarks are the property of their respective owners. LICENSE AGREEMENT THIS PRODUCT CONTAINS CERTAIN COMPUTER PROGRAMS AND OTHER PROPRIETARY MATERIAL, THE USE OF WHICH IS SUBJECT TO THIS LICENSE AGREEMENT. YOU ARE CONSENTING TO BE BOUND BY AND BECOME A PARTY TO THIS LICENSE AGREEMENT.
Contents Preface....................................................................................................................... 7 About This Guide............................................................................................................................. 7 Audience ................................................................................................................................... 7 Legato Product Manuals and Documentation .............................................
Contents Chapter 3: Configuration........................................................................................ 23 Configuring the MPE Client on the NetWorker Server .................................................................. 23 Naming Conventions for Backing Up MPE Volume Sets .............................................................. 24 Listing Groups in an MPE Volume Set ...................................................................................
Contents Auto Media Management with Autochanger Devices .............................................................41 Cleaning Cartridge Use and Management .......................................................................42 Using a Non-Default Slot for the Cleaning Cartridge ........................................................43 Cartridge Access Port .............................................................................................................44 Depositing a Volume ..............
Preface About This Guide The Legato NetWorker® Installation Guide, MPE/iX Version, contains instructions on how to install and configure a Legato NetWorker client and storage node on an HP 3000 business server. After you install the MPE/iX Version of Legato NetWorker as a client and/or storage node, refer to the Legato NetWorker Administrator’s Guide to configure the HP 3000 as a NetWorker client and storage node to back up to a NetWorker server.
Year 2000 Compliance Year 2000 Compliance NetWorker supports dates in the year 2000 and beyond. For additional information and details about related test cases, see the Year 2000 Compliance (Y2K) section on the Legato web site at www. legato.com. Information and Services Legato offers a variety of services, including electronic, telephone, and fax support that provide company, product, and technical information.
Preface Customer Service Contact Legato Customer Service if you have questions about licensing, registering, or authorizing your Legato products. Customer Service also supplies instructions for transferring licenses to a different server (rehosting) and provides status on product orders. Customer Service Address Telephone number (650) 812-6000 (option 3) Fax number (650) 812-6220 E-mail service@legato.com E-mail for order status orderadmin@legato.
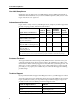
Conventions MPE Versus MPE/iX POSIX Filepath Naming Conventions The HP documentation discusses naming conventions for defining filepaths in MPE and MPE/iX POSIX. We have included a comparison here for your convenience. 10 MPE MPE/iX POSIX FILENAME.GROUP.
Chapter 1: Introduction to NetWorker Overview MPE/iX is the operating system for Hewlett-Packard® HP 3000 business servers. Legato NetWorker provides enterprise storage management capability to the HP 3000-UNIX-NT coexistent market. Legato NetWorker Client/Storage Node, MPE/iX Version, relies on HP’s TurboSTORE software to interface with MPE/iX.
New Features Clients 1 To add a client to the NetWorker server’s list of systems to back up, follow these steps: 1. Install the NetWorker client software. 2. Configure a client resource for that system on the NetWorker server. Note that the NetWorker server only provides backup and recovery services to clients with a configured resource on the server. Refer to the nsr man page for a comprehensive description of the access control policies employed by the NetWorker server.
Chapter 1: Introduction to NetWorker For information on setting variables, refer to the following sources: • “Configuring the MPE Client on the NetWorker Server” on page 23 • “Setting System Variables for Client-Initiated Backups” in the Legato NetWorker User’s Guide, MPE/iX Version, Release 5.5 • “Setting System Variables for a Recovery Session” in the Legato NetWorker User’s Guide, MPE/iX Version, Release 5.
Chapter 2: Installation Software Installation Roadmap NetWorker’s default installation program installs all the NetWorker software packages during a single session. Read the sections referenced for each procedure before you install the NetWorker software following these steps: 1. If you have an earlier version of NetWorker installed on your HP 3000, you must remove the existing NetWorker software before you install this release of NetWorker. See “Removing an Earlier Release of NetWorker” on page 16. 2.
Removing an Earlier Release of NetWorker 9. Configure the system variables to customize the scheduled backups of the MPE client from the NetWorker server. See “Setting System Variables for ServerInitiated Backups” on page 26. 10. Affiliate the NetWorker MPE Client with the NetWorker MPE Storage Node. See “Affiliating Clients to a Storage Node on the NetWorker Server” on page 29. 11. Configure the NetWorker storage node on the NetWorker server.
Chapter 2: Installation • MPE Patch MPEKX37. The MPE patch numbers are the correct patch numbers at the time of printing this guide. Please call the HP North American Response Center for the latest MPE Patch. • 30 MB of disk space. • NS 3000 Network Services up and running. • TCP/IP configured through the NS 3000 Network Services. • NetWorker Windows NT or UNIX server version 4.2 or above as the server of the client. • Names of the servers of which the HP 3000 is a client and storage node.
Installing the NetWorker Software The NETWRKR.SYS group is a special group that only exists for the NetWorker daemons. This separate group allows you to identify the daemons in the SHOWJOB listing. This group also allows you to stop the daemon jobs. Important: You should not carry out any other work as NETWRKR.SYS. 2 To install the NetWorker software, follow these steps: 1. Change to the legato directory: : CHDIR /legato 2. Begin the installation with the following command: : .
Chapter 2: Installation Manually Creating the MPE Group If you responded no to creating the MPE group while installing NetWorker, the following message is displayed: Exiting script so the installer can create a new group. Important: If the MPE group was not was created automatically, the installation script will not be completed unless you create the new MPE group with the same name, NETWRKR.SYS. Changing the name of the group or altering its capabilities is not supported and will cause NetWorker to fail.
Starting the NetWorker Daemons Starting the NetWorker Daemons Important: You must start the two generic NetWorker daemons, PORTMAP and NSREXECD. Note that the third storage node daemon, NSRMMD, is started automatically by the server, using NSREXECD, for each active storage node tape device. NetWorker daemons must be running at all times if automated backups and storage node services are to be enabled. 2 Before you start the two generic daemons, you must edit the JPRTSTRT and JNSRSTRT job files.
Chapter 2: Installation The job list is displayed: JOBNUM STATE IPRI JIN JLIST INTRODUCED JOB NAME #S2 EXEC 20 20 THU 2:06P MANAGER.SYS #J1 EXEC 10S LP THU 2:07P FTPMON,FTP.SYS #J2 EXEC 10S LP THU 2:07P JINETD,MANAGER.SYS #J11 EXEC 10S LP THU 3:18P PORTMAP,NETWRKR.SYS #J12 EXEC 10S LP THU 3:18P NSREXECD,NETWRKR.SYS The installation is complete. How to Stop the NetWorker Daemons Use the following command to stop the NetWorker daemons: : NSRDOWN.NETWRKR.
Chapter 3: Configuration Configuring the MPE Client on the NetWorker Server Before you use NetWorker to back up a NetWorker MPE client, you must add the client to the NetWorker server. When you add the client, you need to choose a network-wide backup schedule, assign a backup group, and choose backup directives. Make sure the server can access the client for its scheduled network-wide backups.
Naming Conventions for Backing Up MPE Volume Sets Naming Conventions for Backing Up MPE Volume Sets MPE supports two types of volume sets: system volume sets and nonsystem volume sets. MPE systems are shipped with a single preconfigured system volume set called MPEXL_SYSTEM_VOLUME_SET. You can add as many nonsystem volume sets as you need.
Chapter 3: Configuration Backing Up Multiple Save Paths in Parallel A new feature of the NetWorker ClientPak for MPE/iX allows you to back up multiple save paths in parallel. The actual number is limited by the "parallelism" value assigned to the parallelism attribute for MPE client configuration on the NetWorker server. The default setting for the parallel attribute is 4 parallel backups.
Naming Conventions for Backing Up MPE Volume Sets Setting System Variables for Server-Initiated Backups You can set system variables to customize the scheduled backups of the HP 3000 NetWorker MPE client from the NetWorker server. You set these system variables by adding them to the JNSRSTRT file on the MPE/ix client. Users can also set these system variables in the CI shell for client-initiated backups.
Chapter 3: Configuration Creating Logs of Your NetWorker Backups You can set the NSR_MPE_LOGNAME system variable in the MPE/iX Command Interpreter to save information on scheduled backups in a log file.
Naming Conventions for Backing Up MPE Volume Sets Turning Off Parallel Backups Setting the system variable NSR_MPE_SCHED_SAVES_PARALLELISM_OFF to any value, including null, turns off any parallelism of server-initiated backups. Backups that are scheduled to run at the same time as defined in the client resource on the NetWorker server will run sequentially. This variable is useful when the host and its I/O are unable to gracefully sustain more than one volume-set-based save at the same time.
Chapter 3: Configuration Affiliating Clients to a Storage Node on the NetWorker Server The link between a client resource and a list of storage nodes is called storage node affinity. Use the NetWorker Administrator program on the NetWorker server to affiliate NetWorker clients to a storage node. You define storage node affinity in the Storage Nodes attribute in the Clients resource. The default setting for the Storage Nodes attribute on most NetWorker client resources is the NetWorker server.
Configuring the Storage Node on the NetWorker Server Configuring the Storage Node on the NetWorker Server This section describes how to configure NetWorker storage nodes for MPE/iX to use autochangers and tape devices. These sections are adapted for MPE/iX from the Legato NetWorker Administrator’s Guide, UNIX Version, for Release 5.1. For a detailed description of storage nodes, refer to this document in the Documents Library from the Legato home page (http://www.legato.com).
Chapter 3: Configuration To enable and use the optional autochanger module with a NetWorker storage node for MPE/iX, you must perform the following configuration tasks before you can configure and enable the autochanger to work with NetWorker: 1. “Selecting SCSI Addresses for the Autochanger” on page 31 2. “Shutting Down the NetWorker Storage Node” on page 31 3. “Installing the Autochanger Hardware” on page 31 4. “Restarting the NetWorker Storage Node” on page 31 5.
Configuring the Storage Node on the NetWorker Server To configure the DLT Library on an HP 3000 perform the following steps: 1. During bootup, run ODE at the ISL prompt: ISL> ODE Note that the MPE ISL ODE “RUN MAPPER” utility might not recognize and list all fast-wide SCSI devices. 2. 3 Run mapper to get device paths: ODE> RUN MAPPER STARTING EXECUTION OF MAPPER Processer Identification: ... I/O Configuration: Type HW SW Revisions Path Component Name ID Mod Mod Hdwr Firm ... /4/4 HP-PB Fast Wide SCSI .
Chapter 3: Configuration 5. Configure the robotic transport/"picker" and DLT tape drives. Use one of the following IDs: – HPC1194F (for robotics and DLT and STK libraries) – DLT7000 – DLT4000 – COMP3840 For example: 3 io> adev 30 id=HPC1194F path=10/4/4.0.0 io> adev 31 id=DLT7000 path=10/4/4.1.0 mode=autoreply io> adev 32 id=DLT7000 path=10/4/4.2.0 mode=autoreply io> adev 33 id=DLT7000 path=10/4/4.3.0 mode=autoreply io> adev 34 id=DLT7000 path=10/4/4.4.0 mode=autoreply 6.
Configuring the Storage Node on the NetWorker Server d. Verify the binding for the tape drives (the differential tape dm): io> lpath 10/4/4.1.0 PATH: 10/4/4.1.0 LDEV: 31 ID: DLT7000 TYPE: TAPE PMGR: SCSI_TAPE2_DM PMGRPRI: 10 3 LMGR: LOGICAL_DEVICE_MANAGER MAXIOS: 0 Repeat this verification step for lpath 10/4/4.2.0, 4.3.0, and 4.4.0. e. Verify the ldev specifications: io> ldev 30/34 LDEV: 30 DEVNAME: OUTDEV: 0 MODE: ID: HPC1194F RSIZE: 128 DEVTYPE: MOSAR_AC PATH: 10/4/4.0.
Chapter 3: Configuration Creating the Device Files Using the mknod Utility An important final step in the autochanger installation is creating the device files required to use the autochanger. Again, you need the SCSI addresses previously selected for the autochanger. To create the device files to bind the LDEV numbers to the POSIX device special files, follow these steps: 1. Create the robotics/”picker” device file as follows: 3 > mknod/dev/sjid1u1 c 0 30 2.
Configuring and Operating NetWorker Autochanger Support Configuring and Operating NetWorker Autochanger Support This section provides information on how to configure and operate NetWorker autochanger support. Much of the information is copied from the Legato NetWorker Administrator’s Guide, UNIX Version. The commands have been modified to use the MPE program names.
Chapter 3: Configuration Testing the Autochanger Connection To use an autochanger for NetWorker storage management, you must first use the JBEXER command to test that the device software you installed has been suitably configured for use with NetWorker. To test the autochanger connection, follow these steps: 1. Become MANAGER.SYS on the NetWorker storage node. 2. Insert two volumes, one each into the first and last slots of the autochanger.
Configuring and Operating NetWorker Autochanger Support 9) Overland Data 10) Philips 11) Qualstar 12) Quantum 13) SONY 3 14) StorageTek 15) Sun 16) Other Choice? 14 Enter the number corresponding to the type of jukebox you are installing: 1) STK 9714 2) STK 9730 3) STK 9710 4) STK 9708/LS-380L 5) STK 9704/LS-340L 6) STK 9709/ACL5480 7) ACL 2640 Choice? 3 Installing an ’STK 9710’ jukebox.
Chapter 3: Configuration 12) dlt7000 13) tz85 14) tz86 15) tz87 16) tz88 17) tz89 3 18) himt 19) qic 20) SD3 21) file 22) logical 23) optical Choice? 11 Enter pathname of media drive 2 /dev/tape42: ? [Return] This media device has not been configured yet. Please select a media device type for /dev/tape42.
Configuring and Operating NetWorker Autochanger Support 22) logical 23) optical Choice? 11 Your jukebox has a bar code reader. Do you want bar code reader support enabled? (yes/no) y 3 Do you want volume labels to match bar code labels? (yes/no) y Jukebox has been added successfully Repeat this step for the remaining devices, for example /dev/tape 43. When you use the JBCONFIG program to configure an autochanger, NetWorker creates a new resource with the name you specified.
Chapter 3: Configuration When you add a remote autochanger device: 1. Add the storage node’s hostname to the Administrator attribute in the NSR resource (Server window in the NetWorker Administrator program) in the following form: manager.sys@storage-node-hostname 2. Run the JBCONFIG program on the storage node machine to define each device in the autochanger.
Configuring and Operating NetWorker Autochanger Support NetWorker does not recognize the following volume labels and considers these volumes unlabeled and available for use: 3 • Volumes without a label • Volumes labeled with something other than a NetWorker label • Volumes with NetWorker labels that were written in a density different from the device in which it is currently loaded.
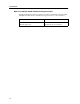
Chapter 3: Configuration The NetWorker cleaning cartridge support provides notification messages to inform you of cleaning cartridge operations, as shown in Table 1. Table 1. Auto Clean Notifications Notification Message Meaning Device cleaning required The Auto Clean attribute is disabled and the device needs to be cleaned. Device cleaned The Auto Clean attribute is enabled and the device has been cleaned.
Configuring and Operating NetWorker Autochanger Support 5. At the command line, enter the following command: : NSRJB;info=”-U uses -j autochanger -S slot” 3 – where uses is the number of uses left on the “Default Cleaning” field (the number you wrote down in Step 2) and slot specifies the slot you now use as the cleaning slot.
Chapter 3: Configuration Withdrawing a Volume To use the CAP to withdraw a volume from a specific slot in the autochanger, follow these steps: 1. Become MANAGER.SYS on the NetWorker storage node machine. 2. Enter the NSRJB command at the system prompt. Replace slot with the slot number for the volume and volume with the label name of the volume: : NSRJB;info=”-w -S slot volume” 3. When the volume reaches the CAP, press the button to open the CAP. 4. Remove the volume and close the CAP.
Configuring and Operating NetWorker Autochanger Support NetWorker starts to label the media in the autochanger with the label displayed in the Starting With attribute. The First Slot and Last Slot attributes determine the range of slots containing volumes that NetWorker labels. Consider the following conventions when labelling volumes: 3 • If you label a specific range of volumes, the name in the Starting With attribute must match the label template.
Chapter 3: Configuration When to Use Barcode Labels Consider the following conventions when using barcodes: • If you have volumes that you use often for recovery or for overwriting with new data, it is beneficial to label them with barcode labels. When your volumes are labeled with barcodes, you save hours of time when you inventory your volumes. • If your existing volumes are stored in a vault or offsite for long periods at a time, you do not have to label existing volumes with barcode labels.
Configuring and Operating NetWorker Autochanger Support Labeling an Autochanger Volume with Barcodes A volume must have a volume label, but it does not require a barcode label. Use the Jukeboxes resource to associate barcode labels with your volumes. To label NetWorker volumes with barcode labels, follow these steps: 3 1. Apply the barcode labels to your volumes. 2. Place the volumes with the barcode labels in the autochanger. 3. Display the Jukeboxes resource. 4.
Chapter 3: Configuration How the Inventory Process Works When NetWorker labels the contents of an autochanger, it registers the location of the volumes in the autochanger slots when it assigns the volume label. As long as you do not change the volumes in the autochanger after labeling them, NetWorker can access the volumes because each volume label is assigned to a specific slot.
Configuring and Operating NetWorker Autochanger Support Checking Autochanger Notifications NetWorker uses e-mail to send notices about NetWorker events. The software uses the three Tape Mount Request notifications to inform you that the autochanger needs attention, as listed below: 3 • Tape Mount Request 1 - displays a pending request for mounting a backup volume. In most cases, the server is waiting for an operator to perform a routine task.
Chapter 3: Configuration • If you do not need the data on the full volume, you can manually change the mode to “recyc” in the Volumes resource. NetWorker overwrites the data with new backups, but maintains the existing labels. This is the only instance in which you do not need to relabel a volume to make it eligible to be overwritten with new data.
Chapter 4: Enabling Networker How to Enable and Register NetWorker The enabler certificate you purchased provides the enabler code you need to enter to use the NetWorker software permanently. Using the Enabler Code To enter the enabler code, follow these steps: 1. Become root on your NetWorker server. 2. Start the GUI version of the NetWorker Administrator program using the following command: # nwadmin & 3. Open the Server window. Fill in the name, address, phone, and e-mail information requested.
How to Enable and Register NetWorker Enabling NetWorker To enable the NetWorker software, the specific process you follow depends on whether the NetWorker software you installed is for a new, updated, or evaluation version. 4 • If you have just purchased your first NetWorker product, an Enabler Certificate was sent separately from the product package. You need the enabler code on the certificate to enable and register the NetWorker product you purchased.
Chapter 4: Enabling Networker • If you installed the NetWorker server software for evaluation purposes, you have 30 days to use the software before you must purchase and enter an enabler code. – You do not need to enter any evaluation enabler codes to evaluate any of the optional NetWorker software products within the 30-day period. – To use the NetWorker software and options beyond the 30-day trial evaluation, you must purchase an enabler code for the software you want to use.
Appendix A: Common NetWorker Commands This appendix contains a table of common NetWorker commands and includes instructions on how to display the man pages. Common NetWorker Commands Table 3 lists the commands used in the installation and configuration of the Legato NetWorker Client/Storage Node, MPE/iX Version. Table 3. Common NetWorker Commands MPE/iX Command UNIX Manual Page Description JBCONFIG jbconfig Configures a jukebox (Media Changer Device) for a NetWorker server.
Displaying the Man Pages Displaying the Man Pages You must display the man pages from the /SYS/NETWRKR directory. To display the man pages, follow these steps: 1. Change to the NetWorker directory: : CHDIR /SYS/NETWRKR 2.