
HP e3000/iX Network Planning and Configuration Guide (36922-90037)


188 Chapter13
Configuring Logging
To Modify the Logging Configuration
Use the fields and the function keys of the screen to configure logging
for the subsystems represented on the screen. If the subsystem for
which you want to enable logging does not appear on this screen, press
the
[Next Screen] function key to go to the next Netxport Log
Configuration screen. There are a total of six logging configuration
screens.
Enable or disable logging classes (or accept HP-recommended defaults).
Press the
[Save Data] key on each screen to create or modify the data
record. Verify that the data record has been created by checking that
the Data flag is Y.
Press the
[Exit Logging] function key when you have finished modifying
the logging configuration.
Fields
Console
Logging The value entered in this field specifies whether or not
logging events for the subsystem and class listed beside
the field will be logged to the system console. A value
must be entered for each subsystem and class listed. A
Y (yes) enables logging to the console, N (no) disables
logging to the console.
Disk Logging The value entered in this field specifies whether or not
logging events for the subsystem and class listed beside
the field will be logged to a disk file. A value must be
entered for each subsystem and class listed. A Y (yes)
enables logging to a file, N (no) disables logging to a file.
The file name that NMS uses is NMLGnnnn.PUB.SYS,
where nnnn is a number from 0000 to 9999. All logging
classes in all subsystems are logged to this file. At each
system startup, or when a file is full, NMS creates a
new NMLGnnnn.PUB.SYS file, naming each successive
logging file by incrementing nnnn. When
NMLG9999.PUB.SYS is full, NMS names the next
logging file NMLG0000.PUB.SYS.
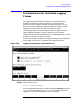
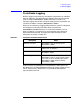
The Netxport Log Configuration (6) screen (#316) in Figure 13-7 is
displayed when you press the
[Next Screen] function key from the
Netxport Log Configuration (5) screen (#69) in Figure 13-6.