
Implementing Windows Server 2012 SR-IOV on HP ProLiant Servers, 2nd edition


Technical white paper | Microsoft Windows Server 2012 SR-IOV
6
Configure System
After your server is prepared, you are ready to install the NIC. For information about the supported HP SR-IOV NICs, see the “
SR-IOV-compliant NICs” section.
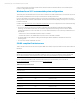
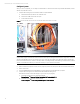
1. Complete the following steps to install the SR-IOV-compliant PCIe NIC:
A. Install SR-IOV stand up NIC into one of the PCIe slots.
B. Insert the two GBIC modules into the ports.
C. Connect the fibre cables.
Figure 3: Install the PCIe NIC, GBIC modules, and connect fibre cables in this manner to test VMs
Important
As an example, Figure 3 illustrates the cable connections necessary for testing the SR-IOV and VM configuration connections
with a ProLiant DL580 G7 server. The connections for your server may vary slightly. The cables will remain connected like
this for the remainder of the procedures in this paper. After completing the steps in the “Making sure that the VM is enabled”
section, connect the fibre cables to your switch as necessary for your network environment.
2. Make sure that the peripheral modules (monitor, keyboard, and mouse) and power cable are connected to the server.
3. Power on the server.
4. Load the HP ROM-Based Setup Utility (RBSU) by pressing the F9 key during POST when prompted.
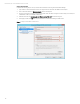
5. Complete the following steps to enable the PCIe NIC and SR-IOV (See Figure 4).
Note that the selection names that display for your server may vary slightly:
A. Select the following options to enable the PCIe NIC:
System Options Processor Options: Enable Intel Virt Tech and Intel Vt-D
B. Select the following options to enable SR-IOV:
Advanced Options Advanced System ROM Options: Enable SR-IOV