
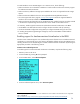
Implementing Microsoft® Windows Server® 2008 R2 Hyper-V™ and Microsoft Hyper-V Server 2008 R2


Installing the Windows Server 2008 R2 Hyper-V server role
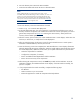
To install the Windows Server 2008 R2 Hyper-V server role, complete the following steps:
1. Click Add Roles. If this is the first role being added to the server, you may see a page describing
the process for adding roles. Click Next.
2. Check the box for Hyper-V and click Next. Review the Windows Server 2008 R2 Hyper-V
overview and then click Next.
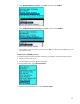
3. Choose the NICs to configure as virtual networks for use by guest OSs. Click Next.
IMPORTANT
When the virtual network switch is bound to the NIC, all protocols are
removed.
Instead of the TCP/IP protocol, the Microsoft Virtual Network Switch
Protocol is installed; therefore, all possible open Terminal Server sessions
will close. To re-enable the old TCP/IP settings, login to the server locally or
through IRC, and then configure the newly created network adapter while
using the old TCP/IP configuration.
NOTE
Microsoft recommends keeping one NIC reserved to manage the host
operating environment. In scenarios where this is not possible, be advised
that network connectivity to the host can be temporarily interrupted during
configuration changes to the virtual network.
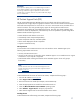
4. Review the summary installation. Make a note of which NICs require configuration as virtual
networks.
5. When prompted, choose to reboot the server to complete the installation. After the server reboots,
log in as Administrator to finish the installation process.
After adding the
Windows Server 2008 R2 Hyper-V role, you can create and configure virtual machines.
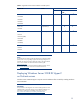
Deploying Hyper-V Server 2008 R2
on ProLiant servers
Microsoft Hyper-V Server 2008 R2 is a standalone component. It is not necessary to install Windows
Server 2008 R2 before installing Microsoft Hyper-V Server 2008 R2. To prepare for installation, do
the following:
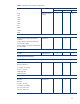
• Make sure that the server selected for installation is included in Table 5 and has the necessary
support for hardware-assisted virtualization.
• Make sure that storage options added to the server are included as supported ProLiant storage
options in Table 6.
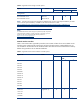
• Make sure that any NICs added to the server are included as supported ProLiant Gigabit Ethernet
NICs in Table 7.
• Go to the support and drivers page at
www.hp.com/support to obtain the supported ROM for
Windows Server 2008 installations for the server.
• If necessary, enable support for No-Execute and hardware-assisted virtualization in the RBSU.
• Use the RBSU to set date/time and configure the boot controller order (if necessary).
• Use the Online RAID Configuration Utility (ORCA) to configure the RAID settings for the server.
19