
Using Microsoft ImageX with the SSTK to Capture and Deploy Windows Server Images on HP Integrity Servers
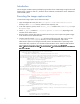


<ProtectYourPC>3</ProtectYourPC>
</OOBE>
<UserAccounts>
<AdministratorPassword>
<Value>Use WSIM to insert an encrypted password, or change the
PlainText value to true and insert a plain text password.</Value>
<PlainText>false</PlainText>
</AdministratorPassword>
</UserAccounts>
</component>
</settings>
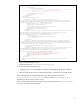
<settings pass="specialize">
<component name="Microsoft-Windows-International-Core"
processorArchitecture="ia64" publicKeyToken="31bf3856ad364e35" language="neutral"
versionScope="nonSxS" xmlns:wcm="http://schemas.microsoft.com/WMIConfig/2002/State"
xmlns:xsi="http://www.w3.org/2001/XMLSchema-instance">
<InputLocale>0409:00000409</InputLocale>
<UILanguage>en-US</UILanguage>
<UILanguageFallback>en-US</UILanguageFallback>
<UserLocale>en-US</UserLocale>
<SystemLocale>en-US</SystemLocale>
</component>
<component name="Microsoft-Windows-UnattendedJoin" processorArchitecture="ia64"
publicKeyToken="31bf3856ad364e35" language="neutral" versionScope="nonSxS"
xmlns:wcm="http://schemas.microsoft.com/WMIConfig/2002/State"
xmlns:xsi="http://www.w3.org/2001/XMLSchema-instance">
<Identification>
<JoinWorkgroup>WORKGROUP</JoinWorkgroup>
</Identification>
</component>
<component name="Microsoft-Windows-TerminalServices-LocalSessionManager"
processorArchitecture="ia64" publicKeyToken="31bf3856ad364e35" language="neutral"
versionScope="nonSxS" xmlns:wcm="http://schemas.microsoft.com/WMIConfig/2002/State"
xmlns:xsi="http://www.w3.org/2001/XMLSchema-instance">
<fDenyTSConnections>false</fDenyTSConnections>
</component>
<component name="Microsoft-Windows-Shell-Setup" processorArchitecture="ia64"
publicKeyToken="31bf3856ad364e35" language="neutral" versionScope="nonSxS"
xmlns:wcm="http://schemas.microsoft.com/WMIConfig/2002/State"
xmlns:xsi="http://www.w3.org/2001/XMLSchema-instance">
<ProductKey>XXXXX-XXXXX-XXXXX-XXXXX-XXXXX</ProductKey>
<RegisteredOrganization>HP</RegisteredOrganization>
<RegisteredOwner>HP</RegisteredOwner>
</component>
</settings>
<cpi:offlineImage cpi:source="" xmlns:cpi="urn:schemas-microsoft-com:cpi"/>
</unattend>
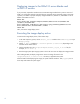
6. Open a command prompt window.
7. Change the directory to C:\Windows\System32\sysprep.
8. Execute the following command line:
sysprep.exe /oobe /generalize /quiet /unattend:sysprep.xml /reboot
9. After the system restarts, do not let it boot Windows again. Instead, boot to the SSTK WinPE.
After loading WinPE, the capture image action starts. The image file is saved at the
images\windows\2008-server-version directory, where version can be sp2 or r2,
depending on the OS version chosen in step 2.
After the SSTK finishes capturing the image, the system reboots Windows. Then, sysprep runs a
short setup and restarts the system again.
3