Windows Server 2008 SP2 and Windows Server 2008 R2 SP1 on HP Integrity Servers Kernel Debugging Guide HP Part Number: T8704-96010 Published: May 2011
Legal Notices Confidential computer software. Valid license from HP required for possession, use or copying. Consistent with FAR 12.211 and 12.212, Commercial Computer Software, Computer Software Documentation, and Technical Data for Commercial Items are licensed to the U.S. Government under vendor's standard commercial license. The information contained herein is subject to change without notice.
Table of Contents About This Document.........................................................................................................7 Intended Audience.................................................................................................................................7 New and Changed Information in This Edition.....................................................................................7 Document Organization.....................................................................
3 Debugging HP Virtual Machines guests....................................................................39 HPVM Windows guest debug process.................................................................................................
List of Figures 1-1 1-2 1-3 1-4 1-5 1-6 1-7 1-8 1-9 1-10 1-11 1-12 1-13 rx1620 debug port (male pins on system board)...........................................................................14 Required plug ends and internal wiring.......................................................................................15 rx1620 debugging port..................................................................................................................21 rx2600 and rx2620 debugging port..................
List of Tables 1-1 1-2 1-3 1-4 1-5 6 Kernel debugging setup options...................................................................................................11 DB9 male pin-out to 5x2 female....................................................................................................14 Computer pin-outs or HP Integrity rx5670 servers.......................................................................15 Computer pin-outs for HP Integrity rx7620 and rx8620 servers..........................
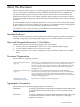
About This Document This document describes the process for debugging the operating system kernel on HP Integrity servers running Microsoft Windows® Server 2008 SP2 and Windows® Server 2008 R2 SP1. The document printing date and part number indicate the document’s current edition. The printing date changes when a new edition is printed. Minor changes may be made at reprint without changing the printing date. The document part number changes when extensive changes are made.
IMPORTANT This alert provides essential information to explain a concept or to complete a task NOTE A note contains additional information to emphasize or supplement important points of the main text. KeyCap The name of a keyboard key or graphical interface item (such as buttons, tabs, and menu items). Note that Return and Enter both refer to the same key. Computer output Text displayed by the computer. User input Commands and other text that you type.
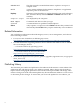
should subscribe to the appropriate product support service. See your HP sales representative for details. Manufacturing Part Number Supported Operating Systems Supported Smart Setup Version Supported Products (Servers) Publication Date T8704–96000 Microsoft Windows Server 2008 with Service Pack 2 (SP2) for Itanium-based Systems Version 7.
1 Debugging the kernel locally If you have programmed on the Windows operating system for any length of time, you are probably familiar with user-mode debuggers and aware of kernel-mode debuggers. User-mode debuggers help developers to debug applications. Kernel-mode debuggers are used mostly by driver writers to debug device drivers and by support professionals to analyze system crashes. This chapter describes how to locally debug the operating system kernel on HP Integrity servers.
Table 1-1 Kernel debugging setup options (continued) Laptop or workstation + Microsoft Debugging Tools for Windows Serial (RS232) null modem cable (DB9 Works with the following HP Integrity female) server models: • BL860c + • BL870c 5x2-to-DB9M converter (for rx1620 • BL860c i2 only) • BL870c i2 • BL890c i2 • rx2800 i2 • rx1620 • rx2600 • rx2620 • rx2660 • rx3600 • rx4640 • rx6600 Laptop or workstation CAT-5 cable (RJ45) + + Microsoft Debugging Tools for Windows RJ45-to-DB9F converter Laptop or work
• operating system itself. KD also supports multiprocessor debugging. Typically, the KD tool runs on the host but not on the computer being debugged. Windows Debugger (WinDbg) is a powerful debugging tool capable of both user-mode and kernel-mode debugging. WinDbg (windbg.exe) provides full source-level debugging for the Windows kernel, kernel-mode drivers, system services, and for user-mode applications and drivers. WinDbg can view source code, variables, stack traces, and memory.
After the installation completes, and after you complete the other required tasks, such as preparing your cable and setting up the target machine, you can launch the Windows Debugger (WinDbg) by selecting Start > All Programs > Debugging Tools for Windows > WinDbg. Building a converter for your cable Some HP Integrity servers do not have a DB9 serial port. To connect the host to these servers, you must build or buy a converter plug to use to connect a cable to the debug port on the server.
Figure 1-2 Required plug ends and internal wiring Use these wiring details and one of the following pin-out tables to build the RJ45-to-DB9F converter that applies to your server model number.
Table 1-5 Computer pin-outs for HP Integrity Superdome/sx1000 servers (continued) RJ45 Pin Wire Color DB9 Female Pin 4 Red 8 5 Green 3 6 Yellow NC 7 Brown 2 8 Gray (White) NC Setting up and connecting to the target machine To set up the server and initiate local debugging, complete the following steps: 1. Change the boot configuration (required for all servers). 2.
In systems running Windows Server 2008, you must edit the boot options with a different tool: • BCDEdit (bcdedit.exe) is a command-line tool for adding, deleting, editing, and modifying boot data in a boot configuration data (BCD) store. The usage information provided below is a quick summary of some of the main features. For a complete description of all arguments and parameters, refer to the Microsoft documentation found here: http://technet.microsoft.com/en-us/library/cc709667(WS.10).
Boot Options -----------Timeout: 20 Default: \Device\HarddiskDmVolumes\PhysicalDmVolumes\BlockVolume1\WINDOWS CurrentBootEntryID: 1 Boot Entries -----------Boot entry ID: 1 OS Friendly Name: Windows Server 2003, Enterprise OsLoadOptions: /redirect BootFilePath: \Device\HarddiskVolume1\EFI\Microsoft\WINNT50\ia64ldr.
5. To confirm that the entries were added correctly, run the bootcfg command again: C:\>bootcfg The new boot configuration appears: Boot Options -----------Timeout: 20 Default: \Device\HarddiskDmVolumes\PhysicalDmVolumes\BlockVolume1\WINDOWS CurrentBootEntryID: 1 Boot Entries -----------Boot entry ID: 1 OS Friendly Name: Windows Server 2003, Enterprise OsLoadOptions: /redirect BootFilePath: \Device\HarddiskVolume1\EFI\Microsoft\WINNT50\ia64ldr.
3. At the Enter OS boot option to modify: prompt, select the first boot option by entering: 1. The system displays the following: 1 LoadIdentifier = Windows Server 2003, Datacenter 2 OsLoadOptions = /REDIRECT /NOVESA 3 EfiOsLoaderFilePath = cf5f2ddc-b885-11d7-b831-000000000000 :: \efi\microsoft\winnt50\ia64ldr.efi 4 OsLoaderFilePath = e605a034-b885-11d7-b831-000000000000 :: \windows Enter VAR to modify: 2 4. 5.
3. Enable the debugger for the desired boot entry: C:\>bcdedit /debug {identifier_of_boot_entry_targeted_for_kernel_debugging} ON Once again, for a complete description this tool, refer to the Microsoft documentation found here: http://technet.microsoft.com/en-us/library/cc709667(WS.10).aspx rx1620 server Connect the cable between the laptop (host) and the rx1620 server (target) using the 5x2-to-DB9M converter as shown in the following image.
Figure 1-5 rx2660 debugging port rx3600 and rx6600 servers For rx3600 and rx6600 servers, connect the serial port on the laptop or workstation to the serial port on the far right side of the back of the server (when facing the back). The following image shows the connection. Figure 1-6 rx3600 and rx6600 debugging port rx4640 server The rx4640 server has 3 DB9 connectors on the rear I/O panel.
Figure 1-7 rx4640 debugging port To enable the debug port, you must open the server's I/O bay and short a jumper header as follows (jumper not provided): 1. 2. Power the system off and verify that it is disconnected from the main AC power supply. Locate the set of three jumpers directly above the brown edge connector socket (the one resembling an AGP slot) on the motherboard, as shown in the following image. Figure 1-8 Location of three jumpers on rx4640 motherboard 3. 4.
Figure 1-9 rx5670 debugging port rx7620, rx8620, and Superdome/sx1000 servers To set up the rx7620, rx8620, or Superdome/sx1000 for local debugging, complete the following steps: 1. Locate the correct debugging port by identifying the core cell. 2. Copy the KD utility to the EFI system partition (rx7620 and rx8620 only). 3. Enable debug port (rx7620 and rx8620 only). 4. Connect to the debug port. Locate the debug port HP Integrity rx7620, rx8620, and Superdome servers are cell-based.
In this example, the root cell is cell 0, physically the topmost cell in the server. Option 2: Identifying the core cell using an nPartition command To identify the nPartition’s core cell while the operating system is running: • You must know the server IPMI password. • You must know the IP address or host name of the server’s management processor. • You have a workstation or laptop with the ParCLI tool installed. • The laptop or workstation is on a network connected to the management processor.
1. At the EFI Shell prompt, enter the following command: EFI Shell> kd -on Now the shared port on the core cell is enabled for kernel debugging. The state of the port is consistent across reboots. However, removing power to the system reverts the debug port back to its default state.
Figure 1-11 Debugging port on Superdome/sx1000 This figure shows two adjacent cells and the kernel debugging ports on each. Always use the RJ-45 connector closest to the handle. Only one debug port can be active for a given partition that spans one or more non-consecutive cells, and you must always connect to the port on the root cell of that partition.
1. Connect the serial-USB-video cable (or SUV, part number 416003–001, supplied with the server) to the 9–pin serial connector on the front of the BL860c/BL870c server blade, or back of the rx2800 i2 server, as shown in the following images. Figure 1-12 BL860c/BL870c debugging port, front panel Figure 1-13 rx2800 i2 debugging port, back panel 2. 3. 4. Connect one end of a null modem cable to the SUV serial port.
4. Because the SUV serial port is shared between the iLO console and the debug serial port, you must issue the following command at the MP command prompt to direct output to the debug serial port: ca –local –mode aux 5. Issue the following command at the Windows command prompt to redirect output to COM2: bcdedit /dbgsettings serial DEBUGPORT:2 BAUDRATE:115200 6. Reboot the target system.
2 Debugging the kernel remotely If you have programmed on the Windows operating system for any length of time, you are probably familiar with user-mode debuggers and aware of kernel-mode debuggers. User-mode debuggers help developers to debug applications. Kernel-mode debuggers are used mostly by driver writers to debug device drivers and by support professionals to analyze system crashes. This chapter describes how to debug the operating system kernel remotely on HP Integrity servers.
• kd.exe) to debug kernel-mode programs and drivers or to monitor the behavior of the OS itself. KD also supports multiprocessor debugging. Typically, the KD tool runs on the host but not on the computer being debugged. Windows Debugger (WinDbg) is a powerful debugging tool capable of both user-mode and kernel-mode debugging. WinDbg (windbg.exe) provides full source-level debugging for the Windows kernel, kernel-mode drivers, and system services and for user-mode applications and drivers.
sample extensions and other samples, the “Debug Help Library” documentation (dbghelp.chm), and the source server documentation (srcsrv.doc). After the installation completes, and after you complete the other required tasks, such as preparing your cable and setting up the target machine, you can launch the Windows Debugger (WinDbg) by selecting Start > All Programs > Debugging Tools for Windows > WinDbg.
1. At the command-line prompt, enter the following command: C:\>bootcfg The current boot configuration appears, as shown in the following example: Boot Options -----------Timeout: 20 Default: \Device\HarddiskDmVolumes\PhysicalDmVolumes\BlockVolume1\WINDOWS CurrentBootEntryID: 1 Boot Entries -----------Boot entry ID: 1 OS Friendly Name: Windows Server 2003, Enterprise OsLoadOptions: /redirect BootFilePath: \Device\HarddiskVolume1\EFI\Microsoft\WINNT50\ia64ldr.
OS Friendly Name: Windows Server 2003, Enterprise OsLoadOptions: /redirect BootFilePath: \Device\HarddiskVolume1\EFI\Microsoft\WINNT50\ia64ldr.
5. To confirm that the entries were added correctly, run the bootcfg command again: C:\>bootcfg The new boot configuration appears: Boot Options -----------Timeout: 20 Default: \Device\HarddiskDmVolumes\PhysicalDmVolumes\BlockVolume1\WINDOWS CurrentBootEntryID: 1 Boot Entries -----------Boot entry ID: 1 OS Friendly Name: Windows Server 2003, Enterprise OsLoadOptions: /redirect BootFilePath: \Device\HarddiskVolume1\EFI\Microsoft\WINNT50\ia64ldr.
3. At the Enter OS boot option to modify: prompt, select the first boot option by entering: 1. The system displays the following: 1 LoadIdentifier = Windows Server 2003, Datacenter 2 OsLoadOptions = /REDIRECT /NOVESA 3 EfiOsLoaderFilePath = cf5f2ddc-b885-11d7-b831-000000000000 :: \efi\microsoft\winnt50\ia64ldr.efi 4 OsLoaderFilePath = e605a034-b885-11d7-b831-000000000000 :: \windows Enter VAR to modify: 2 4. 5.
3. Enable the debugger for the desired boot entry: C:\>bcdedit /debug {identifier_of_boot_entry_targeted_for_kernel_debugging} ON For a complete description this tool, refer to the Microsoft documentation found here: http://technet.microsoft.com/en-us/library/cc709667(WS.10).aspx Enable IPMI LAN access and the debugging option Enable the Windows debugging option and enable LAN access to the management processor (MP) by completing the following steps: 1. 2. 3. Log in to the server’s MP.
3 Debugging HP Virtual Machines guests HP Virtual Machines (HPVM) is a soft partitioning and virtualization technology that provides operating system isolation with CPU allocation and shared I/O. HPVM enables a single Integrity server to emulate multiple virtual machines running distinct operating systems and environments.