
Tuning SQL Server 2005 on Windows Integrity Servers

Page 7 of 13
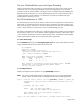
3. Expand Security Settings, and then expand Local Policies.
4. Select the Users Rights Assignment check box. The policies are displayed in the details pane.
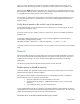
5. In the details pane, double-click Lock pages in memory.
6. In the Local Security Policy Setting dialog box, click Add.
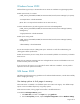
7. In the Select Users or Groups dialog box, add an account with privileges to run sqlservr.exe.
Note: To use this capability, the user running the instance of SQL Server (typically Administrator) must
have the Lock Pages in Memory capability enabled.
Enable write caching on the log disk
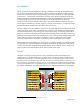
The bigger the system, the greater the number of transactions and so is the importance of a cached
log for the database. The amount of data in the cached log file is proportional to the database. For
example, on a Superdome, if the storage array is too slow to handle the array stream, you should
have write cache enabled for the log drive. As a rule of thumb, for a server with 8 or more
processors, you need significantly more storage for the cached log file.
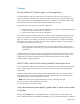
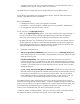
Use an appropriate disk configuration tool to configure and enable the hardware cache. In addition,
the Write Caching and Safe Removal Policies must be correct. To access this, access the disk device
properties:
1. Right-click “My Computer” and select Manage; click Device Manager and Disk Drives.
2. Find the Log Disks and right-click each device entry. If you are using Secure Path or some
other multi-path disk software, the correct disk may be a virtual device.
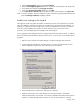
3. Right-click each and select Properties; click the Policies tab.
4. Ensure the radio button “Optimize for performance” is selected.
5. Under this radio button, ensure that “Enable write caching on the disk” and “Enable
advanced performance” are checked. If the cache is enabled at the hardware level, the first
checkbox is usually selected, but the second is not. This second checkbox is critical for