
PMP Setup and Installation Guide v5.5

Preinstallation requirements 11
Client requirements
PMP requires that Internet Explorer 6.0 or later be installed on any client systems.
NOTE: To determine the current version of Internet Explorer, open the browser, and select Help>About Internet
Explorer from the menu bar. An information box displays the current installed version.
The browser security and privacy options on the Local Intranet Web content zone must be set as follows for PMP
to function properly. For example, PMP analysis cannot properly display graphs unless Internet Explorer ActiveX
control settings are properly configured.
The required Internet Explorer security settings and privacy options of the client server are:
• Enable Download signed ActiveX Controls
• Prompt to Download unsigned ActiveX Controls
• Enable Run ActiveX controls and plug-ins
• Enable Script ActiveX controls marked safe for scripting
• Enable Active scripting
• Allow stored and per-session cookies
To modify security and privacy settings for the local intranet Web content zone:
1. Open an Internet Explorer browser.
2. Select Tools>Internet Options from the menu bar.
3. Click the Security or Privacy tab as necessary.
4. Perform any necessary modifications by selecting the appropriate option in each instance.
Oracle requirements
To install PMP with an Oracle database, the database and a user account with database administrator privileges
must be already created.
Creating the PMP database
To create the PMP database in Oracle:
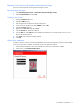
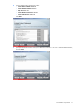
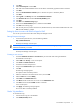
1. Select Start>Programs>Oracle – OraHome92>Configuration and Migration Tools>Database Configuration
Assistant.
2. Click Next.
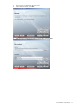
3. Verify that Create Database is selected, and click Next.
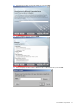
4. At the Database Templates screen, select General Purpose, and click Next.
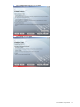
5. At the Database Identification screen, enter the Global Database Name. The SID field automatically lists the
Global Database Name. Click Next.
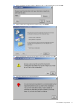
6. At the Database Connection Options screen, verify that Dedicated Server Mode is selected, and click Next.
7. At the Initialization Parameters screen, click the Memory tab, and select Typical.
8. Click Character Sets tab, select Use Unicode (AL32UTF8), and click Next.
9. At the Database Storage screen, click Next.
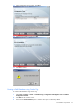
10. At the Creation Options screen, verify that the Create Database checkbox is selected, and click Finish.
11. At the Summary page, click OK. The database creation process occurs, which takes a few minutes.
12. Enter the SYS password, Confirm SYS Password, SYSTEM Password, and Confirm SYSTEM Password. Click
Exit. The PMP database is created.