HP ProLiant Essentials Performance Management Pack Setup and Installation Guide Part number: 345702-403 Twelveth edition: July 2007
Legal notices © Copyright 2003–2007 Hewlett-Packard Development Company, L.P. Confidential computer software. Valid license from HP required for possession, use or copying. Consistent with FAR 12.211 and 12.212, Commercial Computer Software, Computer Software Documentation, and Technical Data for Commercial Items are licensed to the U.S. Government under vendor's standard commercial license. The information contained herein is subject to change without notice.
Contents About this guide Where to go for additional help ................................................................................................................ 5 Website............................................................................................................................................. 5 HP Services and Technical Support........................................................................................................ 5 Overview and structure Introduction .........
Installation and uninstallation................................................................................................................... 40 HP SIM integration ................................................................................................................................. 41 PMP service .......................................................................................................................................... 42 Licensing and monitoring administration ................
About this guide This setup and installation guide can be used for step-by-step instructions when installing and using HP ProLiant Essentials Performance Management Pack. Where to go for additional help For more information about HP ProLiant Essentials Performance Management Pack, refer to: • http://www.hp.
• Warranty—HP will replace defective delivery media for a period of 90 days from the date of purchase. This warranty applies to all Insight Control Management, HP Systems Insight Manager, and ProLiant Essentials products. • Startup technical software support—Phone support is available to help you with basic installation, set-up, and usage questions.
Overview and structure Introduction HP ProLiant Essentials Performance Management Pack (PMP) is a software solution that detects and analyzes hardware bottlenecks on ProLiant servers. PMP provides the tools needed to receive proactive notification of impending bottleneck conditions and debug existing performance issues. With PMP, performance can be monitored on one or more servers. The performance information is analyzed to determine if there is an impending or existing performance bottleneck issue.
Preinstallation requirements Hardware requirements The following tables list the hardware required to successfully run PMP on the analysis server, monitored servers, and client systems. Analysis server requirements The analysis server hardware requirements are listed in the following table. IMPORTANT: The analysis server and the database server must be configured for the same time zone.
Operating system requirements For a complete list of the operating systems supported on the monitored servers, analysis server and client system, refer to the HP ProLiant Essentials Performance Management Pack Support Matrix.
Additional software requirements The following sections detail additional software requirements for the analysis server, monitored servers, client systems, and Oracle. Analysis server requirements Additional software requirements for the analysis server are listed in the following table. Table 2 Analysis server software requirements Software component Minimum requirement Server software • • • TCP/IP installed SNMP services installed and active Internet Explorer 6.
Client requirements PMP requires that Internet Explorer 6.0 or later be installed on any client systems. NOTE: To determine the current version of Internet Explorer, open the browser, and select Help>About Internet Explorer from the menu bar. An information box displays the current installed version. The browser security and privacy options on the Local Intranet Web content zone must be set as follows for PMP to function properly.
Setting up a user account with database administrator privileges Set up user accounts from the Oracle Enterprise Manager Console. Starting Enterprise Manager 1. Click Start>All Programs>Oracle – OraHome92->Enterprise Manager Console. 2. Select Launch Standalone, and click OK. Creating a user account 1. Expand the Databases directory. 2. Expand the PMP directory. 3. Enter the password entered for the HP SIM configuration. 4. In the Connect As dropdown list, select SYSDBA, and click OK. 5.
3. Wait until you are directed to the next screen. 4. At the Welcome screen, click Next. 5. Enter the source and destination path for support files, and click Next.
6. Select Oracle 9 Client 9.2.0.1.0, and click Next. 7. Select Custom, and click Next.
8. In the Available Product Components, select: • Oracle Network Utilities 9.2.0.1.0 • Oracle Database Utilities 9.2.0.1.0 • SQL *Plus 9.2.0.1.0 • Oracle Windows Interfaces 9.2.0.1.0 • Oracle Call Interfaces 9.2.0.1.0 Click Next. 9. Specify the destination location of the Java™ Runtime Environment 1.1.8.16.0 or select the default location, and click Next.
10. Specify the port number or select the default port, and click Next. 11. Verify installation summary, and click Install. 12. When prompted, insert the Oracle 9i Release 2 CD 2 in the CD-ROM drive, and click OK.
13. When prompted, insert the Oracle 9i Release 2 CD 3 in the CD-ROM drive, and click OK. 14. At the Oracle Net Configuration Assistant screen, click Cancel. 15. When prompted to cancel the Oracle Net Configuration Assistant, click Yes. 16. Click OK when the error message appears.
17. At the Configuration Tools window, click Next. 18. At the End of Installation screen, click Exit. 19. Click Yes to confirm. Creating a PMP Database using Oracle 10g To create a PMP database using Oracle 10g: 1. Select Start > Programs > Oracle – OracleHome10g > Configuration and Migration Tools > Database Configuration Assistant. 2. Click Next on the welcome screen. 3. Ensure that the Create Database option is selected. This option is selected by default.
4. Click Next. 5. Select General Purpose and click Next. 6. Enter PMP as the Global Database Name. The SID field is automatically populated with the word PMP. 7. Click Next. 8. Ensure that the Dedicated Server Mode option is selected. This option is selected by default. 9. Click Next. 10. Select Typical in the Memory tab under the Initialization Parameters. 11. Click Characters Set and select the Use Unicode (AL32UTF) option. 12. Click Next. 13. Click Next in the Database Storage page.
The Welcome screen appears. Wait till the next screen appears. 3. Click Next in the Welcome screen.
4. Enter the complete path of the source, if it is not chosen by default. In the destination field, enter the Oracle home name and the complete valid path where you need to install Oracle. 5. Click Next. 6. Select the Enterprise Edition and click Next.
7. Specify the Database name and the select the Database Character set as Unicode Standard UTF-8 AL32UF8 and click Next. 8. Click Next in the Select Database Management Option screen.
9. Select the File System in the Specify Database File Storage Option and verify that the file system is selected and click Next. 10. Click Next in the Specify Backup And Recovery Options.
11. Specify and confirm the passwords for Schema and Database options and click Next. 12. Verify the summary that is displayed and click Install.
13. Once the installation is complete, click Next. The wizard displays the progress of creating the database. 14. Click OK when the progress indicates that the database is created. The Database Configuration Assistant appears.
15. Click OK to complete the installation. 16. Once the components are installed, click Next. 17. Click Yes to confirm the installation and to exit the wizard.
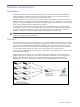
Obtaining the server list Before licensing servers for PMP, you must take steps to ensure that the hardware and software information captured by HP SIM is correct. These steps must be completed after all the servers to be monitored have been upgraded to the proper operating system level and the appropriate Management Agents have been installed. For information about supported operating systems and agent levels, refer to the HP ProLiant Essentials Performance Management Pack Support Matrix.
Installation procedures Overview This chapter provides detailed information required to successfully install or uninstall PMP. Installing PMP PMP is automatically installed and available by default with a typical and custom installation of HP SIM 5.1. NOTE: PMP 4.1 on the Oracle database is available only with custom installation of HP SIM 5.0 SP35. NOTE: PMP 4.5 on the Oracle database is available with custom installation of HP SIM 5.1.
3. Click Next. The Service Account Credentials window appears. 4. Enter your account password and click Next. If the installer detects a database that was previously installed, it prompts you for the database configuration details. You need to enter the amount of data that you need to retain from that database. 5. Select the number of days, months or years that you need to retain data for.
Selecting more than 2 years will imply that you need to retain data for 730 days. This will substantially increase the size of the database. If you do select 2 years, the installer displays a warning message. NOTE: HP recommends that you retain information or data for only 30 days. 6. Click Next to continue with the installation. The installation process begins.
2. Enter your valid user name, password, database name, and the previous database name. Any user of the PMP database must have a DBA privilege. While installing Oracle, the name of the previous database is required. When you upgrade, this name requirement is automatically addressed by the installer. When you re-install the software, you need to provide the previous database name. If you are installing the software for the first time, then you must leave this field empty.
• Online Help for HP Systems Insight Manager • Uninstall HP Systems Insight Manager PMP installs the following Start menu items during installation: • PMP Documentation • PMP Uninstall PMP installs the following menu items to the HP SIM toolbar: • Diagnose>Performance Management Pack • Online Analysis • Offline Analysis • Help>For HP Performance Management Pack • Reports>Performance Management Pack Reports • • Static Analysis Report • System Summary Report • CSV File Generator • Ser
2. Enter the password for HP SIM and click Next. The Install Summary dialog appears. It displays the components that need to be installed. 3. Click Install. As each component is installed, a dialog box displays the progress. When a particular component is being installed, the progress is displayed as, In Progress. When the components are installed, the following message is displayed: Installed successfully. Once the components are installed, the Next and Cancel buttons are enabled. 4. Click Next.
Installation locations The following table lists the default installation locations for HP SIM and PMP. Table 3 Default installation locations Component Default installation location HP SIM C:\Program Files\HP\Systems Insight Manger PMP C:\Program Files\HP\Performance Management Pack 4 Upgrading PMP PMP updates can be manually installed over previous installations of PMP. Upgrades to PMP require a previous version of 4.0 or greater.
Licensing Overview This chapter provides information about licensing servers and network storage for use with PMP. In the earlier releases of PMP, servers and storage were licensed using the Licensing Administration page of PMP. In this version of PMP, the navigation for licensing servers and storage devices is modified. Use the Configuration page or the Online Analysis page to license servers using PMP. This change integrates the licensing feature of PMP with that of HP SIM.
Free licenses PMP comes with five free permanent licenses, which are available for use after installation of the product. The licenses appear in the Available Licenses field of the License Administration page the first time PMP is launched. The free licenses can be applied to any supported server or network storage enclosure to be monitored. To use the free PMP licenses, at the License Administration page, select the checkbox next to the servers to be licensed, and click License Selected Servers.
Start monitoring This chapter describes how to begin monitoring licensed servers with PMP. Enabling monitoring Licenses must be applied to servers and network storage enclosures before monitoring can be started on those devices. For more information about licensing, refer to the “Licensing” chapter of this guide. Changing server monitoring status Servers that are licensed for monitoring are displayed on the Monitoring Administration page with a checkbox next to them.
Enabling network storage logging Network storage enclosures that are licensed and connected to servers currently being monitored are automatically monitored. These enclosures appear on the Monitoring Administration page with a checkbox next to them. The network storage device list displayed on the Monitoring Administration page can be filtered to display all devices, all logging devices, or all devices available for logging. Select the appropriate filter from the View dropdown box.
Default settings The default monitoring settings are: • Monitoring Status – Monitor and Alert • Number of samples to determine status—5 • Number of Log Days - 30 The default monitoring settings can be changed at the Monitoring Administration page. For information about monitoring parameters, refer to the HP ProLiant Essentials Performance Management Pack User Guide. Sample rate PMP does not control the amount of time between samples.
Troubleshooting Overview This chapter identifies and provides solutions for commonly encountered setup and installation tasks.
HP SIM integration The following table displays issues and solutions that can be associated with HP SIM integration. Table 5 HP SIM integration Issue Occurs when Solution When the icon in the PF column is clicked, the overall server performance status indicated in Online Analysis does not match the server performance status in the PF column. The refresh interval of the Refresh the HP SIM console and click the PF column.
Table 5 HP SIM integration Issue Occurs when The error message “Page Not Found” HP SIM CMS name link is not appears when launching PMP from resolved correctly on the the HP SIM menu. network. Note the name used in the browser window. When HP SIM discovers systems, all Virtual Machines do not appear in the “All Devices Not Available for Licensing” table in the Licensing Setup page. Solution Verify that the name resolves on the network and that it is not being affected by any proxy settings in the browser.
Licensing and monitoring administration The following table displays issues and solutions that can be associated with licensing and monitoring administration. Table 7 License administration issues Issue Occurs when Solution While logged on as Administrator, access to functions from the Monitoring Administration page is lost and one of the following error messages appears: The Current User must have 'administrator' or 'operator' rights enabled in order to access PMP administration functions.
Table 7 License administration issues Issue Occurs when While attempting to license a virtual When the virtual host is not licensed by host, the following message appears: VMM. Device is not licensed by VMM. Solution To ensure that the Virtual Host is registered and licensed to VMM, complete the following procedure: 1 Select the host server on the “All Systems” page. 2 Click Configure and select Virtual Machine Host Registration. 3 Select Register VM Host.
PMP components The following displays issues and solutions that can be associated with PMP components. Table 8 PMP components Issue Occurs when Solution Although monitoring has been started and the proper number of samples for analysis has been collected, the Storage components icon for a monitored server remains “Unknown” in PMP Online Analysis. The driver for the storage controller is not current. Update the driver for the storage controller. You can get the latest driver from http://www.hp.
Table 8 PMP components Issue Occurs when Although monitoring has been started No supported NICs are active. and the proper number of samples for analysis has been collected, the Network Connections icon for a monitored server remains “Unknown” in PMP Online The NIC agents on the monitored Analysis page. server are not running. The NIC agents are running, but they collect and send invalid values to PMP. Solution Verify that the NIC card is supported.
Database The following table displays issues and solutions that can be associated with the PMP database. Table 9 Database components Issue Occurs when When generating reports or PMP is logging data, and the hard drive is out of space. deleting logged files, the following error message appears: [Microsoft][ODBC SQL Server Driver][SQL Server] Cannot open database requested in login ‘PMP_V3_0.’ Login fails. Solution NOTE: You must be logged on as an administrator or a member of the administrators group.
Windows Server 2003 The following table displays issues and solutions that can be associated with Windows Server 2003. Table 10 Windows Server 2003 issues Issue Occurs when Solution When accessing HP SIM for the first time The site is not accepted as a on a Windows Server 2003 system, the trusted site by the security settings. following message appears: Content from Web site listed below is being blocked by Internet Explorer security configuration Add the site to the trusted zone.
Index A L administration: issues, 42; licensing, 34; monitoring, 36 analysis server: overview, 7; requirements, 8, 9 Automatic Discovery, 26 license: demo, 35; free, 35; issues, 42; management, 34; preparation, 34; purchasing, 35; status, 34 C Management Agents, supported versions, 9 manual installation, 27 middle-tier: overview, 7; requirements, 8, 9 modifying monitoring status, 36 monitored server, requirements, 9 monitoring: default settings, 38; enabling, 36; issues, 42; number of samples, 38; para