
Installation (Smart Setup) Guide, Windows Server 2003, v6.2


3. Verify storage compatibility by reviewing the HP Integrity Server-Storage support matrices
here:
http://www.hp.com/products1/serverconnectivity/support_matrices.html
This list is not exhaustive. Storage vendors can support more configurations than those
indicated at the site. As a general rule, check with your storage vendor and an HP sales
representative for a definitive statement on server and storage compatibility.
Task 3: Back up Existing Data
To restore critical data onto the server hard disk after installing or migrating to Windows, you
must first back up the data and verify that you can restore it:
1. Perform a complete server backup using your existing backup utilities.
2. Verify the integrity of the backup by restoring samples of data to another server.
3. Store the backup in a safe place.
Task 4: Choose an Installation Environment
Your installation environment consists of the server model number, the installation method (GUI
or Headless console, Integrated Remote Console, or PXE/WDS), and the installation media used
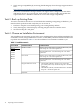
to perform the installation. Table 1-1 lists the installation environments available to you.
Table 1-1 Installation matrix
Installation MediaInstallation MethodServer Model
Windows Server 2003 OS disc (provided by Microsoft) + HP
Smart Setup disc + HP Smart Update disc
Headless consoleNon Cell-Based
Servers
rx2660
rx3600
rx6600
BL860c
BL870c
HP Reinstallation disc + HP Smart Setup disc + HP Smart
Update disc
Windows Server 2003 OS disc (provided by Microsoft) + HP
Smart Setup disc + HP Smart Update disc
GUI console
HP Reinstallation disc + HP Smart Setup disc + HP Smart
Update disc
• Virtual Media (vMedia) + Windows Server 2003 disc
(provided by Microsoft) + HP Smart Setup disc + HP Smart
Update disc
• Virtual Media (vMedia) + HP Reinstallation disc + HP Smart
Setup disc + HP Smart Update disc
Integrated Remote Console
PXE/WDS
14 Preparing for the Installation