
Cluster Installation and Configuration Guide - Windows Server 2003


2. Install and configure your HP StorageWorks MultiPath for Windows software.
For an overview and general discussion of the MultiPath software, go to:
http://h18006.www1.hp.com/products/sanworks/secure-path/spwin.html
HP MultiPathing IO (MPIO) Device Specific Module software can be used as an alternative
to HP StorageWorks Secure Path to provide multipath support.
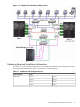
NOTE: You must use MultiPath software if more than one host bus adapter (HBA) is
installed in each cluster. The reason for installing more than one HBA per cluster is to provide
multiple connections between the clusters and your shared storage (see Figure 2-1). HP
strongly recommends multiple HBAs and MultiPath software because they provide
continuous access to your storage system and eliminate single points of failure.
3. Connect the node to the shared storage.
4. For details about creating logical drives, see your storage system user guide. Using those
directions, create a logical drive with at least 510 MB of space.
NOTE: While the absolute minimum allowable size is 50 MB, Microsoft recommends at
least 500 MB for the cluster quorum drive (specifying 510 MB ensures that the disk size is
at least 500 MB of formatted space). The extra space in the logical drive is used for internal
disk size calculations by your Storage Array Configuration Utility. For information about
this topic, see the Microsoft Knowledge Base article EN-US280345, “Quorum Drive
Configuration Information,” at:
http://support.microsoft.com/default.aspx?scid=kb;EN-US;280345
Information about disk sizes is also available in the cluster node Help documentation.
Server clusters do not support GPT shared disks. For information, see the Knowledge Base
article EN-US284134, “Server clusters do not support GPT shared disks,” at:
http://support.microsoft.com/default.aspx?scid=kb;en-us;284134
5. Select Start→Programs→Administrative Tools→Computer Management→Disk
Management. Use this tool to create the NTFS partitions, making them the MBR type.
When running Disk Management, complete the following tasks:
• Allow Disk Management to write a disk signature when initializing the disk.
• Establish unique drive letters for all shared disks, typically starting in the middle of the
alphabet to avoid local and network drive letters.
• Establish meaningful volume label name on shared disks, such as: Quorum Disk Q or
SQL Disk S.
IMPORTANT: Do not upgrade the logical drives from Basic to Dynamic. Microsoft Cluster
Services do not support Dynamic disks.
6. Close Disk Management for Microsoft Windows Server 2003, 64-bit Edition.
Preparing Node 2+ for Clustering
To prepare node 2 for clustering, complete the following steps:
1. Power on and boot node 2.
2. Click Start→Control Panel→HP Management Agents.
3. Click the Services tab, select Clustering Information on the right side, then click Add to
move it to the left side. The Cluster Agent service starts, which forwards cluster status
information and makes it accessible from the System Management Homepage.
4. Right-click the My Computer desktop icon and select Properties.
Creating and Configuring the Cluster 29