
Cluster Installation and Configuration Guide - Windows Server 2003


NOTE: If your public network paths are teamed, you must put your teamed connection
at the top of the list (instead of the external public network).
8. Repeat Step 1 through Step 7 for each node in the cluster. Be sure to assign a unique IP
address to each node while keeping the subnet mask the same for all nodes.
9. If you are running multiple public networks (for example, Public-1, Public-2, and so on),
repeat Step 1 through Step 8 for each network, until all are configured.
10. When all your public networks are configured, continue to the section, NIC Teaming.
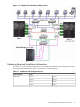
NIC Teaming
To configure NIC teaming for multiple public networks, complete the following steps:
1. Double-click the Network Configuration Utility (NCU) icon in the lower right corner of
your taskbar.
2. In the list that displays in the NCU main window, click each of your public network NICs
(one per network), then click Team>Properties.
3. The Team Properties window appears. Accept the default settings or change them as
determined by your network administrator, and then click OK to create the NIC team.
4. Right-click the My Network Places desktop icon and select Properties.
5. A new connection icon appears in the Network Connections window. This is the single
teamed connection that represents the multiple networks you just teamed together.
6. Right-click the new icon, select Rename, and change the name to TEAM.
7. Right-click the TEAM icon and select Properties.
8. Click the General tab, click Internet Protocol (TCP/IP), then click Properties.
9. Click the General tab, and assign the IP Address and Subnet Mask values determined by
your network administrator.
10. Click OK several times to implement the changes and exit the connection properties window.
NOTE: Microsoft does not recommend the use of NIC Teaming for private networks.
Preparing Node 1 for Clustering
To prepare node 1 for clustering, complete the following steps:
1. Power on and boot node 1.
2. Click Start→Settings→Control Panel→HP Management Agents.
3. Click the Services tab, select Clustering Information on the right side, then click Add to
move it to the left side. The Cluster Agent service starts, which forwards cluster status
information and makes it accessible from the System Management Homepage. Click OK.
4. Right-click the My Computer desktop icon and select Properties.
5. Click the Computer Name tab and click Change. Select the Domain Name radio button
and enter the domain name determined by your network administrator. Reboot when
prompted and log into the new domain.
Configuring the Shared Storage
To review the Microsoft recommendations and best practices for securing the shared data in
your cluster, go to:
http://technet2.microsoft.com/windowsserver/en/library/
f64e46ba-2d09-4f1a-ba9c-f2b1f71821eb1033.mspx?mfr=true
To configure the shared storage, complete the following steps:
1. Power on node 1 and log into the domain.
28 Administering the Cluster