
Setup and Install


4. In the Test Windows Sign In section, select the domain from the Domain drop-down menu,
and then type in the username and password for an authenticated user in the Username and
Password text boxes. Click Test to test the credentials.
5. Click Apply.
Configure Addressing
Devices configured to use the Digital Sending Software can be configured to use one of two different
types of address books: (1) an address book that resides on the server on which the Digital Sending
Software is installed, and (2) the Global Address List (GAL) that exists as data in Active Directory.
You can only configure a device to use one of these addressing methods at a time.
In option one, the Digital Sending Software can be configured to periodically export data from the
Global Address List to the service-based address book. Or, by using the Address Book Manager (an
optional component of the Digital Sending Software) administrators can create recipients by entering
names and e-mail addresses or can import lists of recipients in several popular formats. In either
case, devices perform queries of the service-based address book as users enter a recipient’s e-mail
address at the control panel of the device. Option one has the advantage that NTLM can be used to
“bind” (authenticate) to the Active Directory server. Option two only provides Simple authentication.
NOTE: NTLM authentication can be used as the bind method for option one. Option two only
provides Simple authentication. If Simple is chosen, the username and password are transmitted over
the network as ‘cleartext.’ This means that this information can be read by anyone with access to the
data on the network.
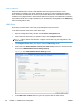
Configure the Service-Based Address Book
Follow these steps to configure the service-based address book.
1. Open the DSS Configuration Utility and click the Addressing tab.
2. Click to select the Enable Network Contacts (use LDAP server) check box.
3. In the Network Directory Server (LDAP) Step 1 section, type in the IP address or Hostname of
the Domain Controller or Global Catalog Server in the LDAP Server Address text box.
NOTE: If the Global Catalog Server is used, the default LDAP port must be changed to 3268.
4. In the Server Authentication Requirements (Step 2) section, click to select the Server
requires authentication option, and then select NTLM from the drop-down menu.
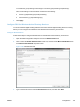
5. Type the credentials of an authenticated user into the Username, Password, and Domain text
boxes.
6. In the Sync Schedule section, select the replication frequency.
7. Click Apply.
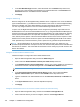
Configure individual devices to connect to the LDAP interface of Active Directory
1. Open the DSS Configuration Utility, and then click the Device Configuration tab.
2. Click to select the device you want to configure, and then click Configure Device.
134 Chapter 3 Installation and configuration ENWW