
User Manual
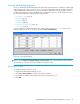


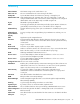

Table Of Contents
- Contents
- About this guide
- Using McDATA Web Server/Element Manager
- Managing Fabrics
- Securing a fabric
- Security consistency checklist
- Connection security
- User account security
- Remote authentication
- Device security
- Edit Security dialog
- Create Security Set dialog
- Create Security Group dialog
- Create Security Group Member dialog
- Editing the security configuration on a switch
- Viewing properties of a security set, group, or member
- Security Config dialog
- Archiving a security configuration to a file
- Activating a security set
- Deactivating a security set
- Configured Security data window
- Active Security data window
- Fabric services
- Rediscovering a fabric
- Displaying the event browser
- Working with device information and nicknames
- Zoning a fabric
- Zoning concepts
- Managing the zoning database
- Managing the active zone set
- Managing zones
- Merging fabrics and zoning
- Securing a fabric
- Managing switches
- Managing user accounts
- Configuring RADIUS servers
- Displaying switch information
- Configuring port threshold alarms
- Paging a switch
- Setting the date/time and enabling NTP client
- Resetting a switch
- Configuring a switch
- Archiving a switch
- Switch binding
- Restoring a switch
- Restoring the factory default configuration
- Downloading a support file
- Installing Product Feature Enablement keys
- Installing firmware
- Displaying hardware status
- Managing ports
- Glossary
- Index
McDATA® 4Gb SAN Switch for HP p-Class BladeSystem user guide 91
Viewing and configuring ports
Port color and text provide information about the port and its operational state. To display port number and
status information for a port, position the cursor over a port on the faceplate display. The status information
changes depending on the View menu option selected. Green indicates active; gray indicates inactive.
Context-sensitive popup menus are displayed when you right-click a port icon. Use the drop-down lists in
the Port Properties dialog to change the following parameters:
• Port symbolic name, page 91
• Port states, page 92
• Port types, page 93
• Port speeds, page 94
• Port transceiver media status, page 94
• Device scan, page 94
The port settings are configured using the Port Properties dialog shown in Figure 41. To open the Port
Properties dialog, select one or more ports, then select Port > Port Properties.
Figure 41 Port Properties dialog
NOTE: Use the Select to Propagate Changes to Entire Column options to propagate the same change to
all selected ports, select the options before making a change to a port.
Port symbolic name
To change the symbolic name of a port:
1. Open the faceplate display and select a port.
2. Select Port > Port Properties to open the Port Properties dialog.
3. Click inside the Symbolic Name field, and enter a new name for the port.
4. Click OK.