
User Manual
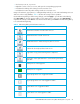


Table Of Contents
- Contents
- About this guide
- Using McDATA Web Server/Element Manager
- Managing Fabrics
- Securing a fabric
- Security consistency checklist
- Connection security
- User account security
- Remote authentication
- Device security
- Edit Security dialog
- Create Security Set dialog
- Create Security Group dialog
- Create Security Group Member dialog
- Editing the security configuration on a switch
- Viewing properties of a security set, group, or member
- Security Config dialog
- Archiving a security configuration to a file
- Activating a security set
- Deactivating a security set
- Configured Security data window
- Active Security data window
- Fabric services
- Rediscovering a fabric
- Displaying the event browser
- Working with device information and nicknames
- Zoning a fabric
- Zoning concepts
- Managing the zoning database
- Managing the active zone set
- Managing zones
- Merging fabrics and zoning
- Securing a fabric
- Managing switches
- Managing user accounts
- Configuring RADIUS servers
- Displaying switch information
- Configuring port threshold alarms
- Paging a switch
- Setting the date/time and enabling NTP client
- Resetting a switch
- Configuring a switch
- Archiving a switch
- Switch binding
- Restoring a switch
- Restoring the factory default configuration
- Downloading a support file
- Installing Product Feature Enablement keys
- Installing firmware
- Displaying hardware status
- Managing ports
- Glossary
- Index

McDATA® 4Gb SAN Switch for HP p-Class BladeSystem user guide 47
Adding zone members
You can zone a port/device by switch domain ID and port number, or the device port WWN. Adding a
port/device to a zone affects every zone set in which that zone is a member. Domain ID/port zoning is
only supported in McDATA Fabric interop mode for other McDATA switches. To add ports/devices to a
zone:
1. Select Zoning > Edit Zoning to open the Edit Zoning dialog.
2. Choose one of the following methods to add the port/device:
• Select a port/device in the Port/Device tree, and drag it into the zone. Press and hold the Control
key while selecting multiple ports/devices.
• Select a port/device in the Port/Device tree. Press the Control key while selecting to select multiple
ports/devices. Select a zone set in the left pane. Select Edit > Add Members.
• Select a port/device in the Port/Device tree. Press and hold Control while selecting multiple
ports/devices. Select a zone set in the left pane. Click Insert.
If the port/device you want to add is not in the Port/Device tree, you can add it by doing the following:
a. Right-click the selected zone.
b. Select Edit > Create Members.
c. Select the WWN or Domain/Port option.
d. Enter the hexadecimal value for the port/device according to the option selected: 16 digits for a
WWN member or 4 digits for a Domain/ Port member (DDPP). Domain IDs can be 97–127 when
interop mode is set to Standard or1–31 when interop mode is set to McDATA Fabric mode.
3. Click OK to display the Error Check dialog.
4. Click Error Check to check for zoning conflicts, such as empty zones or zone sets.
5. Click Save Zoning to implement the changes.
6. Click Close to close the Error Check dialog.
7. Click Close to close the Edit Zoning dialog.
NOTE: Domain ID conflicts can result in automatic reassignment of switch domain IDs. These
reassignments are not reflected in zones that use domain ID/port number pair to define their membership.
Be sure to reconfigure zones that are affected by a domain ID change.
Renaming a zone or a zone set
To rename a zone or zone set:
1. Select the zone/zone set to be renamed in the Edit Zoning dialog.
2. Select Edit > Rename.
3. Enter a new name for the zone/zone set in the Rename Zone/Rename Zone Set dialog.
4. Click Yes in the Rename Zone/Rename Zone Set dialog to save the change.
5. Click Apply in the Edit Zoning dialog to save the change.
6. Click Close to close the Edit Zoning dialog.
Removing a zone member
Removing a zone member will affect every zone and zone set in which that zone is a member. To remove
a member from a zone:
1. Select the zone member to be removed in the Edit Zoning dialog.
2. Select Edit > Remove.
3. Click Yes in the Remove dialog to save the change.
4. Click Apply in the Edit Zoning dialog to save the change.
5. Click Close to close the Edit Zoning dialog.