
User Manual


Managing the HAFM application78
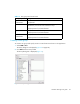
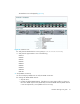
The SNMP tab is displayed (Figure 36).
Figure 36 Address Properties dialog box (SNMP tab)
5. Select a Read option.
•Select Default ‘public’ to select the default string.
•Select Custom to specify a custom string.
6. Select a Write option.
•Select Default ‘private’ to select the default string.
•Select Custom to specify a custom string.
7. If you selected Custom in step 5 or step 6, continue to step 8. Otherwise, proceed to step 10.
8. Enter the custom string in the Custom box.
9. Enter the string again in the Confirm Custom box.
10.Click OK.
11.Click OK to close the Discover Setup dialog box.
Reverting to a default community string
To set the community string with default values:
1. Select Discover > Setup.
The Discover Setup dialog box is displayed (Figure 32 on page 72).
2. Select an IP address from the Available Addresses list.
3. Click Add.
The Available Addresses dialog box is displayed (Figure 35 on page 76).
4. Click the SNMP tab.
The SNMP tab is displayed (Figure 36 on page 78).
5. Select Default ‘public’ and Default ‘private’.
6. Click OK.
Configuring the product type and access
To specify the product type and set a user name and password for the address: