
Service manual


Chapter 6 Replacing Parts
82
Replacing the Duplex SCSI Board
The Duplex SCSI Board mounts on the back of the hot-swap card cage and serves the purpose of splitting it
into two SCSI channels.
1. Log off all users. Back up files. Follow instructions in your network operating system (NOS)
documentation to gracefully shut down all networking software and applications.
2. Press the power switch on the HP NetServer's control panel when prompted by the operating
system.
3. Disconnect the power cables.
WARNING The power supplies will continue to provide standby current to the NetServer until
the power cable is disconnected.
4. If you have a rack-mounted LH3000r, then consider removing the signal cables from the rear of
the enclosure before extending the enclosure on the slides (if you don't have a cable
management arm). If necessary, label the signal cables to support re-connecting them.
5. Remove the top cover (rack-mount orientation) or the side cover (pedestal version).
CAUTION Wear a wrist strap and use a static-dissipating work surface connected to the
chassis when handling components. Ensure that the metal of the wrist strap
contacts your skin.
6. Follow the steps described in "Replacing the Hot-Swap Drive Cage".
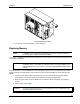
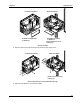
7. Remove the Duplex SCSI Board.
Duplex SCSI Board Removal/ Replacement
Replacing the Duplex SCSI Board
Reverse the steps described above and resume operations.