
Service manual


Chapter 6 Replacing Parts
77
DIMM Replacement
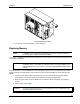
CAUTION Wear a wrist strap and use a static-dissipating work surface connected to the
chassis when handling components. Ensure that the metal of the wrist strap
contacts your skin.
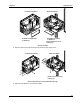
1. Remove the HP DIMM from its container, handling the module by its edges.
2. Locate the DIMM socket for installation and spread the two retainer clips.
3. Align the notches on the DIMM with the keys on the socket and hold the DIMM at a 90
° angle to
the system board.
4. Insert the DIMM fully into the socket. Close the retaining clips on the sides of the DIMM socket
my moving them to the upright position.
CAUTION Do not rock the DIMM into place, but apply firm and even pressure. If a gap exists
between the retaining latches and the DIMM, remove and replace the module until
no gap exists.
A
lignment
Notches
Retaining
Clips
Installing a DIMM
5. If all DIMMs have been installed, replace the cover.
6. If the NetServer is a rack installation, return the chassis into the rack.
7. Re-install the bezel onto the front of the HP NetServer.
8. Reconnect the power cord(s).
9. Power on the HP NetServer according to the respective NOS power up instructions.
10. Return the HP NetServer to normal operation.