
Service manual


Chapter 6 Replacing Parts
104
Replacing a VRM
You may choose to swap out a VRM (voltage regulator module) in the process of troubleshooting processor
problems.
1. If the HP NetServer is operating, log off all users and if necessary back-up files.
2. Follow instructions in your network operating system (NOS) documentation to gracefully shut
down all networking software and applications.
3. Press the power switch on the HP NetServer's control panel when prompted by the operating
system.
Normally, this completes the power down procedure.
4. Disconnect the power cord from its power source.
WARNING The power supplies will continue to provide standby current to the NetServer until
the power cable is disconnected.
5. Gain access to the respective model of the HP NetServer by referring to "Replacing the Bezel
and Replacing the Covers".
6. Remove the top cover (rack-mount) or the right side cover (pedestal) along with the left hand
cover (rack-mount) or top (pedestal).
CAUTION Wear a wrist strap and use a static-dissipating work surface connected to the
chassis when handling components. Ensure that the metal of the wrist strap
contacts your skin.
7. Slide the system board assembly from the chassis and place its metal plate side down on an
anti-static pad.
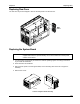
8. Identify the VRM location as primary or secondary.
Primary VRM
Secondary
VRM
VRM Locations
9. Pull the connector latches to the side and lift the VRM upwards.
CAUTION Do NOT pull on the VRM heat sinks. Grasp the module by the edges of the PCB
(printed circuit board).