
Service manual


Chapter 6 Replacing Parts
95
Replacing the PCI Hot-Plug Assembly
Use this topic to replace the Hot-Plug Assembly located at the rear surface of the chassis. The same Hot-
Plug Assembly is used in both models of the HP NetServers (LH3000/LH3000r). The NetServer should be
shut down before removing PCI latch hardware.
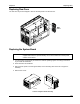
The plastic latch (8), which holds the PCA in place, is hinge mounted on a molded plastic frame and the
plastic frame is inserted into metal shell secured to the rear of the chassis with four (4) screws. The blue
plastic tabs are individual mounted on metal posts that remain in the chassis.
1. Log off all users and if necessary back-up files.
2. Follow instructions in your network operating system (NOS) documentation to gracefully shut
down all networking software and applications.
3. Press the power switch on the HP NetServer's control panel when prompted by the operating
system.
4. Disconnect the power cables.
WARNING The power supplies will continue to provide standby current to the NetServer until
the power cord(s) is/are disconnected.
5. Remove the left (or top) cover to access the inside of the chassis by referring to:
6. Disconnect the Hot-Plug Assembly connector on the I/O board.
7. Open all eight tabs to release the Hot-Plug Assembly.
8. Remove the two screws underneath the Hot-Plug Assembly, using a T-15 Torx driver.
9. Remove the two screws at the rear of the Hot-Plug Assembly, using a T-15 Torx driver.
10. Pull the Hot-Plug Assembly out of the NetServer.
Shell with
latches
Tab
Hot-Plug Assembly Latch and Tab Hardware
11. To remove the individual blue tab, remove the respective screw for the desired blue tab.
12. To install the Hot-Plug Assembly and the blue tabs, reverse Steps.