
Manual
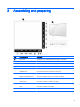
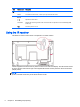

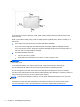

Table Of Contents
- Product features
- Safety and maintenance guidelines
- Assembling and preparing
- Remote control
- Using the display
- Connecting the display to a Digital Signage media player or computer
- Adjusting the screen
- Adjusting sound
- Using additional options
- Using the input list
- Input label adjustment
- Adjusting aspect ratio
- 16:9 : This selection will allow you to adjust the picture horizontally, in linear proportion, to fi ...
- Just Scan : This selection will allow you to view the best quality picture without loss of the origi ...
- 1:1 : The original’s aspect ratio is not adjusted. (Only Display Port PC, HDMI PC, RGB PC)
- 4:3 : This selection will allow you to view a picture with an original 4:3 aspect ratio. Black bars ...
- Zoom : This selection will allow you to view the picture without any adjustment, while filling the e ...
- Cinema Zoom : Choose Cinema Zoom when you want to enlarge the picture in correct proportion. Note: W ...
- Customizing settings
- Making connections
- Setting up the display for music, videos, and photos
- Operating the touch screen
- Troubleshooting
- Specifications
- Agency regulatory notices
- Federal Communications Commission notice
- Declaration of Conformity for products marked with the FCC logo (United States only)
- Canadian notice
- Avis Canadien
- European Union regulatory notice
- German ergonomics notice
- Japanese notice
- Korean notice
- Power cord set requirements
- Product environmental notices
- California Perchlorate Material Notice
- Materials disposal
- Disposal of waste equipment by users in private households in the European Union
- Chemical substances
- HP recycling program
- Restriction of Hazardous Substances (RoHS)
- India restriction of hazardous substances (RoHS)
- Turkey EEE regulation
- Ukraine Restriction of Hazardous Substances
- Taiwan Battery Disposal Warning
- Controlling multiple products
- Connecting the cable
- RS-232C configurations
- Communication parameter
- Command reference list
- Transmission / Receiving protocol
- Transmission
- Acknowledgement
- 01. Power (Command: k a)
- 02. Input Select (Command: k b)
- 03. Aspect Ratio (Command: k c)
- 04. Energy Saving (Command: f l)
- 05. Picture Mode (Command: d x)
- 06. Contrast (Command: k g)
- 07. Brightness (Command: k h)
- 08. Sharpness (Command: k k)
- 09. Color Temperature (Command: k u)
- 10. Auto Configuration (Command: j u)
- 11. Balance (Command: k t)
- 12. Sound Mode (Command: d y)
- 13. Treble (Command: k r)
- 14. Bass (Command: ks)
- 15. Speaker (Command: d v)
- 16. Volume Mute (Command: k e)
- 17. Volume Control (Command: k f)
- 18. Time (Command: f a)
- 19. Off Timer(On/Off Timer Time (Command: f e)
- 20. On Timer(On/Off Timer) Time (Command: f d)
- 21. Sleep Time (Command: f f)
- 22. Power On Delay (Command: f h)
- 23. Language (Command: f i)
- 24. ISM method (Command: j p)
- 25. Reset (Command: f k)
- 26. Tile Mode (Command: d d)
- 27. Tile ID Set (Command: d i)
- 28. Tile H Position (Command: d e)
- 29. Tile V Position (Command: d f)
- 30. Tile H Size (Command: d g)
- 31. Tile V Size (Command: d h)
- 32. Natural Mode (In Tile Mode) (Command : d j)
- 33. DPM Select (Command: f j)
- 34. Temperature Value (Command: d n)
- 35. Remote Controller Lock/ Key Lock (Command: k m)
- 36. Key (Command: m c)
- 37. OSD Select (Command: k l)
- 38. Operating time return (Command: d l)
- 39. Serial No. (Command: f y)
- 40. S/W Version (Command: f z)
- 41. Backlight (Command: m g)
- 42. Display Name (Command: v a)
- 43. Abnormal State (Command: k z)
- 44. Display Location (Command: v b)
- 45. Player Name (Command: v d)
- 46. DHCP (VOE) (Command: v e)
- 47. Scheduling Input Select (Command : f u) (Main Picture Input)
- 48. IP Address, VOE Setup (Command: v f)
- 49. Auto Detection (Command: f g)
- 50. Subnet mask, VOE Setup (Command: v g)
- 51. IP Address, NSM Setup (Command: v k)
- 52. Mac Address, VOE Setup (Command: v h)
- 53. Check VOE Availability (Command: v i)
- 54. Mac Address, NSM setup (Command: v j)
- 55. Product Name. (Command : f v)

Item Screen marks Description
(2) INPUT Changes the input source.
MENU Accesses the main menus, or saves your input and exits the menus.
Moves the selection up and down.
Adjusts the volume level.
AUTO/SET Displays the current signal and mode. Press this button to adjust the screen automatically (RGB
mode only).
Turns the power on or off.
Using the IR receiver
This allows a remote control sensor to be placed in a custom location.
The IR magnetic IR receiver must be placed on the front or side of the display. The IR receiver should
be in the remote control line of sight. The magnetic IR receiver must be placed on the screw location
(display frame).
NOTE: The IR receiver is made with a magnet. If it is attached to the side or the bottom of the
product, external shocks may cause the IR receiver to fall.
6 Chapter 3 Assembling and preparing