LASERJET PROFESSIONAL M1210 MFP SERIES 系列 EN Installation Guide CN 安装指南 ID Panduan Instalasi KO 설치 설명서 TH คู่มือการติดตั้ง TW 安裝指南 VI Hướng dẫn Cài đặt www.hp.
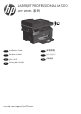
10 - 32.5°C (50 - 91°F) P P V LQFKH NJ OE PP LQFKHV 1 10% - 80% P P LQFKHV EN Select a sturdy, well-ventilated, dust-free area, away from direct sunlight to position the product. CN 选择一处通风良好、免受灰尘侵扰且没有直射阳光的固定区域来安 放该产品。 ID Pilih tempat yang kokoh, berventilasi baik dan bebas debu, jauh dari sinar matahari langsung untuk meletakkan produk. KO 제품을 설치하기 위해 안정감있고 환기가 잘 되며 먼지가 없고 직사광선이 없는 장소 를 선택합니다.
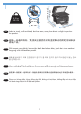
2 HP La serJe t 3 1 2 3 4 5 6 7 8 9 10 11 12
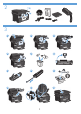
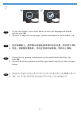
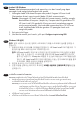
2 1 3 5 2 1 6 1 3 4 2 EN Connect the power cord between the product and a grounded AC outlet, and then turn on the product. Make sure your power source is adequate for the product voltage rating. The voltage rating is on the product label. The product uses either 110-127 Vac or 220-240 Vac and 50/60 Hz. Caution: To prevent damage to the product, use only the power cord that is provided with the product.
ID Hubungkan kabel listrik antara produk dan stopkontak AC tertanahkan, lalu nyalakan produk. Pastikan sumber daya Anda memadai untuk peringkat tegangan produk. Peringkat tegangan ada pada label produk. Produk ini menggunakan 110-127 Vac atau 220-240 Vac dan 50/60 Hz. Awas: Untuk mencegah kerusakan pada produk, gunakan hanya kabel listrik yang disediakan bersama produk. KO 제품과 접지 AC 콘센트 사이에 전원 코드를 연결한 다음 제품의 전원을 켭니다. 콘센트 의 전압이 제품 전압에 맞는지 확인합니다. 전압은 제품 레이블에 나와 있습니다.
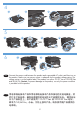
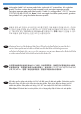
7 1 2 EN 1. O n the control panel, use the arrow buttons to select your language and location, and then press OK. 2. Optional: To adjust the viewing angle, slide the control panel to the left and tilt it up. CN 1. 在控制面板上,使用箭头按钮选择语言和所在位置,然后按下 OK。 2. 可选:要调整观看角度,可向左滑动控制面板,然后向上倾斜。 ID 1. D i panel kontrol, gunakan tombol panah untuk memilih bahasa dan lokasi, lalu tekan OK. 2. Opsional: Untuk menyesuaikan sudut lihat, geser panel kontrol ke kiri dan miringkan ke atas. KO 1.
TH 1. บ นแผงควบคุม ให้กดปุ่มลูกศรเพื่อเลือกภาษาและที่ตั้งของคุณ แล้วกด OK 2. ทำหรือไม่ก็ได้: ในการปรับมุมมอง ให้เลื่อนแผงควบคุมไปทางซ้ายและเอียงขึ้น TW 控制面板上,使用箭頭按鈕選擇您的語言與位置,然後按下 OK。 1. 在 2. 選擇性:若要調整視野角度,請將控制面板向左側滑動,然後往上傾斜。 VI 1. T rên bảng điều khiển, sử dụng các nút mũi tên để chọn ngôn ngữ và vị trí của bạn, sau đó bấm OK. 2. Tuỳ chọn: Để điều chỉnh góc xem, trượt bảng điều khiển về phía trái và nghiêng bảng lên trên.
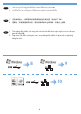
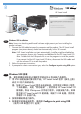
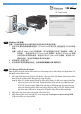
HP Smart Install EN Windows USB installation Note: Some virus-checking and firewall software might prevent you from installing the product software. 1. Connect the USB cable between the computer and the product. The HP Smart Install program (see picture above) should start automatically within 30 seconds. Note: If HP Smart Install does not start automatically, AutoPlay might be disabled on your computer. Browse My Computer and double-click the HP Smart Install CD drive. Double-click the SISetup.
ID Instalasi USB Windows Catatan: Ada beberapa perangkat lunak pemeriksa virus dan firewall yang dapat mencegah Anda menginstal perangkat lunak produk. 1. Hubungkan kabel USB antara komputer dan produk. Program HP Smart Install (lihat gambar di atas) semestinya aktif dalam 30 detik secara otomatis. Catatan: Jika program HP Smart Install tidak aktif secara otomatis, AutoPlay mungkin dinonaktifkan di komputer. Jelajahi My Computer dan klik ganda drive CD HP Smart Install. Klik ganda file SISetup.
HP Smart Install TW Windows USB 安裝 注意:某些病毒檢查和防火牆軟體可能使您無法安裝產品軟體。 1. 利用 USB 纜線連接電腦與本產品。HP Smart Install 程式(見上圖)應會在 30 秒內自動 啟動。 注意: 如果 HP Smart Install 未自動啟動,則可能是電腦已停用了自動播放。瀏覽「我 的電腦」,然後連按兩下 HP Smart Install 光碟機。連按兩下 SISetup.exe 檔案 以執行程式來安裝本產品。若您找不到 HP Smart Install 光碟機,請中斷 USB 纜線的連接,然後使用軟體光碟安裝本產品。 2. 依照螢幕上的指示進行。 3. 若出現提示要您選擇連線類型,請選擇設定為使用 USB 列印選項。 VI Cài đặt qua USB trên Windows Lưu ý: Một vài phần mềm kiểm soát virut và tường lửa có thể không cho phép bạn cài đặt phần mềm thiết bị này. 1.
9 EN Windows network installation Note: Some virus-checking and firewall software might prevent you from installing the product software. 1. Connect the network cable to the product, and wait for about one minute for the network to assign an IP address. 2. Press the Setup button. Use the arrow buttons to select Reports, and then press OK. Select Config report, and then press OK. Locate the product IP address on the page that prints. 3.
KO Windows 네트워크 설치 참고: 일부 바이러스 검사 및 방화벽 소프트웨어가 제품 소프트웨어 설치를 방지할 수 있습니다. 1. 네트워크 케이블을 제품에 연결하고 네트워크에 IP 주소가 할당되도록 1분 정도 기 다립니다. 버튼을 누릅니다. 화살표 버튼을 사용하여 보고서를 선택한 다음 OK를 누 2. 설정 릅니다. 구성 보고서를 선택한 다음 OK를 누릅니다. 인쇄한 페이지에서 제품 IP 주 소를 찾습니다. 3. 컴퓨터에서 웹 브라우저를 열고 브라우저의 주소줄에 IP 주소를 입력합니다. 4. HP Smart Install 탭을 클릭하고 다운로드 버튼을 클릭합니다. 화면에 표시되는 지시 사항에 따릅니다. TH การติดตั้งแบบเครือข่ายสำหรับ Windows หมายเหตุ: ซอฟต์แวร์ตรวจจับไวรัสและไฟร์วอลล์อาจป้องกันไม่ให้คุณติดตั้งซอฟต์แวร์ของเครื่องพิมพ์ 1.
VI Cài đặt qua mạng Windows Lưu ý: Một vài phần mềm kiểm soát virut và tường lửa có thể không cho phép bạn cài đặt phần mềm thiết bị này. 1. Cắm cáp mạng vào sản phẩm, và đợi khoảng một phút để mạng gán địa chỉ IP. 2. Bấm nút Cài đặt . Sử dụng các nút mũi tên để chọn Reports (Báo cáo), sau đó bấm OK. Chọn Config report (Báo cáo cấu hình), sau đó bấm OK. Tìm địa chỉ IP của sản phẩm trên trang in. 3. Trên máy tính của bạn, mở trình duyệt Web, và nhập địa chỉ IP vào dòng địa chỉ của trình duyệt. 4.
10 EN Mac installation Note: Some virus-checking and firewall software might prevent you from installing the product software. 1. Insert the software installation CD into the computer CD drive. Note: Connect the USB cable and turn the product on before installation. 2. In the pop-up dialog box, click the installer program. 3. Follow the onscreen instructions to install the printer driver. CN Mac 安装 注:某些病毒检测和防火墙软件可能会阻止您安装产品软件。 1. 将软件安装 CD 插入计算机的 CD 驱动器中。 注: 安装前,请先连接 USB 电缆并打开产品电源。 2.
TW Mac 安裝 注意:某些病毒檢查和防火牆軟體可能使您無法安裝產品軟體。 1. 將軟體安裝光碟插入電腦光碟機中。 注意: 安裝之前請先接上 USB 纜線並開啟本產品電源。 2. 在快顯對話方塊上,按一下安裝程式。 3. 請依照螢幕上的指示安裝印表機驅動程式。 VI Cài đặt trên Mac Lưu ý: Một vài phần mềm kiểm soát virut và tường lửa có thể không cho phép bạn cài đặt phần mềm thiết bị này. 1. Đưa đĩa CD cài đặt phần mềm vào ổ CD máy tính. Lưu ý: Nối cáp USB và bật sản phẩm trước khi cài đặt. 2. Trong hộp thoại bật lên, nhấp vào chương trình cài đặt. 3.
11 EN Connect the phone cords for the fax and the handset. A country/region specific adapter for the RJ-11 telephone cord may be required to connect to the telephone jack. Use the HP Fax Setup Wizard to configure the date, time, and fax header information. CN 连接传真和听筒的电话线。特定国家/地区可能需要用于 RJ-11 电话线的 适配器,才能连接至电话插孔。使用 HP Fax Setup Wizard 配置日期、 时间及传真标题信息。 ID Hubungkan kabel telepon untuk faks dan handset.
12 /$6(5-(7 352 0 0)3 6(5,(6 4XLFN 5HIHUHQFH IRU &RQWURO 3DQHO %XWWRQV DQG /LJKWV 4 5 6 7 3 2 1 8 9 10 15 Item 1 Icon 14 13 12 11 Description Toner-level status light: Indicates the level of toner in the print cartridge is low. 2 Attention light: Indicates a problem with the product. View the LCD display for a message. 3 Ready light: Indicates the product is ready or is processing a job. 4 LCD display screen: Displays status information, menus, and messages.
13 EN Test the document feeder. Load the control-panel description page in the document feeder, button. If the product is in energy-saving mode, press and then press the Start Copy any button to activate it. CN 测试文档进纸器。将控制面板说明页装入文档进纸器,然后按下“开始 复印” 按钮。如果产品处于节能模式,请按下任何按钮激活它。 ID Uji pengumpan dokumen. Muat halaman uraian panel kontrol di pengumpan dokumen, lalu tekan tombol Start Copy . Jika produk sedang berada dalam mode hemat energi, tekan tombol apa saja untuk mengaktifkannya. KO 문서 공급기를 테스트합니다.
14 EN Test copy. Load the control-panel description page on the scanner glass, and then press the Start Copy button. CN 测试复印。将控制面板说明页放在扫描仪玻璃板上,然后按下“开始 按钮。 复印” ID Uji fotokopi. Muat halaman uraian panel kontrol di kaca scanner, lalu tekan tombol Start Copy . KO 복사를 테스트합니다. 제어판 설명 페이지를 스캐너 유리에 놓은 다음 복사 시작 버튼을 누릅니다. TH ทดสอบการทำสำเนา วางหน้าคำอธิบายแผงควบคุมบนกระจกของเครื่องสแกน แล้วกดปุ่ม เริ่มทำสำเนา TW 測試影印。將控制面板說明頁放在掃描器玻璃板上,然後按下開始影印 VI 按鈕。 Sao chép thử.
15 EN Test scan. Load the control-panel description page on the scanner glass. Windows: In the HP program group, select Scan to, and select a scanning destination. Mac: Open the HP Director, click Scan, and click Scan again. Click Finish, and then click Destinations. Name the file and specify the destination location. Click Save. CN 测试扫描。将控制面板说明页放在扫描仪玻璃板上。Windows: 在 HP 程序组中,选择扫描到,然后选择扫描目标。Mac:打开 HP Director,单击扫描,然后再次单击扫描。单击完成, 然后单击目标。为文件命名,指定目标位置。单击保存。 ID Uji pindai.
1 3 2 EN 4 3) Redial/Pause button; 4) Flash button. Identify and use the phone buttons. 1) M1, M2, and M3 memory buttons; 2) Store button. Program numbers to the M buttons by pressing Store, dialing a phone number, pressing Store again, and then pressing one of the M buttons. CN Use the Redial/Pause button to redial the last number dialed on the handset. If the line is busy, press Flash, and then Redial/Pause to redial the number.
1 3 2 TH 4 ระบุและใช้ปุ่มโทรศัพท์ 3) ปุ่ม โทรซ้ำ/หยุดชั่วคราว 4) ปุ่ม แฟลช 1) ปุ่มหน่วยความจำ M1, M2 และ M3 2) ปุ่ม จัดเก็บ ใช้ปุ่ม โทรซ้ำ/หยุดชั่วคราว เพื่อโทรซ้ำหมายเลขล่าสุด ที่โทรด้วยหูโทรศัพท์ หากสายไม่ว่าง ให้กด แฟลช แล้ว โทรซ้ำ/หยุดชั่วคราว เพื่อโทรซ้ำหมายเลขนั้น ตั้งโปรแกรมหมายเลขให้กับปุ่ม M โดยกด จัดเก็บ หมุนหมายเลขโทรศัพท์ กด จัดเก็บ อีกครั้ง แล้วกดปุ่ม M ปุ่มใดปุ่มหนึ่ง TW 3) 重撥/暫停按鈕; 4) Flash 按鈕。 識別並使用電話按鈕。 1) M1、M2 和 M3 記憶按鈕; 2) 儲存按鈕。 使用重撥/暫停按鈕來重撥電話上最後撥打的 號碼。如果線路忙線中,按下 Flash,再按重 撥/暫停
EN Receive a fax when the phone rings. 1. Answer the phone. 2. If you hear fax tones, wait for the product to pick up the fax. 3. After the phone becomes silent, hang up the handset. CN 在电话铃响时接收传真。 1. 接听电话。 2. 如果听到传真音,则等待产品拾取传真。 3. 电话静音后,挂起听筒。 ID Menerima faks saat telepon berdering. 1. Angkat telepon. 2. Jika terdengar nada faks, tunggu sampai produk menjawab faks. 3. Setelah telepon diam, taruh gagang telepon. KO 전화기가 울릴 때 팩스를 수신합니다. 1. 전화를 받습니다. 2. 팩스 통신음이 들리면 제품에 팩스가 수신될 때까지 기다립니다. 3.
EN Send a fax using the handset (Manual Dial). 1. Load the document. 2. Call the recipient on the handset. 3. When the recipient is ready, press Start Fax on the control panel. CN 使用听筒发送传真(手动拨号)。 1. 装入文档。 2. 通过听筒拨打收件人的电话。 3. 收件人准备就绪后,按下控制面板上的开始传真。 ID Mengirim faks dengan gagang telepon (Putar Manual). 1. Muatkan dokumen. 2. Panggil pihak penerima di gagang telepon. 3. Setelah penerima siap, tekan Mulai Faks di panel kontrol. KO 핸드셋을 사용하여 팩스를 발송합니다(수동 다이얼). 1. 문서를 넣습니다. 2. 핸드셋으로 수신인에게 전화합니다.
EN Setup is complete. If you did not register your product during software installation go to www.register.hp.com to register now. CN 安装完成。如果在软件安装期间未注册产品,请立即访问 www.register.hp.com 进行注册。 ID Penataan selesai. Jika Anda tidak mendaftarkan produk Anda pada saat instalasi perangkat lunak, kunjungi www.register.hp.com untuk mendaftar sekarang. KO 설치가 완료됩니다. 소프트웨어 설치 도중 제품을 등록하지 않은 경우 www.register.hp.com 으로 이동하여 이제 등록하십시오.
16 www.hp.com/support/ljm1210series EN The HP LaserJet Guide and other documentation are on the CD that came with the product or in the HP Program folder on your computer. The HP LaserJet Guide is a product help tool that provides easy access to product information, HP product web support, troubleshooting guidance, and regulatory and safety information.
www.hp.
www.hp.com Copyright and License 版权与许可 © 2010 Copyright Hewlett-Packard Development Company, L.P. © 2010 Copyright Hewlett-Packard Development Company, L.P. Reproduction, adaptation or translation without prior written permission is prohibited, except as allowed under the copyright laws. The information contained herein is subject to change without notice. The only warranties for HP products and services are set forth in the express warranty statements accompanying such products and services.