
Reference Guide

To use the printer-driver only software solution with a direct USB connection, a USB Print port must have
already been created by a previous installation of the printing-system software. There are several direct
USB printing-system software installation options that establish a USB Print port:
●
Complete an installation using the in-box printing-system software CD.
●
Download the "Recommended Solution", which provides installation options identical to the
printing-system software CD.
Once a USB Print port is created by a previous direct USB installation, the printer-driver installation can
be completed using that USB Print port.
Use the following instructions to install the printer driver only:
1. Click Start, and then do one of the following:
-or-
For Windows Server 2003 and Windows XP Professional: Select Settings, and then click
Printers and Faxes.
-or-
For Windows XP Home: Click Control Panel, and then double-click the Printers and Other
Hardware icon.
-or-
For Windows Vista: Click Computer, click Control Panel, and then click Hardware and
Sound.
2. Click Add Printer, and then click Next.
3. When asked if the product is a local or network product, select Local printer attached to this
computer, and then click Next.
NOTE: Do not select the Automatically detect and install my Plug and Play printer
option.
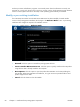
4. On the Select a Printer Port screen, select the USB Print port that was created by a previous
USB installation, and then click Next.
5. On the Install Printer Software screen, click Have Disk.... The Install from Disk dialog
box appears.
6. Insert the printing-system software CD into the CD-ROM drive.
7. Click Browse..., and then select the printer driver for the product.
To install the PCL 6 printer driver, navigate to the root folder of the CD (where X is the letter of the
CD-ROM drive) and select the hppdp608.inf file.
56 Chapter 3 Install Windows printing-system components ENWW