
Reference Guide

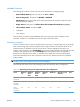
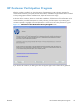
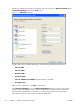

The HP Scan software uses a simple user interface with a list of shortcuts, a Restore Defaults button,
a Advanced Settings button, and a Scan button.
Figure 2-2 HP Scan dialog box
The list contains any user-defined destinations, and the following default destination options:
●
Save as PDF
●
Save as JPEG
●
E-mail as PDF
●
E-mail as JPEG
●
Save as editable text (OCR) (if Readiris software is installed)
●
Everyday Scan
After you select a destination, click Scan to start the scan.
Click Advanced Settings to open the Advanced Settings dialog box, where you can create,
change, or delete the destination options that are available in the list and specify the destination
options that are available when you press the Scan button on the product control panel. Each
destination has a unique name and scan settings associated with it.
30 Chapter 2 Windows software description ENWW