
Reference Guide


Scan software
●
Scan methods
●
HP Scan software
●
Scan drivers
Scan methods
Scan from the product by using any of the following methods:
●
From the product control panel. On the product control panel, touch the Scan button. Use
the arrow buttons to select an option, and then touch the Scan button to start the scan.
NOTE: Scanning from the product control panel is possible only after the option has been
configured in the HP Scan software.
The following options are configured by default for a USB connection:
◦
If you select File, the scanned photo will be saved to a directory that you specify.
◦
If you select OCR, the scanned document will be opened in the Readiris software to convert
into an editable text document.
NOTE: This option only appears if Readiris text-recognition software is installed on the
computer. For more information, see the help on the Readiris CD.
◦
If you select EMAIL PIC, the scanned photo will be attached to a new e-mail message. You
can then add an e-mail address, add notes, and send the message.
◦
If you select EMAIL DOC, the scanned document will be attached to a new e-mail message.
You can then add an e-mail address, add notes, and send the message.
◦
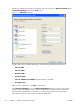
If you select SETUP, the HP Scan software opens the Scan Setup Options dialog box,
where you can create, change, or delete the destination options that are available when you
touch the Scan button on the product control panel.
NOTE: Photos are scanned at 150 dpi and documents are scanned at 300 dpi.
●
From the computer by using HP Scan (Windows). Click Start, select Programs or All
Programs, select HP, select the name of the product, and then click Scan. For more
information, see
HP Scan software on page 29.
●
From a WIA- or TWAIN-compliant software program. Check the help system in the
software program to learn how to scan by using a WIA- or TWAIN-compliant scanner from within
that program. For more information, see
Scan drivers on page 33.
28 Chapter 2 Windows software description ENWW