HP Scanjet Enterprise N9120/Flow N9120 - Installation Guide

3
2
1
3
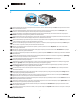
Connect the power supply to the product (1), plug the power supply into a power outlet (2), and then press the Power button (3).  Do
not connect the USB cable until the software installation process says to do so.
EN
FR
Connectez l'alimentation au produit (1), branchez-la ensuite à une prise de courant (2), puis appuyez sur le bouton d’alimentation (3).
 Ne connectez pas le câble USB avant que le processus d’installation du logiciel ne vous le demande.
DE
Schließen Sie das Netzteil am Produkt (1) an und verbinden Sie das Netzteil mit einer Netzsteckdose (2). Drücken Sie dann die Netztaste (3).
 Schließen Sie das USB-Kabel erst an, wenn Sie bei der Installation der Software dazu aufgefordert werden.
IT
Collegare l'alimentatore al prodotto (1), inserire l'alimentatore nella presa di corrente (2), quindi premere il pulsante di accensione (3).
Attenzione:
ES
Conecte la fuente de alimentación al producto (1), conecte la fuente de alimentación a una toma (2) y luego presione el botón Power
(Encendido) (3).

CA
Connecteu el cable d’alimentació al producte (1), endolleu-lo a una presa de corrent (2) i premeu el botó d’encesa (3).
 No

HR


CS



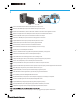
Ta bort all förpackningstejp enligt det separata bladet med anvisningar och lossa sedan skrivarvagnens spärr.

luckorna till dokumentmatarutrymmet.
SV

Not:

TR



BG
Eemaldage kogu pakketeip vastavalt eraldiolevale juhendile ning seejärel vabastage kelgulukk.
 Osa teipi võib olla dokumendisööturi
sees.
ET

 Dalis

LT


LV


UK


KK
AR
4
HP LaserJet Information Engineering