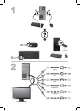
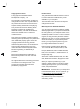
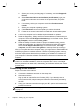
2” (30cm) HDMI DVI VGA DisplayPort DVI/HDMI DVI/VGA
http://www.hp.com/go/contactHP http://welcome.hp.com/country/us/en/wwcontact_us.
Copyright and License Product notice © Copyright 2012 Hewlett-Packard Development Company, L.P. This guide describes features that are common to most models. Some features may not be available on your computer. The information contained herein is subject to change without notice. The only warranties for HP products and services are set forth in the express warranty statements accompanying such products and services. Nothing herein should be construed as constituting an additional warranty.
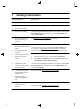
1 Getting information Type of information Where to find ● Set up your computer. Quick Setup (this Guide) ● Use the computer. Quick Setup (this Guide) ● Connect to the Internet. ● Recover factory settings. Troubleshooting and Maintenance Guide on your computer. Select the HP Support Assistant app on the Start screen, select My computer, and then select User guides. ● See how-to videos about Visit http://www.hp.com/supportvideos (English only) using the features of your computer.
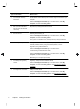
Type of information Where to find ● Find computer warranty HP Worldwide Limited Warranty and Technical Support included with your information. computer. Select the HP Support Assistant app on the Start screen, select My computer, and then select User guides. ● Get up-to-date information http://www.hp.com/support/consumer-forum and help from the Windows community. ● Connect to a TV.
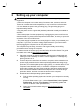
2 Setting up your computer WARNING! To reduce the risk of electrical shock or damage to your equipment: • Place the computer in a location away from water, dust, moisture, and soot. These can increase the inside temperature, or can cause fire or electrocution. • Do not disable the power cord grounding plug. The grounding plug is an important safety feature. • Plug the power cord in a grounded (earthed) outlet that is easily accessible at all times.
c. Select your country and language, if necessary, and click Support & Drivers. d. Select Download drivers and software (and firmware), type your computer model name and number in the product field, and press Enter. e. If necessary, select your computer model from Product search results. f. Select your computer operating system. g. Click Download next to each update you wish to download. h. Follow the on-screen instructions to install each downloaded update. 4.
3 Setting up additional features Using Beats Audio™ (select models only) Your HP TouchSmart PC features audio connectors (headphone and Audio Out) that are optimized for Beats Audio™ headphones and external audio systems (purchased separately). Select HP TouchSmart PC models also include four Beats-optimized internal speakers and a Beats toggle button on the keyboard. Your computer comes ready for you to experience music with Beats enabled.
3. Select Playback devices. The Sound window opens. 4. On the Playback tab, look for the Default Device. It may display a green circle with a checkmark in it. If the Default Device is one of the following, then your HDMI monitor is already activated: ● NVIDIA High Definition Audio (select models only) ● ATI High Definition Audio (select models only) ● Realtek HDMI Output Select the Cancel button to close the window, and then continue with the next procedure, “Adjusting resolution,” if necessary.
NVIDIA graphics 1. cards Right-click an empty area of the desktop, and then click NVIDIA Control Panel. The View Selection window opens. 2. In the Selecting a Task area on the left, under Display, click Change resolution. The Change resolution window opens. 3. If your HP computer is connected to an HP monitor, make sure that the Show only TV resolutions check box does not contain a check mark.
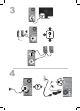
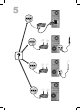
dual-monitor setup (or for three monitors), and proceed to the instructions for ATI Eyefinity Catalyst™ setup. 1. Verify that the PC is set up according to the instructions in the setup view. Do not power on the PC or monitor. 2. Connect the monitors to an available display connector on the back of the PC. The monitor’s connection type must match the connector on the PC. NOTE: The three-monitor setup requires that you separately purchase an additional monitor and cable.
4 Maintaining your computer Cleaning procedures Keeping your computer system free of dust, dirt, and heat will prolong its life. ● Dust, pet hair, and other particles can build up, creating a blanket effect; as a result, components can overheat or, in the case of the keyboard and mouse, not work smoothly and effectively. ● Check your system once a month for visible signs of dust and debris, and clean it about once every three months. ● Visit http://www.hp.
5 Troubleshooting Refer to the documentation provided by the product manufacturer for information about peripheral-specific problems, such as issues with a monitor or a printer. The following tables present some issues you might encounter while installing, starting up, or using your computer and possible solutions. For more information or for additional troubleshooting options, see Getting information on page 1. Computer does not start Symptom Possible solution Error message: Restart the computer.
Symptom Possible solution Computer Use the Task Manager to close any programs not responding, or restart the computer: seems to be 1. locked up and is not responding. Press the Ctrl+Alt+Delete keys on the keyboard simultaneously. 2. Select Task Manager. 3. Select the program that is not responding, and then select End task. If closing programs does not work, restart the computer: 1. Press the Ctrl+Alt+Delete keys on the keyboard simultaneously. 2.
Power Symptom Possible solution Computer does Press and hold the Power button until the computer turns off. Check Power Settings. not turn off when the Power button is pressed. Computer shuts ● The computer might be in an exceedingly hot environment. Let it cool down. down ● Ensure that computer air vents are not blocked and that the internal fan is running — automatically. see Cleaning procedures on page 9. (Your computer might not have an internal fan.
Keyboard and mouse (general) Symptom Possible solution Keyboard Use the mouse to turn off the computer, unplug and reconnect the keyboard to the back commands and of your computer, and then restart your computer. typing are not recognized by the computer. Mouse (with cable) Unplug and reconnect the mouse cable to your computer. does not work or is not detected. If the mouse is still not detected, turn off the computer, unplug and reconnect the mouse cable, and then restart the computer.
Keyboard and mouse (wireless) Symptom Possible solution Wireless keyboard ● inches) during initial setup or for re-synchronization. work or is not detected. Ensure that you are using the wireless keyboard or wireless mouse within range of the receiver, approximately 3 meters (10 feet) for normal use, and within 30 cm (12 or mouse does not ● Ensure that the mouse is not in Suspend mode, which occurs after 20 minutes of inactivity. Click the left mouse button to reactivate it.
Speakers and sound Symptom Possible solution No sound is 1. produced. From the Start screen, type c, select Control Panel, and then select System and Security. 2. Under Action Center, select Troubleshoot common computer problems, and then select Troubleshoot audio playback.
Symptom Possible solution I cannot connect to 1. From the Start screen, type c, and then select Control Panel. 2. Under Network and Internet, select Connect to the Internet. the Internet. Verify that you are using the proper cables for your Internet connection type. Your computer might have a dial-up modem and an Ethernet network adapter (also called a network interface card, or NIC).
Updating device Complete the following procedure to update a driver, or to revert to an earlier version of the drivers driver if the new one does not solve your problem: 1. From the Start screen, type c and then select Control Panel. 2. Select System and Security, and then in the System area, select Device Manager. 3. Select the arrow to expand the type of device you want to update or roll back. (For example, DVD/CD-ROM drives). 4. Double-click the specific item (for example, HP DVD Writer 640b).
Software If any of your factory-installed software programs or hardware drivers are damaged, you can program and reinstall them by using the Recovery Manager program (select models only). hardware driver reinstallation NOTE: Do not use the Recovery Manager program to reinstall software programs that came on CDs or DVDs included in the computer box. Reinstall these programs directly from the CDs or DVDs. Before you uninstall a program, be sure you have a way to reinstall it.
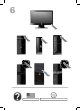
6 Support information Ways to get help Easy to reach. Easy to use. Award-winning HP Customer Support is our promise to help you get the most from your computer. Whether with tools located on your computer, from information on the web, by phone, or through your local retailer, you’ll find what you need. Before contacting the HP Customer Care Center, it’s important to have the following information handy.
Customer support for repairs If your computer needs to be repaired or to have parts replaced, you have two choices: ● You can easily replace many of your computer parts that are considered consumer replaceable. This is the fastest method of repair, as many times we can send the part directly to your home or business in a few days. (This option may not be available in all countries/regions.) ● If a repair is necessary, the HP Customer Care Center will make arrangements to fix your computer.
Droit d'auteur et licence Informations sur le produit © Copyright 2012 Hewlett-Packard Development Company, L.P. Ce manuel décrit des fonctions communes à la plupart des modèles. Cependant, certaines fonctions peuvent ne pas être disponibles sur votre ordinateur. Les informations contenues dans ce document peuvent être modifiées sans préavis. Les garanties relatives aux produits et aux services HP sont décrites dans les déclarations de garantie limitée expresse qui les accompagnent.
accédez au site http://welcome.hp.com/country/ us/en/wwcontact_us.html.
1 Obtenir des informations Type d’informations Où trouver ● Configurer l'ordinateur. Quick Setup (Installation rapide) (ce guide) ● Utiliser l'ordinateur. Quick Setup (Installation rapide) (ce guide) ● Connectez-vous à Internet. ● Restaurer les paramètres Guide de dépannage et de maintenance sur votre ordinateur. d’usine.
Type d’informations Où trouver ● Site Web Assistance HP : http://www.hp.com/go/contactHP Recherchez les manuels de l’utilisateur électroniques et les caractéristiques de votre modèle d’ordinateur. ● Commandez des pièces et recherchez une aide supplémentaire pour le dépannage. ● Mettez à niveau ou remplacez Guide de mise à niveau et d'entretien courant des composants de votre Site Web Assistance HP : http://www.hp.com/go/contactHP ordinateur.
Type d’informations Où trouver ● HP Support Assistant (Service d'assistance HP) : maintient les Maintenir votre ordinateur. performances de votre ordinateur et résout les problèmes plus rapidement grâce aux mises à jour automatisées, aux diagnostics intégrés et à l’assistance guidée. Sélectionnez l'application HP Support Assistant (Service d'assistance HP) sur l'écran de démarrage.
2 Configuration de votre ordinateur AVERTISSEMENT ! Afin d'éviter tout risque de choc électrique ou de dommages à votre équipement : • Placez l'ordinateur dans un endroit éloigné et protégé de la poussière, de l'humidité et de la suie. Ces éléments peuvent augmenter la température interne, provoquer un incendie ou entraîner une électrocution. • Ne désactivez pas la fiche de mise à la terre du cordon d'alimentation. La mise à la terre est une caractéristique de sécurité importante.
a. Identifiez le système d'exploitation et la version actuels de votre ordinateur. (À partir de l'écran de démarrage, appuyez sur la touche p, sélectionnez Panneau de configuration, sélectionnez System and Security (Système et sécurité), puis sélectionnez Système. Le système d'exploitation et la version sont indiqués sous Spécifications.) b. Ouvrez votre navigateur Internet et allez sur http://welcome.hp.com/ country/us/en/wwcontact_us.html. c.
REMARQUE : N'utilisez que des logiciels originaux concédés sous licence. L'installation de logiciels copiés peut s'avérer instable, infecter l'ordinateur par un virus, ou être illégale. Les solutions de sécurité peuvent détecter le vol, les mauvaises manipulations et les attaques logicielles, mais elles ne peuvent pas les éviter. Connexion à Internet Étapes pour vous connecter à Internet : 1. Branchez le matériel conformément aux instructions de mise en route. 2. Accédez à un service Internet.
3 Installation de fonctionnalités supplémentaires Utilisation de Beats Audio™ Votre PC HP TouchSmart présente des connecteurs audio (écouteurs et sortie audio) qui sont optimisés pour des écouteurs Beats Audio™ et des systèmes audio externes (achetés séparément). Les modèles Select HP TouchSmart PC incluent également quatre haut-parleurs internes optimisés grâce à la technologie Beats et un bouton de basculement Beats sur le clavier.
IMPORTANT : Vous devez connecter le moniteur HDMI à la carte graphique avant d'activer le son et d'ajuster la résolution. Activation du son 1. Appuyez sur la touche Windows du clavier pour afficher le Bureau. 2. Faites un clic droit sur l'icône du Volume (haut-parleur blanc) dans la zone de notification, à l'extrémité droite de la barre des tâches. 3. Sélectionnez les Périphériques de lecture. La fenêtre Son s'ouvre. 4. Dans l’onglet Lecture, recherchez le périphérique par défaut.
Cartes graphiques 1. NVIDIA Cliquez avec le bouton droit de la souris sur une zone vide du Bureau, puis cliquez sur Panneau de configuration NVIDIA. La fenêtre Sélection de l’affichage s’ouvre. 2. Dans la zone Sélection d'une tâche, sur la gauche, dans Afficher, cliquez sur Changer la résolution. La fenêtre Changer la résolution s’ouvre. 3. Si votre ordinateur HP est connecté à un moniteur HP, assurez-vous que la case Afficher uniquement les résolutions TV n’est pas cochée.
Ces instructions concernent une installation standard à deux moniteurs. Si vous avez acheté un système à double moniteur avec le logiciel ATI™ Eyefinity, suivez ces instructions pour une installation à deux (ou trois) moniteurs, puis passez aux instructions pour l'installation d'ATI Eyefinity Catalyst™. 1. Vérifiez que le PC est configuré selon les instructions dans l'affichage de l'installation. N'allumez pas le PC ou le moniteur. 2.
Installation d'ATI Eyefinity Catalyst™ 1. Faites un clic droit sur l'icône Eyefinity Catalyst™ sur le bureau pour afficher ATI Catalyst Control Center™. 2. Sélectionnez CCC-Advanced, sélectionnez Carte graphique, sélectionnez Bureau et moniteurs puis suivez les instructions à l’écran pour configurer la disposition de l’affichage des deux ou trois moniteurs.
4 Maintenir votre ordinateur Procédures de nettoyage Garder l’ordinateur propre, sans poussière ni saletés et à l’abri de la chaleur, permet de prolonger sa durée de vie. ● De la poussière, des poils d'animaux et autres particules peuvent s'accumuler, produisant un effet de « couverture » ; il peut en résulter une surchauffe des composants ou, dans le cas du clavier et de la souris, un fonctionnement incorrect et inefficace.
5 Dépannage et maintenance Reportez-vous à la documentation fournie par le fabricant du produit pour obtenir de plus amples informations sur les problèmes spécifiques aux périphériques, comme les problèmes de moniteur ou d’imprimante. Les tableaux suivants présentent quelques problèmes que vous pourriez rencontrer lors de l’installation, du démarrage, ou de l’utilisation de votre ordinateur, ainsi que des solutions possibles.
Symptôme Solution L’ordinateur Utilisez le Gestionnaire des tâches pour fermer les programmes qui ne répondent pas, ou semble bloqué pour redémarrer votre ordinateur : et ne répond 1. Appuyez simultanément sur les touches Ctrl+Alt+Supprimer du clavier. 2. Sélectionnez le Gestionnaire des tâches. 3. Sélectionnez le programme qui ne répond pas, puis sélectionnez Fin de tâche. pas. Si le problème persiste après avoir fermé le programme, redémarrez l’ordinateur : 1.
Affichage (moniteur) Symptôme Solution L’écran n'affiche Rebranchez le câble d’alimentation au dos du moniteur et à la prise murale. rien, et le voyant d’alimentation du Appuyez sur l'interrupteur du moniteur. moniteur est éteint. L’écran n’affiche Appuyez sur la barre d'espace du clavier ou déplacez la souris pour réactiver l'affichage. rien. Appuyez sur le bouton de Veille (certains modèles uniquement) ou sur la touche Échap du clavier pour sortir du mode Veille.
Symptôme Solution Le curseur ne se Appuyez sur Verr Num sur le clavier pour désactiver Verr Num, afin de pouvoir utiliser les déplace pas lorsque touches fléchées du clavier numérique. les touches fléchées du clavier numérique sont utilisées. Le curseur ne suit Utilisez le clavier pour enregistrer les modifications dans tous les programmes ouverts, pas les puis redémarrez votre ordinateur. mouvements de la 1. souris.
Clavier et souris (sans fil) Symptôme Solution Le clavier ou la ● (12 pouces) lors de la configuration initiale ou de la resynchronisation. fonctionne pas ou n'est pas détecté(e) Assurez-vous d’utiliser un clavier ou une souris sans fil situé à portée du récepteur, approximativement 3 mètres (10 pieds) pour une utilisation normale, et 30 cm souris sans fil ne ● après l'installation. Assurez-vous que la souris n’est pas en mode veille (après 20 minutes d'inactivité).
Haut-parleurs et son Symptôme Solution Il n’y a pas de son. 1. À partir de l'écran de démarrage, appuyez sur la touche p, sélectionnez Panneau de configuration, puis sélectionnez System and Security (Système et sécurité). 2. Sous Centre de maintenance, sélectionnez Résoudre des problèmes informatiques courants, puis sélectionnez Résoudre les problèmes liés aux lectures audio.
Accès à Internet Symptôme Solution Les programmes Ouvrez une session Internet et lancez le programme de votre choix. Internet ne démarrent pas automatiquement. Impossible d’établir 1. une connexion à Internet. À partir de l'écran de démarrage, appuyez sur la touche p, puis sélectionnez Panneau de configuration. 2. Sous Réseau et Internet, sélectionnez Connexion à Internet. Vérifiez si vous utilisez des câbles adaptés à votre type de connexion Internet.
Dépannage du logiciel Pour corriger ● logiciels, ● essayez ces méthodes : Éteignez complètement l'ordinateur puis rallumez-le. C'est la manière la plus facile (et parfois la meilleure). des problèmes Mettez à jour les pilotes (voir section suivante, "Mise à jour des pilotes de périphériques"). ● Utilisez le programme Restauration du système de Microsoft et procédez à une réinstallation des pilotes matériels (voir Restauration du système Microsoft plus loin dans ce tableau).
Restauration du Si vous rencontrez un problème qui peut être dû à un logiciel installé sur votre ordinateur, système de utilisez la fonction Restauration du système pour ramener votre ordinateur à son état lors Microsoft d’un point de reprise précédent. Vous pouvez aussi établir ces points manuellement. REMARQUE : Utilisez toujours la procédure Restauration du système avant d’utiliser le programme Récupération système.
Réinstallation Si une application ou un pilote installé en usine est endommagé, vous pouvez les réinstaller des logiciels et à l'aide du programme Gestionnaire de réinstallation (certains modèles uniquement). des pilotes REMARQUE : N'utilisez pas le Gestionnaire de réinstallation pour réinstaller les logiciels contenus sur les CD ou les DVD qui se trouvaient dans l’emballage de votre ordinateur. Réinstallez ces programmes directement à partir des CD ou des DVD.
6 Informations sur l'assistance technique Informations sur l'assistance technique Simple d'accès. Facile à utiliser. Le service d'assistance clientèle HP déjà plusieurs fois récompensé incarne notre engagement à vous aider pour profiter au mieux de votre ordinateur. Que ce soit par le biais des outils installés sur votre ordinateur, des informations disponibles sur Internet, par téléphone ou par l'entremise de votre détaillant local, vous trouverez des réponses à tout.
3. ● support par e-mail ● conversation en temps réel avec des spécialistes de l’assistance technique HP qualifiés ● numéros de téléphone du support technique Pour obtenir une aide en ligne, allez sur le site Web du HP Customer Care Center (Centre d'aide à la clientèle HP) à l'adresse suivante : http://www.hp.com/go/contactHP. Une assistance téléphonique pour que vous puissiez démarrer est assurée pendant trente (30) jours à partir de la date à laquelle vous avez acheté votre ordinateur.
dans le guide HP Worldwide Limited Warranty and Technical Support (Garantie HP limitée internationale et support technique).
The power to make a change Thank you for your purchase. HP is dedicated to producing the highest quality, best performing, and easiest to use computers in the world. HP also designed this product with the environment in mind. If this computer is a replacement for an older computer you no longer need, go to www.hp.com/go/recycle to find out if HP can help you dispose of your old computer with minimum impact on the planet. Le pouvoir de changer les choses Nous vous remercions pour votre achat.