
HP SureStore HD Server 4000 User's Guide - 5967-9979


11
-
30 Resolving Problems with Your Server
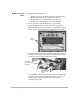
8. Insert the new tape drive module (consisting of the tape drive in
its tray) into the tape drive slot at the front of the server.
The tray must fit between two sheet metal guides at both sides
of the enclosure. If the tray does not slide easily, it may not be
inside the guides. When the tray is fully inserted, its front holes
align with the holes in the metal front of the enclosure.
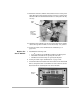
9. Use the Torx
®
#15 screws that you removed from the old tape drive
module in step 3 on page 11-28, to secure the new tape drive
module to the enclosure.
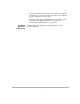
10. Inside the enclosure at the rear of the tape drive, attach the SCSI
cable connector labeled “
TAPE
” to the SCSI connector or adapter
at the back of the drive. (“
TAPE
” faces upward.) Push on the white
tab to slowly and firmly push the connector. (See illustration
below.) When fully secured, the two levers at the sides of the
connector will pop outward.
CAUTION!
❏
Do
not
push on the levers to secure the SCSI connector. Push on
the back of the connector on the SCSI cable instead. Care and
firmness are required due to the large number of small pins.
Slide tray
between
sheet metal
guides
Attach SCSI
cable
connector:
Push on
white tab.
Do not push on
side levers.