
User Manual


The following sections describe the steps required to develop, deploy, and run the EmpInfo
application.
• “Developing EmpInfo on Windows using the Eclipse Galileo IDE” (page 40)
• “Deploying EmpInfo on NonStop” (page 87)
• “Running EmpInfo on NonStop” (page 89)
Developing EmpInfo on Windows using the Eclipse Galileo IDE
NOTE:
• It is not mandatory for you to use the Eclipse Galileo IDE. You can use any IDE that supports
Java.
• The screen captures in this section are based on Eclipse Galileo IDE version 3.5.2. The screen
captures may look different if you use a different version of Eclipse Galileo.
The following activities are required to develop the EmpInfo application using the Eclipse Galileo
IDE:
1. “Developing a Basic EmpInfo Application” (page 41)
2. “Developing and Configuring Views and the Controller” (page 57)
3. “Developing Business Logic and Providing the Web Interface” (page 62)
4. “Integrating the Web-tier of EmpInfo with NonStop SQL/MX Database” (page 65)
5. “Enabling EmpInfo to Delete and Retrieve Employee Details” (page 73)
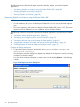
Creating the Eclipse Workspace
1. To open the Eclipse workspace, double-click the eclipse.exe file in <Eclipse IDE
Installation Directory>.
The Workspace Launcher dialog box appears. By default, the workspace is set to the existing
workspace, if already created.
You can use the existing workspace or create a new one by clicking Browse... and selecting
a folder.
Figure 2 Workspace Launcher Dialog Box
40 Spring Framework