
User Manual

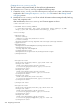

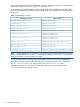


Figure 137 The WAR Export dialog box
4. Click Finish. The WAR file is created.
NOTE: If you have specified an existing name for the WAR file, the Finish button is disabled.
In this case, change the name of the WAR file. If you want use the existing name, select the
Overwrite existing file check box.
Deploying the EmpInfo WAR File in NSJSP on NonStop
To deploy the EmpInfo WAR file on your NonStop system, complete the following steps:
1. Go to http://<IP Address of the iTP WebServer>:<port#>/<manager directory>.
The NSJSP Manager Login screen appears.
Figure 138 shows the NSJSP Manager Login screen.
Integrating MyFaces into Spring 307