HP NonStop MXDM User Guide for SQL/MX Release 3.2.1 HP Part Number: 691119-002 Published: February 2013 Edition: J06.15 and subsequent J-series RVUs; H06.
© Copyright 2013 Hewlett-Packard Development Company, L.P. Legal Notice Confidential computer software. Valid license from HP required for possession, use or copying. Consistent with FAR 12.211 and 12.212, Commercial Computer Software, Computer Software Documentation, and Technical Data for Commercial Items are licensed to the U.S. Government under vendor's standard commercial license. The information contained herein is subject to change without notice.
Contents About this guide............................................................................................7 Publishing history......................................................................................................................7 New and changed information...................................................................................................7 Supported Release Version Updates (RVUs)..................................................................................
Using a favorite.................................................................................................................33 Viewing a list of favorites....................................................................................................33 Removing a favorite............................................................................................................34 Removing a favorites folder.............................................................................................
Displaying table indexes and their properties........................................................................59 Viewing the table index columns.....................................................................................60 Viewing the table index attributes....................................................................................60 Viewing the DDL output for a table index..........................................................................
Starting and stopping server traces...........................................................................................95 Viewing MXCS user permissions...............................................................................................95 Adding an MXCS user............................................................................................................96 Editing MXCS user permissions.................................................................................................
About this guide This guide describes how to use MXDM to monitor and manage SQL/MX databases. Related Topics “Publishing history” (page 7) “New and changed information” (page 7) “Supported Release Version Updates (RVUs)” (page 7) “Audience” (page 7) “Related documentation” (page 8) “HP encourages your comments” (page 11) Publishing history This guide supports HP NonStop SQL/MX Release 3.2.1 until otherwise indicated by its replacement publication.
Table 1 Chapters in the manual (continued) Chapter Description “Navigating MXDM” (page 27) Discusses the MXDM UI and its elements “Performing basic MXDM operations” (page 39) Discusses basic operations that you can perform in MXDM “Viewing database objects” (page Discusses the procedures to view database objects on a system 48) “Managing MXCS objects” (page Discusses the procedures to view and manage MXCS objects 79) “Launching the NonStop SQL/MX Discusses the procedures to launch and configure RMXCI
• Connectivity manuals SQL/MX Connectivity Service Manual Describes how to install and manage SQL/MX Connectivity Service (MXCS), which enables ODBC and other connectivity APIs to use NonStop SQL/MX. SQL/MX Connectivity Service Administrative Command Reference Describes the SQL/MX Administrative Command Library (MACL) available with the SQL/MX conversational interface (MXCI).
• Online help SQL/MX Database Manager Help Contents and reference entries from the SQL/MX Database Manager User Guide. Reference Help Overview and reference entries from the SQL/MX Reference Manual. Messages Help Individual messages grouped by source from the SQL/MX Messages Manual. Glossary Help Terms and definitions from the SQL/MX Glossary. NSM/web Help Context-sensitive help topics that describe how to use the NSM/web management tool.
FC [ num ] [ -num ] [ text ] K [ X | D ] address { } Braces. A group of items enclosed in braces is a list from which you are required to choose one item. The items in the list can be arranged either vertically, with aligned braces on each side of the list, or horizontally, enclosed in a pair of braces and separated by vertical lines. For example: LISTOPENS PROCESS { $appl-mgr-name } { $process-name } ALLOWSU { ON | OFF } | Vertical Line.
Include the document title and part number of the document.
1 Introduction to MXDM This chapter discusses the following topics: • “Overview” (page 13) • “MXDM features and functionalities” (page 13) • “MXDM functional flow” (page 15) Overview MXDM is an integrated graphical user interface (GUI) client that enables you to connect to and manage multiple NonStop SQL/MX databases.
• • • ◦ View information related to table profiles and statistics. ◦ View EMS logs. SQL Whiteboard —enables you to execute queries and view data results. Using the SQL Whiteboard, you can perform the following: ◦ Execute DDL and Data Manipulation Language (DML) statements. ◦ Persist queries across sessions for reuse. ◦ Copy query results to a spreadsheet. ◦ Highlight a portion of an SQL statement and execute (syntax highlighting). ◦ Cancel an executing query.
MXDM functional flow The functional model within which MXDM operates includes the following components on the client workstation: • MXDM • Windows ODBC/MX driver On the NonStop system, you must install the required MXCS objects and create those database objects that you want to manage using MXDM. Figure 1 (page 15) shows the MXDM functional flow.
2 Installing and uninstalling MXDM This chapter discusses the following topics: • “Supported version of SQL/MX” (page 16) • “Contents of the installation package” (page 16) • “Prerequisites” (page 16) • “Installing MXDM” (page 17) • “Uninstalling MXDM” (page 17) Supported version of SQL/MX The MXDM client can connect to systems running SQL/MX Release 3.2 or later. Contents of the installation package MXDM is available in 32-bit and 64-bit versions.
NOTE: If you want to use RMXCI, you must install RMXCI and the JDBC T4 V32 driver. Installing MXDM This section discusses the following topics: • “Installing the 32-bit version of MXDM” (page 17) • “Installing the 64-bit version of MXDM” (page 17) NOTE: If you are installing MXDM on Microsoft Windows Vista, and you are not logged on as an administrator, you must install the files in alternate location, such as C:\user\your logon name\NonStop SQLMX Database Manager.
Before uninstalling MXDM, you must consider the following: • You do not have to uninstall the MXDM client before installing a newer version of MXDM. • Uninstalling does not remove favorites or system definitions. • If you uninstall from the Start menu, you are prompted to either repair or remove MXDM. Selecting Repair is nondestructive, and verifies the program files. Selecting Remove begins the uninstallation process.
3 Managing MXDM system objects This chapter discusses the following topics: • “Starting up MXDM” (page 19) • “Adding a system” (page 19) • “Connecting to a system” (page 20) • “Disconnecting from a system” (page 22) • “Using the Systems Tool” (page 22) • “Editing a system definition” (page 24) • “Copying a system definition” (page 24) • “Removing a system” (page 25) • “Testing a system definition” (page 25) • “Setting the connection timeout” (page 25) • “Exiting MXDM” (page 26) Startin
the objects. You can also use the Save Persistence option to save the system definition. During subsequent attempts to connect to that system, the saved system definition is automatically retrieved. To add a new system definition: 1. Open the Add System dialog in one of the following ways: • In the navigation tree pane, right-click the My Systems folder, and select Add.... • Select Tools→Systems Tool, and click Add.... The Add System dialog appears. Figure 2 (page 20) shows the Add System dialog.
1. Open the Connect / Edit System dialog in one of the following ways: • In the navigation tree pane, right-click the system name, and select Connect... • In the navigation tree pane, click the system icon. • Select Tools→Systems Tool, and double-click the system definition of the system to which you want to connect. Alternatively, select the system definition, and click Edit... The Connect / Edit System dialog appears. The saved system definition appears by default.
Related Topics “Adding a system” (page 19) “Disconnecting from a system” (page 22) Terms My Systems Systems Tool system definition Disconnecting from a system Disconnecting from a system closes all ODBC connections with that system. To disconnect from a selected system: 1. Perform one of the following: • In the navigation tree pane, right-click the connected system name, and select Disconnect.
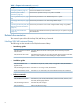
Figure 3 Systems Tool dialog Table 2 (page 23) describes the settings in the Systems Tool dialog. Table 2 Systems Tool settings Setting Description State Displays the current state of the system definition (Connected or Disconnected). System Name Displays the label that identifies this NonStop system. The system name can be up to 32 characters in length, and can consist of letters, numerals, and the underscore character. Data Source Displays the name of the client data source.
Table 3 Systems Tool options Setting Description Test Enables you to test a selected system and displays the results in the Connection Test Result dialog. Test is enabled when you select one or more systems. Edit... Enables you to launch the Connect / Edit System dialog with the current settings of the selected system. Edit is enabled when you select one or more systems. Add... Enables you to launch the Add dialog. Add Like...
2. In the Add System Like dialog: a. Specify a new name in the System Name field. b. Retain or modify the information specified in the fields of the selected system. For more information on the fields, see “Adding a system” (page 19). NOTE: If the data source that you specify already exists on the local system, the remaining fields are automatically loaded into this dialog. c. Click Add. The new system definition is added. Removing a system To remove a system from MXDM: 1.
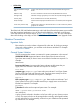
To set the connection timeout: 1. Perform one of the following: • On the MXDM toolbar, click Options ( • Select Tools→Options.... ) The Options dialog appears. 2. 3. Select Framework under General. In the right pane of the Options dialog, enter the number of seconds that you want to specify for the connection timeout. Figure 4 (page 26) shows the Options dialog. Figure 4 Options dialog 4. Click OK. The new timeout value is set.
4 Navigating MXDM This chapter discusses the following topics: • “MXDM interface” (page 27) • “MXDM banner” (page 28) • “Using the MXDM menus” (page 28) • “Using the MXDM toolbar” (page 30) • “Selecting an area” (page 31) • “Adjusting the display of an area” (page 32) • “Using the My Favorites pane” (page 33) • “Using the navigation tree” (page 34) • “Using the right pane” (page 36) • “Working with windows, tabs, and panes” (page 37) MXDM interface Figure 5 (page 27) shows the MXDM inter
Table 4 Parts of the MXDM interface (continued) Number Label Description 5 Selected area Displays the selected area. 6 My Favorites pane Favorites appear in the My Favorites pane. For more information, see “Using the My Favorites pane” (page 33). 7 Navigation tree pane The navigation tree displays all the systems that you have added using the Systems Tool. For more information, see “Using the navigation tree” (page 34).
Using the File menu options Table 5 (page 29) describes the File menu options. Table 5 File menu options Option Description Import Persistence Imports persistence data from a file that was saved using MXDM. NOTE: All the current settings are replaced by the settings in the imported file. For more information, see “Saving and importing system definitions” (page 46). Save Persistence Saves the current configuration. Export Persistence Saves the configuration to any file.
Table 7 Tools menu options Option Description SQL Whiteboard Launches the SQL Whiteboard. For more information on SQL Whiteboard, see “Using the SQL Whiteboard” (page 101). SQL/MX Remote Launches RMXCI. For more information on RMXCI, see “Launching the NonStop SQL/MX Conversational Interface Remote Conversational Interface” (page 99). Systems Tool Opens the Systems Tool dialog. For more information on Systems Tool, see “Using the Systems Tool” (page 22). Options... Opens the Options dialog.
Table 10 MXDM tools Tool Description Displays the Connect / Edit System dialog and enables you to connect to a system or modify a system definition. For more information, see “Connecting to a system” (page 20). Enables you to disconnect the selected system. For more information, see “Disconnecting from a system” (page 22). Enables you to define, add, edit, remove, duplicate, test, and open connections to a SQL/MX database using MXDM. For more information, see “Using the Systems Tool” (page 22).
Table 11 Supported areas Area Description Database Provides information about the database objects. For more information, see “Viewing database objects” (page 48). Connectivity Provides information about MXCS objects. For more information, see “Managing MXCS objects” (page 79) MXDM displays the currently selected area below the menu bar “MXDM interface” (page 27). When you select an area, MXDM displays the characteristics of that area for all connected systems.
Using the My Favorites pane MXDM enables you to create favorites and organize them in folders. Subsequently, you can use favorites to easily navigate to the required objects. Favorites appear in the My Favorites pane. Creating a folder to store favorites In the My Favorites pane, you can create folders at the top level or folders within folders: 1. In the My Favorites pane, right-click the My Favorites folder and select New Folder...
Removing a favorite To remove a favorite, right-click the favorite, and select Remove. Removing a favorites folder To remove a folder, right-click the folder, and select Remove. The folder and all favorites contained within it are removed. Considerations You can create a favorite and store it in a folder. You can save your favorites and other personalized client settings. However, you cannot perform the following actions: • Move a favorite from one folder to another folder.
When you select the Database area, you can view the database objects on the connected systems, in the navigation tree. The right pane displays more details about any object selected in the navigation tree pane. For more information, see “Using the right pane” (page 36). To add a new system, click Add... at the bottom of the right pane. If systems have been added previously, the right pane displays the active systems. To display the options related to My Systems, right-click the My Systems folder.
Related Topics “MXDM interface” (page 27) “Adding a system” (page 19) “Using the My Favorites pane” (page 33) “Using the right pane” (page 36) “Disconnecting from a system” (page 22) Terms My Systems Using the right pane The right pane displays information about the selected objects in the My Favorites pane or in the navigation tree. Table 15 (page 36) describes the options displayed in the right pane when you select the My Systems folder.
Working with windows, tabs, and panes MXDM provides all of the conventional user-interface controls available in other Windows applications. MXDM windows can be resized within permissible limits. When a window is resized, graphical objects in a window get resized, if necessary. To display information, MXDM provides the following features: • Ability to clone windows and tabs, and manage multiple open windows from one dialog.
Figure 9 Window controls 38 Navigating MXDM
5 Performing basic MXDM operations This chapter discusses the following topics: • “Obtaining version and build information” (page 39) • “Resolving errors and error messages” (page 39) • “Sorting and moving data columns” (page 40) • “Working with data grids” (page 41) • “Copying data” (page 45) • “Saving and importing system definitions” (page 46) Obtaining version and build information The version and build information appears in the About NonStop SQL/MX Database Manager dialog.
Sorting and moving data columns You might want to see rows in an MXDM display (for example, a list of schemas) grouped on the basis of the information type. You can sort the displayed data in some tabs based on column values. You can also change the order of the columns by dragging a column heading to the left or right. To change the sort order of a displayed column, click the heading of the column that you want to sort. A triangle appears at the right indicating the order.
Figure 12 Changed order of columns Working with data grids This section discusses the following topics: • “Introduction to data grids” (page 41) • “Obtaining row details for a data grid” (page 42) • “Copying data grid information” (page 43) • “Customizing the data grid” (page 43) • “Searching the data grid” (page 44) Introduction to data grids The SQL Whiteboard Statement Details pane and the Report Results pane display information in a data grid.
Some MXDM tabs, such as the tabs in the Database area, do not provide data grids. You can sort single columns and copy the data in these tabs. However, you cannot obtain row details, search for items, or display context menus.
Figure 14 Viewing multiple rows in the data grid Related Topics “Introduction to data grids” (page 41) “Customizing the data grid” (page 43) Copying data grid information To copy the data in cells, select the cells you want to copy, and then right-click and select Copy. Figure 15 (page 43) shows how you can copy grid information. Figure 15 Copying grid information To copy data in noncontiguous cells, use the Ctrl key. The cell values are copied into the Windows clipboard.
Table 18 Procedures to customize the data grid To Do this Show or hide columns 1. Right-click a column heading in any data grid, and select Show/Hide Grid Columns. The Show/Hide Grid Columns dialog appears. 2. Select the columns that you want to display, and click OK. NOTE: Change the order of displayed columns Click Defaults at any time to restore the default column selections.
Figure 16 Searching for information Related Topics “Introduction to data grids” (page 41) Copying data You can copy data to different locations, and use the data for comparisons and analysis. This section discusses the following topics: • “Copying data to the clipboard” (page 45) • “Copying data to a file” (page 45) • “Copying data to a spreadsheet” (page 45) • “Copying data to a browser” (page 46) Copying data to the clipboard Data to Clipboard saves the data to the clipboard.
Copying data to a browser Data to Browser invokes Internet Explorer or a default browser that displays the table data. The data is copied internally in standard HTML format. Internet Explorer is then invoked on a temporary HTML file. You can then use Internet Explorer to save the contents. NOTE: If the table has no data, the Copy buttons are disabled. Saving and importing system definitions MXDM enables you to save multiple system definitions and share them with other client workstations.
3. Click Yes. MXDM copies the information from the .mxdm file into the persistence file and prompts you to reconnect if you were connected to active systems.
6 Viewing database objects This chapter discusses the following topics: • “Viewing catalogs and their objects” (page 48) • “Viewing schemas” (page 50) • “Viewing table properties” (page 53) • “Viewing schema views and their properties” (page 65) • “Viewing procedures and their properties” (page 68) • “Viewing SQL/MP aliases and their properties” (page 72) • “Viewing table statistics and their properties” (page 75) • “Viewing sequence generators and their properties” (page 73) For information
4. Click a catalog. The following tabs related to the catalog appear in the right pane: • Attributes • Registrations • Schemas • DDL Figure 17 (page 49) shows the catalog properties. Figure 17 Catalog properties Viewing catalog attributes To view the catalog attributes and their values: 1. In the navigation tree, select the catalog. 2. In the right pane, click Attributes. The following attributes and their values appear: • Name: — The name of the catalog.
2. In the right pane, click Registrations. The following details appear: • System: — The system where this catalog is registered. • Location: — The physical volume where the catalog is registered. • Rule: — The replication rule. The rule can be automatic or manual. Viewing schemas within a catalog To view the schemas in the catalog: 1. In the navigation tree, select the catalog. 2. In the right pane or the Schemas folder within the catalog, click Schemas.
5. Click a schema. The following tabs related to the schema appear in the right pane: • Attributes • Tables • Views • Procedures • SQL/MP Aliases • Sequences • DDL Figure 18 (page 51) shows the schema properties. Figure 18 Schema properties Viewing schema attributes To view the schema attributes and their values: 1. In the navigation tree, select the schema. 2. In the right pane, click Attributes.
2. In the right pane or the Tables folder within the schema, click Tables. The following details appear: • Name: — The name of the table. Each table name is a hyperlink. Clicking the hyperlink displays the details of the table. • Metadata UID: — The internal UID number of the table. • Creation Time: — The time and date when the table was created. The Creation Time attribute is in the yyyy-MM-dd HH:mm:ss.FFFFFF format. • Redefinition Time: — The time and date when the table was last redefined.
2. Do one of the following: • In the right pane, click SQL/MP Aliases. • Within the schema, click the SQL/MP Alias folder. The following details appear: • Name: — The name of the SQL/MP alias. Each SQL/MP alias name is a hyperlink. Clicking the hyperlink displays the details of the SQL/MP alias. • Metadata UID: — The internal UID number of the SQL/MP alias. • Creation Time: — The time and date when the SQL/MP alias was created. The Creation Time attribute is in the yyyy-MM-dd HH:mm:ss.
6. Select a table. The right pane displays the following tabs: • Columns • Primary Key • Hash Key • Store Order • Check Constraints • Unique Constraints • Foreign Keys • Attributes • Partitions • Related Objects • DDL • Statistics • Privileges Figure 19 (page 54) describes the table properties. Figure 19 Table properties Additionally, each table in the navigation tree contains two folders: Indexes and Triggers.
2. In the right pane, click Columns. The following details appear: • Primary Key: — An icon or special symbol to indicate that the column is part of the primary key. If the column is not a part of the primary key, the field is blank. • Column Name: — The name of the column (string). • Data Type: — The SQL data type of the column. • Nullable: — If a column is NOT NULL or NOT NULLABLE NOT DROPPABLE, the value displayed is Not Nullable Not Droppable. Otherwise, the field is blank.
2. In the right pane, click Store Order. The following details appear: • Position: — The position of the column in the key, for the physical file. • Column Name: — The name of the column (string) • Sort Order: — The order specified as Ascending or Descending. • Added By: — The property indicates whether the column was added by the system or by the user. Viewing check constraints To view the check constraints for a table: 1. In the navigation tree, select the table. 2.
2. In the right pane, click Attributes. The following details appear: • Name: — The name of the table. • Metadata UID: — The internal UID number of the table. • Log Inserts Only: — A string value of True or False. • Reorganize Enabled: — A string value of True or False. • Update Statistics Enabled: — A string value of True or False. • Last Updated Statistics: — A string value of Never or a timestamp in the yyyy-MM-dd HH:mm:ss.FFFFFF format.
2. In the right pane, click Partitions. The following details appear: • Partition Number: — The index number of the partition. • System: — The name of the NonStop system where this partition is located. • Name: — The partition name that is created by the system. • File: — The physical file where the partition is located. • Percent allocated: — The percentage of the partition used. • Row count: — The number of rows in the partition.
2. In the right pane, click DDL. The DDL tab displays the SHOW DDL output for the table. You can use this statement in MXCI to create the table. For more information on the SHOW DDL command, see the HP NonStop SQL/MX Release 3.2.1 Reference Manual. Viewing information related to table statistics To view information related to table statistics: 1. In the navigation tree, select the table. 2. In the right pane, click Statistics. The histogram statistics for the table appear.
6. Expand the contents of a table. The Indexes and Triggers folders appear. 7. Within the Indexes folder, select the required Index. In the right pane, the following tabs related to the Index appear: • Columns • Attributes • DDL • Partitions Figure 20 (page 60) shows the table index properties. Figure 20 Table index properties Viewing the table index columns To view the table index columns: 1. In the navigation tree, select the index. 2. In the right pane, click Columns.
2. In the right pane, click Attributes. The following attributes and their values appear: • Name: — The name of the index. • Metadata UID: — The internal UID number of the index. • Unique: — This attribute specifies whether the index is unique. The available values are Yes or No. • Populated: — This attribute specifies whether the index is populated. The available values are Yes or No. • System Created: — This attribute indicates whether the index was created by the system.
2. In the right pane, click Partitions. The following details related to table index partitions appear: • Partition Number: — The name of the column (string). • System: — This attribute specifies the sort order as Ascending or Descending. • Name: — This attribute specifies whether the column was added by the system or a user. • File: — The physical file where the partition is located. • Percent Allocated: — The percentage of the partition used. • Row Count: — The number of rows in the partition.
7. Within the Triggers folder, select the required Trigger. In the right pane, the following tabs related to the trigger appear: • Attributes • Related Objects • DDL Figure 21 (page 63) shows the table trigger properties. Figure 21 Table trigger properties Viewing the table trigger attributes To view the table trigger attributes: 1. In the navigation tree, select the trigger. 2. In the right pane, click Attributes. The following attributes and their values appear: • Name: — The name of the trigger.
2. In the right pane, click Related Objects. The following details appear: • Relationship: — This attribute specifies the relationship between this trigger and the object. • Related Object Type: — This attribute specifies the type of the object. • Related Object Name: — This attribute specifies the name of the object. The object name is linked to the object. • Metadata UID: — A unique ID of the related object. This ID is a long value.
Figure 22 SHOW DDL dialog NOTE: The SHOW DDL option is available only for a schema node and its child nodes in the navigation tree. The SHOW DDL option is not available for catalogs and the Schemas folder. In the SHOW DDL... dialog, the Select Objects pane displays the list of systems and the objects that they contain. You can select these objects.
2. In the navigation tree pane, click Database. MXDM displays a list of existing systems. 3. In the navigation tree, expand the contents of the system. The list of catalogs appears. 4. Expand the contents of a catalog. The list of schemas appears. 5. Expand the contents of a schema. The Views folder appears. 6. Select a view.
2. In the right pane, click Columns. The following details related to view columns appear: • Column Name: — The name of the column (string). • Source Object: — The name of the source object associated with the column. If it is a computed object, this field is blank. Clicking the source object name directs you to the location of the object. • Data Type: — The SQL data type of the column.
Viewing information related to view privileges To view information related to the view privileges: 1. In the navigation tree, select the view. 2. In the right pane, click Privileges. The following details related to the view privileges appear: • Grantee: — The name of the user whose privilege is described. • Grantor: — The name of the user who granted the privileges or the special SQL user names PUBLIC and SYSTEM. • With Grant: — This attribute indicates whether the user has grant privileges.
6. Select a procedure. In the right pane, the following tabs related to the procedure appear: • Attributes • Parameters • Related Objects • DDL • Privileges Figure 24 (page 69) shows the properties of a procedure. Figure 24 Procedure properties Viewing attributes of a procedure To view the attributes of a procedure: 1. In the navigation tree, select the procedure.
2. In the right pane, click Attributes. The following details related to attributes appear: • Name: — The name of the procedure. • Metadata UID: — The unique ID number of the procedure. • Dynamic Result Sets: — The maximum number of result sets returned. • SQL Access: — This attribute specifies how the procedure accesses the SQL data. If the procedure does not perform SQL operations, the value displayed in this field is N.
2. In the right pane, click Parameters. The following details related to parameters appear: • Name: — The name of the parameter. • Direction: — The following values appear: ◦ IN — Passes data to the procedure. ◦ OUT — Accepts data from the procedure. This value is the default for array parameters. ◦ INOUT — Passes data to and accepts data from the procedure. • SQL Data Type: — This attribute specifies an SQL data type that corresponds to the Java parameter of the procedure's Java method.
2. In the right pane, click Privileges. The following details related to the procedure privileges appear: • Grantee: — The name of the user whose privilege is described. • Grantor: — The name of the user who granted the privileges and the special SQL user names PUBLIC and SYSTEM. • With Grant: — This attribute indicates whether the user has grant privileges. • Grant Level: — The level at which the permissions are visible. The column displays the schema, object, and column values.
6. Select an SQL/MP alias. In the right pane, the following tabs related to the SQL/MX alias appear: • Attributes • DDL Figure 25 (page 73) shows the properties of an SQL/MP alias. Figure 25 SQL/MP alias properties Viewing attributes of the SQL/MP alias To view the attributes of a SQL/MP alias: 1. In the navigation tree, select the SQL/MP alias. 2. In the right pane, click Attributes. The following details related to attributes appear: • Name: — The name of the SQL/MP alias.
5. Expand the contents of a schema. The Sequences folder appears. 6. Select a sequence generator. In the right pane, the following tabs related to the sequence generator appear: • Attributes • DDL • Privileges Figure 26 (page 74) shows the properties of a sequence generator. Figure 26 Sequence generator properties Viewing attributes of a sequence generator To view the attributes of a sequence generator: 1. In the navigation tree, select the sequence generator.
2. In the right pane, click Attributes. The following details related to attributes appear: • Name: — The name of the sequence generator. • Metadata UID: — A unique ID number of the sequence generator. • Start With: — The first sequence number to be generated. • Increment By: — The increment value of the sequence generator. • Min Value: — The minimum value of the sequence generator. • Max Value: — The maximum value of the sequence generator.
1. 2. Log on to the HP NonStop SQL/MX Database Manager. In the navigation tree pane, click Database. MXDM displays a list of existing systems. 3. In the navigation tree, expand the contents of the system. The list of catalogs appears. 4. Expand the contents of a catalog. The list of schemas appears. 5. Expand the contents of a schema. The Tables folder appears. 6. 76 Select a table.
7. In the right pane, click Statistics. The following histogram statistics for the table appear: • Column Name: — The name of the column. • Data Type: — This attribute specifies the column data type. • # Nulls: — The number of null values for the column. • Min Value: — The minimum value of the column. • Max Value: — The maximum value of the column. • Skew: — The CV entry in histograms table for the column. • UEC: — The TOTAL_ UEC (Unique Entry Count) entry from histograms table for the column.
The top pane displays the column name, table name, the percentage sampled, and the time when the sample was taken. The following details appear: • Data Type: — Displays the column data type. • # Nulls: — The number of null values for the column. • Skew: — The CV entry from histograms table for this column. The middle pane displays the ten most frequent values for the column. The value itself and its cardinality (number of occurrences) appear.
7 Managing MXCS objects This chapter discusses the following topics: • “Viewing MXCS servers” (page 79) • “Stopping an MXCS server” (page 81) • “Viewing MXCS Services” (page 81) • “Starting up an MXCS service” (page 82) • “Stopping an MXCS service” (page 83) • “Viewing data sources” (page 84) • “Creating a data source” (page 85) • “Copying a data source” (page 92) • “Starting up a data source” (page 93) • “Stopping a data source” (page 93) • “Updating a data source” (page 94) • “Delet
4. In the right pane, click MXCS Server Status. The list of MXCS servers and their status appear. Figure 28 (page 80) shows the MXCS servers and their status. Figure 28 MXCS Servers Status Table 20 (page 80) describes the fields in the MXCS Server Status tab. Table 20 MXCS Server Status fields Field Description Process Name The operating system process name of the server. Service Name The MXCS service to which the process belongs. Data Source Name The user-defined name of the data source.
Stopping an MXCS server To stop an MXCS server: 1. Log on to the HP NonStop SQL/MX Database Manager. 2. In the navigation tree pane, click Connectivity. 3. Expand the system that contains the MXCS servers that you want to stop. 4. Click MXCS Services. 5. In the right pane, click MXCS Server Status to display the list of MXCS servers. 6. Select the server that you want to stop. You can select more than one server. 7. Click Stop... The Stopping Server dialog appears. 8. Click Stop Immediately.
5. In the right pane, click MXCS Services to display details of the Association and Configuration servers. Figure 29 (page 82) show the properties related to MXCS Services. Figure 29 MXCS Services tab Table 21 (page 82) describes the fields in the MXCS Services tab. Table 21 MXCS Services fields Field Description Service Name The MXCS service to which the process belongs. Service Type Association server or Configuration server. Association Servers (MXOAS) are persistent processes.
To start up an MXCS service: 1. Log on to the HP NonStop SQL/MX Database Manager. 2. In the navigation tree pane, click Connectivity. 3. In the navigation tree pane, select the system that contains the MXCS services. 4. In the navigation tree pane, expand the MXCS Services folder for the system. 5. Right-click the name of the service that you want to start up, and select Start. The MXCS service starts.
Viewing data sources To view data sources: 1. Log on to the HP NonStop SQL/MX Database Manager. 2. In the navigation tree pane, click Connectivity. MXDM displays a list of existing systems. 3. Expand the system and click the Data Sources folder. Figure 30 (page 84) shows the data sources in the navigation tree. The right pane displays the details corresponding to the data sources.
4. In the navigation tree pane, click a data source. In the right pane, the properties in the Data Source Status tab appear. Figure 31 (page 85) shows the properties in the Data Source Status tab. Figure 31 Properties in the Data Source Status tab In the right pane, the following details related to the data source appear: • Data Source Name: — The name of the data source. • Service Name: — The MXCS service to which the process belongs. • State: — The current state of the data source.
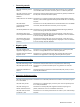
5. Configure the data source properties, as described in: • “Using General Properties” (page 86). • “Using the DEFINEs and SETs tab” (page 88) • “Using the Control Query Defaults tab” (page 90) • “Using the Control Table Statements tab” (page 91) NOTE: Some tabs provide tooltips that explain the use of an option or the range of values supported for a field. Figure 32 (page 86) shows a tool tip for one of the fields. Figure 32 Tooltip in tabs 6. 7.
Table 22 General Properties options (continued) Group Option Description The system default is 600 seconds. You can assign a value between 1 and 2,147,483,647. Connection Idle Timeout Specifies the number of minutes that a client-server connection remains idle before the MXCS server terminates the connection. You must assign a value between 1 and 2,147,483,647. The system default is 600 seconds.
Table 22 General Properties options (continued) Group Option Description Resource Management Add See “Adding and modifying the resource management policy” (page 88). Modify See “Adding and modifying the resource management policy” (page 88). Remove Removes the selected resource management policy.
Table 24 DEFINEs tab buttons Button Function Add... Displays the Add DEFINE dialog. Modify... Displays the Edit DEFINE dialog. Remove Removes the selected DEFINE statement. Figure 33 Add DEFINE About SETs SET variables affect the behavior of MXCS. For example, you can set default catalog and schema names for servers running in this data source when they are not set at the client data source. Client data source values take precedence over server data source values.
Figure 34 SET SESSION example 1 Internally, MXDM concatenates the Name and Value fields to form the SET command. Therefore, you can specify the value alone in the value field and the rest of the command in the Name field, as shown in the example. Alternatively, you can specify the type of the SET command in the Name field and the rest of the command in the Value field. HP recommends that you use this approach. Figure 35 (page 90) shows an example.
Figure 37 Add CQD Using the Control Table Statements tab The Control Table Statements tab allows you to modify certain options for specific tables. Table 26 (page 91) describes the options. Table 26 Options in the Control Table Statements tab Value Description Name Specifies name of the table. If-Locked Determines the result if you attempt to access data with read committed or if you serialize access, and the data is locked by another user.
MDAM Value Description The value used is the system default setting that exists at execution. Enable SQL/MX determines whether to use MDAM. Off MDAM is not used. On MDAM is used. Priority The possible values are 1 through 9, where 9 is the highest value. You can specify a higher priority for short-duration OLTP-type requests running with concurrent long-duration query requests. CAUTION: Using the highest possible value (9) can interfere with SQL/MX system-level activity.
2. In the navigation tree pane, click Connectivity. MXDM displays a list of existing systems. 3. 4. Expand the system for which you want to create a new data source. Right-click Data Sources, and select Copy Data Source... The Copy Data Source window appears. 5. Modify the required fields. • “Using General Properties” (page 86). NOTE: You must change the data source name. If you do not change the name, MXDM returns an error message indicating that the data source already exists.
4. 5. 6. 7. Click MXCS Services. In the right pane, click Data Source Status. Select all of the services in which the data source is configured. Click Stop... The Stopping Data Source dialog appears. 8. 9. In the Reason field, enter a reason for stopping the data source. Select one of the following options: NOTE: After you click one of the stop options, you cannot cancel the operation. • Stop on Client Disconnect • Stop Immediately CAUTION: Use Stop Immediately with caution.
Term operator permission Starting and stopping server traces Data from server traces is stored in the EMS log. The event ID is 21034.
Figure 38 (page 96) shows the properties in the MXCS Permissions tab. The MXCS Permission tab indicates whether the user has OPERATOR or USER permission. Figure 38 MXCS Permissions tab To view the current MXCS users: 1. Log on to the HP NonStop SQL/MX Database Manager. 2. In the navigation tree pane, click Connectivity. MXDM displays a list of existing systems. 3. 4. Under My Systems, select the system for which you want to view permissions. In the right pane, click MXCS Permissions.
4. 5. In the right pane, click MXCS Permissions. Click Add.... The Add User dialog appears. 6. 7. 8. Under System Users, select Operator or User. From the System Users grid, select the users that you want to add to the MXCS Users grid. Click Configure. The user name is configured, and it appears in the MXCS Users pane. 9. Click Add. The user is added.
5. Select the MXCS users, and click Delete. A confirmation dialog appears. 6. Click Yes to confirm. The MXCS user is deleted.
8 Launching the NonStop SQL/MX Remote Conversational Interface This chapter discusses the following topics: • “Introduction to RMXCI” (page 99) • “Locating the RMXCI program” (page 99) • “Launching RMXCI” (page 99) • “Setting Auto Logon options” (page 100) Introduction to RMXCI The SQL/MX database supports a client-based utility, called NonStop SQL/MX Remote Conversational Interface (RMXCI), which enables you to enter SQL statements interactively, or from script files in its command-line interface.
catalog, and schema name also are considered while logging on. To set auto logon properties, see “Setting Auto Logon options” (page 100). You can launch more than one RMXCI window using the described methods. If you set the Auto Logon option, the user credentials of the currently selected SQL/MX database that is connected to log on to RMXCI are used each time. If you select Tools→SQL/MX Remote Conversational Interface, the RMXCI window appears with a prompt ready to execute the RMXCI commands.
A Using the SQL Whiteboard This appendix discusses the following topics: • “Introduction to the SQL Whiteboard” (page 101) • “Viewing the SQL Whiteboard” (page 101) • “SQL Whiteboard panes” (page 101) • “Statement List pane” (page 102) • “Statement pane” (page 103) • “Statement Details pane” (page 105) • “Reusing a connection ” (page 106) • “Loading and saving SQL statements to a file” (page 106) • “Highlighting the SQL syntax” (page 107) • “Managing the layout of panes” (page 107) Intro
Figure 39 SQL Whiteboard Related Topics “Statement List pane” (page 102) “Statement pane” (page 103) “Statement Details pane” (page 105) Statement List pane The Statement List pane provides a list of SQL statements that you added in the current session or earlier sessions of the SQL Whiteboard tool. The list of SQL statements in one MXDM session persists in other MXDM sessions similar to how connection information and favorites persist.
Statement pane The Statement pane enables you to enter any SQL command (DDL or DML) in the text field. The maximum number of characters you can enter in the text field is 2,147,483,647. Table 30 (page 103) describes the fields that define a statement in the Statement pane. Table 30 Statement pane fields Field name Function Name Enables you to enter the name of the SQL statement. You can specify a name to identify the statement in the statement list.
Figure 40 Parameters dialog Enter a value, for example 1. The statement is executed, and the following tabs will appear in Statement Details dialog: • Execution Results — Displays the output generated by the statement after the parameter is replaced by the value you entered. • Execution Parameters — Lists p1 parameter with value 1. • Executed Statement — Contains Select t1 from T where t1 = 1. You can enter another statement that uses the parameter, p1. The statement will be executed.
• When a statement is executed and the number of rows in the result set exceeds the Rows/Page threshold, statement execution happens in the page mode. Partial results are retrieved and displayed. • When statement execution happens in the page mode, the Statement Details pane displays Next Page. The following considerations apply: ◦ Until you click Next Page, the execution is paused, and the SQL cursor remains open. However, the Time Elapsed timer continues to run because it tracks the wait time.
Table 32 Execution Results fields Field or button Function Last Evaluated Indicates when the statement was last evaluated. Query Execution Time Indicates the time taken to execute the query. Status Displays the executed statement status. The status indicates whether the statement was executed successfully or whether the statement was canceled. Next Page Displays the next set of execution results when the statement execution happens in the page mode.
Table 34 File menu options Menu item Function Load SQL Statement Loads the text of an SQL statement from an ASCII file to the Statement field. Save SQL Statement Saves the current SQL statement text from the Statement field to an ASCII file. This command saves only the statement text, but not the statement results. To save the results, use the Data to Clipboard, Data To Spreadsheet, or the Data to File options.
Glossary area A broad category of features that you can manage or monitor using MXDM. See “Selecting an area” (page 31). association server The logical component that starts up and manages MXCS SQL servers and associates a client connection request with a specific MXCS SQL server in a data source. See also “Viewing MXCS Services” (page 81).
SQL Whiteboard. In page mode, only a partial result of a query is held in memory and displayed in the Statement Details page. For more information, see “Page mode” (page 104). persistence file A binary file that contains state and user preference information (for example, system definitions, user-specified options, favorites, and layout information). For more information, see “Saving and importing system definitions” (page 46).
Index A About box, MXDM, 39 command, Help menu, 30 Add DEFINE dialog box, 89 Add SET dialog box, 89 Admin_Load_DataSource stopping service for, 83 Alerts data grid, customizing, 43 Application Name, MXCS Server, 80 Apply button Configuration tab, 94 Data Source Status tab, 95 Area connectivity, 32 database, 32 defined, 108 selecting, 31 showing and hiding, 32 Association servers defined, 108 Available Data Source Status, 85 Data Sources, 84 B Banner example, 28 location, 27 Build information MXDM client, 3
Delimited identifiers, 86 Disconnecting toolbar button, 30 Disconnecting (see also Connecting) defined, 108 disconnecting (see also connecting) function, 22 Documentation feedback on, 11 Documents, related information, 8 E Edit DEFINE dialog box, 89 Edit menu options, 29 Edit SET dialog box, 89 Editing a system, 24 Error messages, 39 Exit command, 29 Exiting MXDM, 26 Export Persistence command, 29 F Favorite considerations, 34 creating, 33 creating a folder for, 33 defined, 108 removing, 34 removing a fol
Next Page button description of, 106 Statement Details pane, 105 Node MXCS Services, 82 order, 87 utilization, 87 NonStop SQL/MX Remote Conversational Interface (RMXCI) command, Tools menu, 30 launching, 99 learning about, 99 Number of servers, 87 O ODBC connection, testing, 25 Operator permission defined, 108 Options command, Tools menu, 30 general, 32 HP NonStop SQL/MX Remote Conversational Interface (RMXCI), 100 show/hide area, 32 toolbar button, 30 Out-of-memory exceptions, 104 P Page mode defined, 10
Special characters, 86 SQL statement defined, 109 loading into SQL Whiteboard, 106 saving to ASCII file, 106 statistics, 87 SQL Whiteboard canceling an SQL query, 105 command, 30 defined, 109 displaying, 101 executing hightlighted test, 105 highlighting syntax, 107 loading and saving SQL statements, 106 managing layout, 107 overview, 101 parameter prompt, 103 reusing a connection, 106 statement details pane, 105 statement list, 102 statement pane, 103 toolbar button, 30 SQL/MX Database Manager parts of, 27