
User Manual


1. Double-click the eclipse.exe file in <Eclipse IDE Installation directory> to
open the Eclipse IDE.
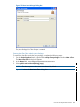
The Workspace Launcher dialog box appears. By default, the workspace is set to your existing
workspace, if already created.
NOTE: D:\sash_usr\axis2 is the sample workspace that is used to develop the
AxisClient client application for the TemperatureConverter web service.
Figure 113 shows the Workspace Launcher dialog box.
Figure 113 Workspace Launcher Dialog Box
2. Click OK.
To create a new workspace, click Browse and select the folder you want to use as your
workspace and then click OK.
The Eclipse SDK Welcome screen appears.
Figure 114 shows the Eclipse SDK Welcome screen.
Figure 114 Eclipse SDK Welcome Screen
Close the Welcome screen. The Workspace is created.
3. Click File→New→Java Project to open the New Project dialog box.
4. From the list of folders, select Java→Java Project and click Next.
Figure 115 shows the New Project dialog box.
Overview of TemperatureConverter 325