
Installing and upgrading to HP Insight Software 6.3 on Windows Server 2008 R2 Failover Cluster with SQL Server 2008 for high availability


33
5. Update the Database Description referring to the da tabase name created on the secondary system.
Note:
Use the database name (corresponding to the hp.Database.databaseName
keyword) recorded in Step 7 of Installing Insight Software components on
the secondary system
.
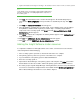
6. Click Next. The a uthentication mode selection window appears. The default settings may be
retained. Click
Client configuration and set port number as determined previously. Then, OK to
close.
7. Click Next. The database selection window appears.
8. Select the database created by the secondary system. Use the database name (corresponding to
the hp.Database.databaseN ame keyword) recorded in Step 7 of Installing Insight Software
components on the secondary system
. Click N ex t. The final M icrosof t SQ L Server DSN
Configuration window appears.
9. Click Finish to complete the configuration. A summary window appears. Click Test Data Source to
verify the configuration
10. Click OK. The ODBC Data Source Administrator window appears.
11. Click OK to close the ODBC Data So urce Administrator window.
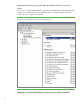
Adding the Insight Software cluster resources
To complete the installation of HP Insight Softw are to the cluster, several cluster resources must be
created using Failover Cluster Manager
.
1. If the secondary system is powered on, shut it down and wait for it to complete.
2. If the primary system is powered off, power it on and wait for it to complete.
3. Log in to W indow s on the primary system as SQ L/ IS Administrator.
4. Po w er the secondary system on.
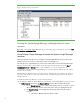
5. Open Failover Cluster Manager on the primary system, in the left pane click Nodes and confirm
that the Status for both nodes is Online, and that the primary system owns all cluster resources.
6. The cluster group for Systems Insight Manager and Insight Software, and its access point and disk
resource were created before Insight Software was installed. Clicking
Services and applications in
Fa i l o ver Cluster Manager should show a screen similar to
Figure 8.