
Installing and upgrading to HP Insight Software 6.2 on Windows Server 2003 R2 MSCS for high availability


13
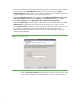
Note:
You might need to scroll down to the bottom of the
Active Agents
list box
to ensure and verify that
Clustering Information
has been added to
the
list.
c.
Click
OK
to apply the update and
Yes
to restart the management agents.
Set the SNMP service community name and security
To successfully complete the HP Systems Insight Manager installation on your cluster, it is a
prerequisite that the SNMP com
munity name and security are configured as follows during software
installation. On each system:
1.
From the
Start Menu
, select
Administrative Tools
Services
. The
Services console
appears.
2.
Scroll down the list and right
-
click
SNMP Service
, and then select
Properties
. The
SNMP Service
Properties
dialog box appears.
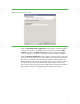
3.
Select the
Security
tab.
4.
Select
Send authentication trap
.
5.
In the list of
Accepted community names
, ensure that the name
public
with
READ WRITE
rights is
present.
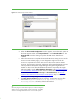
6.
Select
Accept SNMP packets from an
y host
. After Insight Software has been installed, this setting
can be changed to accept
SNMP packets from specific hosts only
. If you change this later, the
primary and secondary
system
s and all cluster virtual servers must be included in the list of host
s
from which the CMS is permitted to accept packets.
Create cluster resource groups for Insight Software and SQL
Before installing Microsoft SQL Server 2005 and Insight Software, create the cluster resource
groups for them.
Note:
If you plan to use an ex
isting instance of Microsoft SQL Server 2005,
you must create only the Insight Software resource group.
1.
Ensure both the primary and secondary systems are online. Log in to the primary system as
Administrator.
a.
Open the Cluster Administrator tool and confirm
that the primary system owns all
the cluster resources. Ensure that the Cluster Service is running on the secondary
system by selecting the
Start Cluster Service
menu option if it is not running.
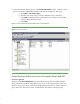
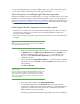
b.
In the left pane, find the name of the cluster you created
and select the
Groups
folder under it. You will see the cluster group created when you established the
cluster. It will be in resources for the
Cluster Name, Cluster IP address
and the
shared quorum disk.
See Cluster Quorum, drive U: in the
Storage
requirements
and MSCS cluster IP address and name in
Network
requirements above.