
Installing and upgrading to HP Insight Software 6.0 on Windows Server 2003 R2 MSCS for high availability

20
4. Find on the shared Insight software disk, V:\ in this paper, the Insight software installation
directories given in Steps 7 and 11 of “Installing Insight software components on the primary
system”. Rename the existing top-level folder(s), typically the folder “Program Files”, to another
name, for example, “First Install”. For installation of the secondary system, the path information
given for the Insight software install location(s) must be identical to that given for the primary
system. (Generally, all your inputs to the configuration screens should be the same as for the
primary system installation.)
5. [ICG: Step 2–22] Repeat the above Steps 3 through 14 of “Installing Insight software components
on the primary system”.
6. Inspect the Insight software installation directory for the Insight Control performance management
installation log, located at C:\HPIC\logs\ICM_<installtimestamp>\hppmp.log. Toward the end of
the file, there may be entries similar to:
Schema created successfully
Integrating PMP Menu items & Status column to HPSIM...
Checking SIM running status...
Not running now. PMP Menu items & Status columns will be integrated when
SIM starts
You can also manually run V:\VSE\Systems Insight Manager\lbin\
mxconfigrefresh after copying *.xml & *.properties files from
V:\VSE\Performance Management Pack to V:\VSE\Systems Insight
Manager\setup folder
If these entries appear, which suggest that the PMP configuration has not completed, then copy the
*.xml and *.properties files from the PMP installation directory (V:\VSE\Performance Management
Pack\) to the SIM setup folder (V:\VSE\Systems Insight Manager\setup\).
7. Open the ~\Systems Insight Manager\config\database.props file (for example, using Notepad)
and record the database name corresponding to the hp.Database.databaseName keyword.
8. Shutdown the Secondary system.
Retarget the HP SIM data source name on the primary system
1. Start the primary system and log in as done previously.
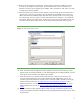
2. Run Control Panel>Administrative Tools>Data Sources (ODBC).
3. Select the System DSN tab.
4. Select Insight_v50_0 and click Configure.
5. Update the Database Description referring to the database name created on the secondary system.
Note: Use the database name (corresponding to the hp.Database.databaseName keyword)
recorded in Step 7 of “
Install Insight software components on the secondary system
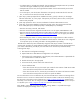
6. Click Next. The authentication mode selection window appears. The default settings may be
retained. Click Client configuration and set port number as determined previously. Then, OK
to close.
.”
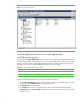
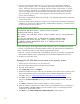
7. Click Next. The database selection window appears, as shown in Figure 8.
8. Select the database created by the secondary system. Use the database name (corresponding to
the hp.Database.databaseName keyword) recorded in Step 7 of “Install Insight software
components on the secondary system.”
9. Click Next. The final Microsoft SQL Server DSN Configuration window appears.