
Installing and upgrading HP Insight Management 7.0 on Windows Server 2008 R2 Failover Clusters

17
b. Check the box of the disk to be added and click OK. The disk is added as Cluster Disk n
under Available Storage, located in the middle pane.
c. Right-click the new cluster disk and then click Properties. Enter a new Resource Name that will
more easily identify the disk’s function (for example, DTC for disk T:), and then click OK. This
will allow the proper disk to be selected more easily in the sections that follow.
3. Similarly, in Failover Cluster Manager, rename the witness disk resource:
a. In the left pane, click the name of the cluster.
b. In the center pane, ensure that Core Cluster Resources is expanded.
c. Under Core Cluster Resources, right-click the disk under Disk Drives and then click Properties.
Enter a new Resource Name and then click OK.
4. In the left pane of Failover Cluster Manager, expand Networks to enumerate the public and
private networks. Check the assigned names. Rename these resources to create descriptive names
by right-clicking a network and changing its Resource Name under Properties.
5. Validate the Failover Cluster configuration again. Repeat Step 4 in
Table 2.
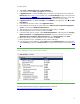
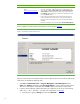
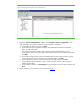
At this point a two-node Failover Cluster has been created, and no clustered services or applications
are yet configured. All relevant Microsoft operating system updates should have been applied to both
cluster nodes. Failover Cluster Manager should produce a display similar to one shown in
Figure 4.
Figure 4: Newly created Failover Cluster
Changing administrator accounts
If you have both administrator accounts configured, log out of the Cluster Administrator account and
then log in as SQL/IM Administrator. This administrator account is used for the remainder of the white
paper.