
Installing and upgrading HP Insight Management 7.0 on Windows Server 2008 R2 Failover Clusters

13
On each system:
1. Select Start Administrative Tools Server Manager.
2. In the left pane, expand Roles and Features one level each.
3. If Application Server is listed under Roles, select it, and then in the right pane ensure that all the
Role Services listed in
Figure 2 are installed. If so, exit Server Manager and go to the next section,
Setting the SNMP service community name and security. If Role Services are missing, in the right
pane, to the right of Role Services, click Add Role Services and then continue at step
9.
4. If Application Server is not listed under Roles, click Add Roles in the right pane. This runs the Add
Roles Wizard.
5. In the Select Server Roles window, select Application Server.
6. If the Add Roles Wizard pops up and prompts you to Add role services required for Application
server?, click the button Add Required Role Services.
7. With Application Server selected on the Select Server Role window, click Next.
8. Read the Application Server window, and then click Next.
9. In the Select Role Services window, under Distributed Transactions, select the boxes for Incoming
Remote Transactions and Outgoing Remote Transactions. If present, also select the boxes for
Application Server Foundation, .NET Framework 3.5.1, and TCP Port Sharing. Click Next.
10. Review the selections on the Confirmation screen, and then click Install.
11. Review the Results screen, click Close, and then reboot if indicated.
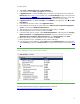
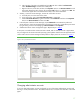
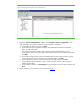
12. In the left pane of Server Manager, expand Roles and click Application Server. In the right pane,
expand Summary, scroll down to Roles Services and expand. Your display should look like
Figure
2.
Figure 2: Application Server Role Services from Server Manager
See Distributed Transaction Support for Application Server, located at:
http://technet.microsoft.com/en-us/library/cc772014.aspx.