
Data migration of an existing Microsoft Windows CMS to a new Insight Software 6.2 system

19
2.
The folder,
configdata
-
import
, under
<HPSIM installation directory>
\
Systems
Insight Manager
\
data
on the target CMS must be shared with full permission
s granted to the
database server for the user running the import tool. The share name must be the default,
configdata
-
import
.
Note:
If
you encounter issues during
import, set permissions to full control for
Everyone.
3.
The SQL service account must be configu
red to run as a domain user or administrator user that
has
access to the
configdata
-
import
share named
previously
.
4.
On the target CMS, set folder permissions on the
<HPSIM installation
directory>
\
Systems Insight Manager
\
data
\
configdata
-
import
to full control for
authenticatedUsers
.
5.
The temporary directory,
C:
\
temp
, must be present at the remote database server. This directory
is generally provided by the Windows operating system.
6.
The
xp_cmdshell
must be enabled on the remote database.
a.
For SQL
2005, open SQL Surface Area Configuration, select the Database instance
used for the installation, select
sp_cmdshell
and click the check box to enable.
b.
For SQL 2008, open Microsoft SQL Server Management Studio, select the database
instance used for instal
l, then right click and select Facets. Select
Surface area
Configuration
from the pull
-
down box and se
t
XPCmdShellEnabled
to true.
Note:
You must disable
xp_cmdshell
and stop sharing once the import process
is complete.
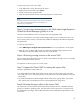
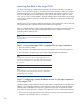
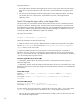
Note:
The CLI console displays the
import operation steps performed for remote
SQL server as shown in Figure 2.
Step 3: Copying saved files to the target CMS
1.
Copy the zip file created during the export operation on the source CMS to the target CMS folder
located at
<HP SIM Install path>
\
dat
a
\
configdata
-
import
. If the export file is placed
in a different location, the location can be specified on the command line when the import
operation is done.
2.
Copy the saved scripts and/or custom executables from the safe location during Step 3: Saving
an
y customer created scripts or executables in the
Before you begin
to the target CMS in the
appropriate location.
3.
Copy the install PSP directory from the same safe loca
tion to the
<siminstalldir>/Install
PSP
directory on the target CMS.
Step 4: Prepare the Cluster CMS for running the import utility
This step is applicable to Cluster CMS only.